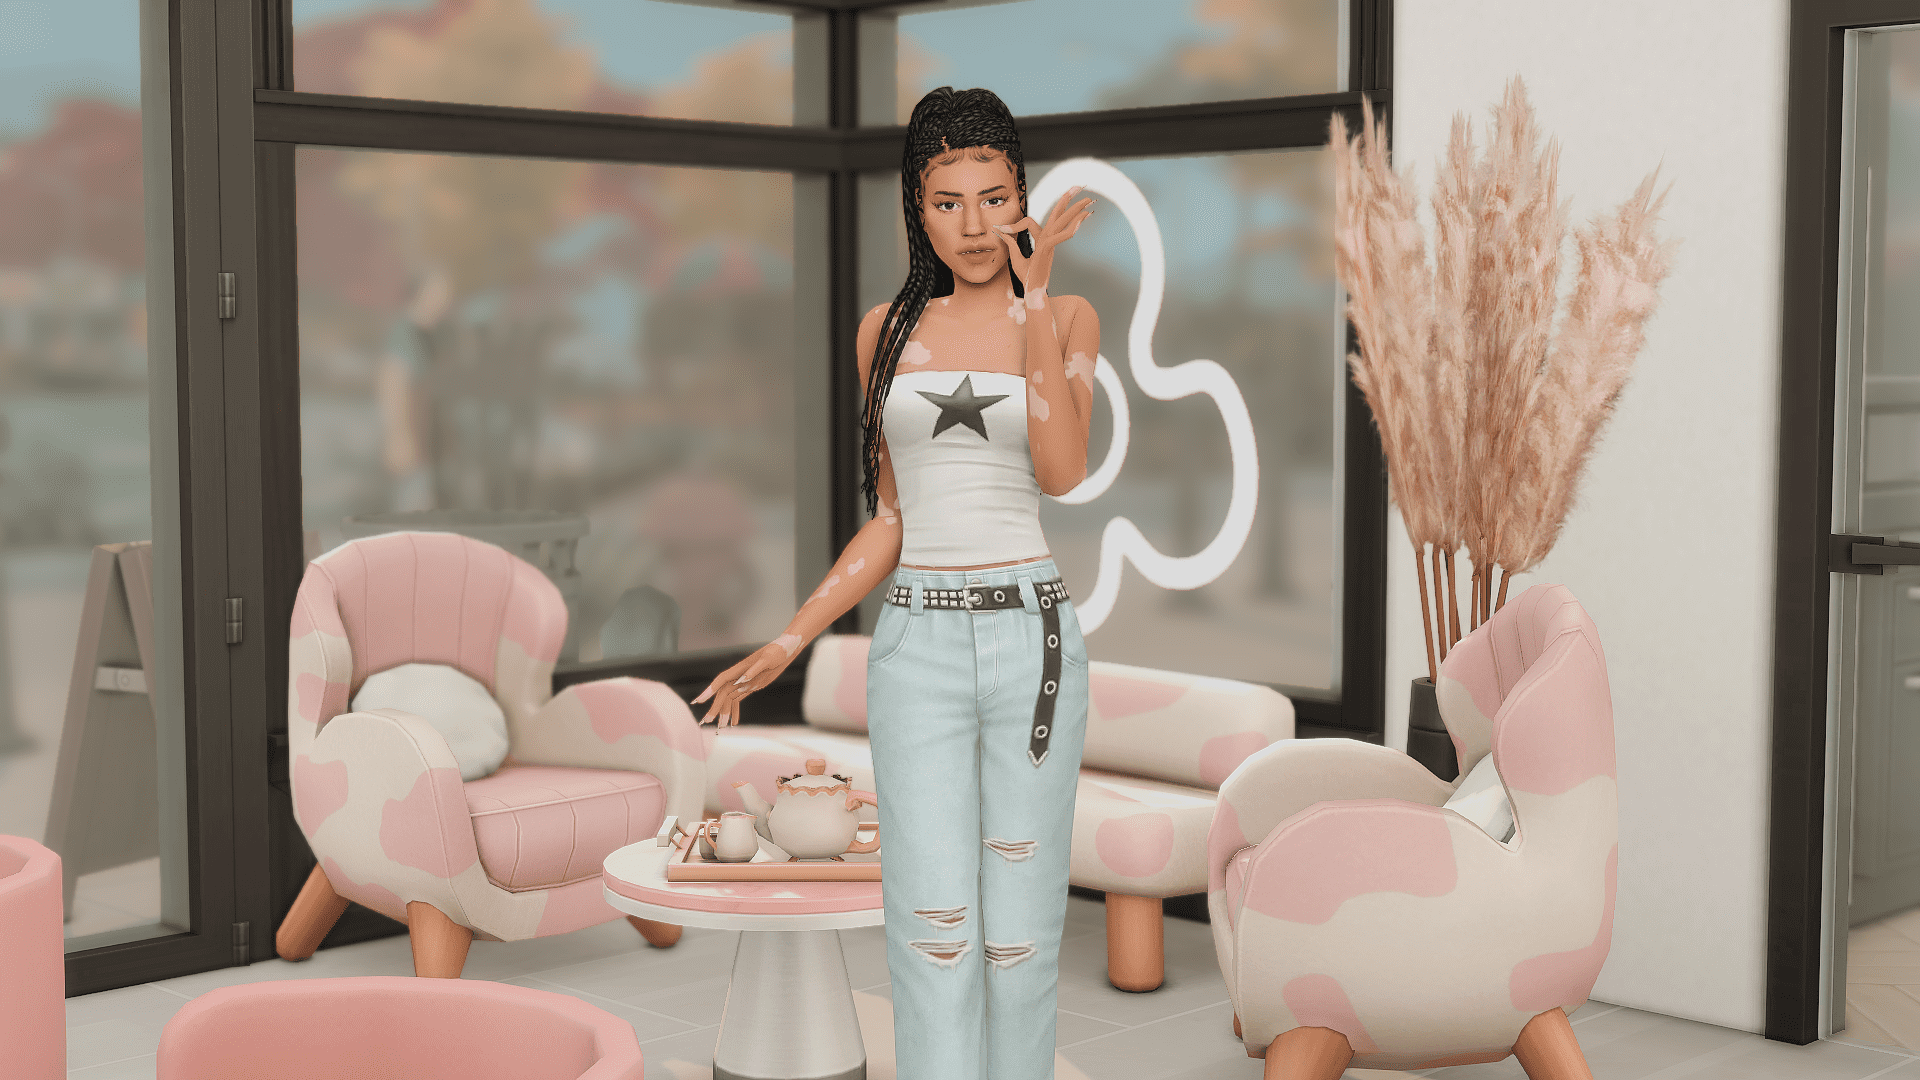
Step-by-step guide to taking screenshots in The Sims 4
Whether you're capturing a tender moment between two sims or organizing a photoshoot with 20 characters, this guide has you covered. We've compiled all the tips, tricks, and life hacks you'll need to turn your ideas into stunning screenshots – from technical setup to creative posing and fine-tuning the weather for the perfect vibe. Whether you're a beginner or an experienced simmer, this guide will walk you through every step to create breathtaking photos in The Sims 4!
First and foremost, beautiful screenshots start with a beautiful scene – no technical tricks can save a dull image. We’ve already published several articles about improving in-game graphics, so if you haven’t yet perfected your visuals, definitely check those out:
Graphics FAQ for The Sims by buggy starship
Graphics settings in The Sims 4
Now, let’s break down the actual photoshoot process. We picked up tons of useful tips and tricks for this guide from Rosannatxt and milkemie videos. We highly recommend watching them – you’ll definitely discover something new and cool (plus, their videos are absolutely gorgeous).
Stage 1: Technical preparation for the shoot
Of course, a photoshoot requires preparation, including technical preparation. There are several things worth thinking about in advance.
1. Download all mods that may come in handy during the process
There are tons of mods for creating beautiful screenshots in The Sims. Some speed up and simplify the process, and some are absolutely essential. We’ll tell you exactly which mods you need later in this article.
2. Create a separate save for the shoot
Of course, this step is optional, but if you are planning a large-scale photoshoot, a separate save is very convenient. Progress in your main save until you reach the event you want to capture beautifully, and then make a copy just for the photoshoot.
You can create several saves to experiment with locations, outfits, and lighting in each one. That way, you won’t have to endlessly change things back and forth – you can simply return to the save with the desired settings. Once you’ve taken all the pictures, you can delete the extra saves to avoid cluttering your computer.
Speaking of your computer...
3. Check your device’s performance
Again, this is important only if you’re planning a big shoot with lots of sims.
To fit all the characters you need onto the lot, change the maximum number of sims allowed on the lot using MC Command Center by deaderpoolmc (hereafter referred to as MCCC):
Click any computer on the lot – MC Command Center – MCCC settings… – Gameplay Settings – Maximum household size
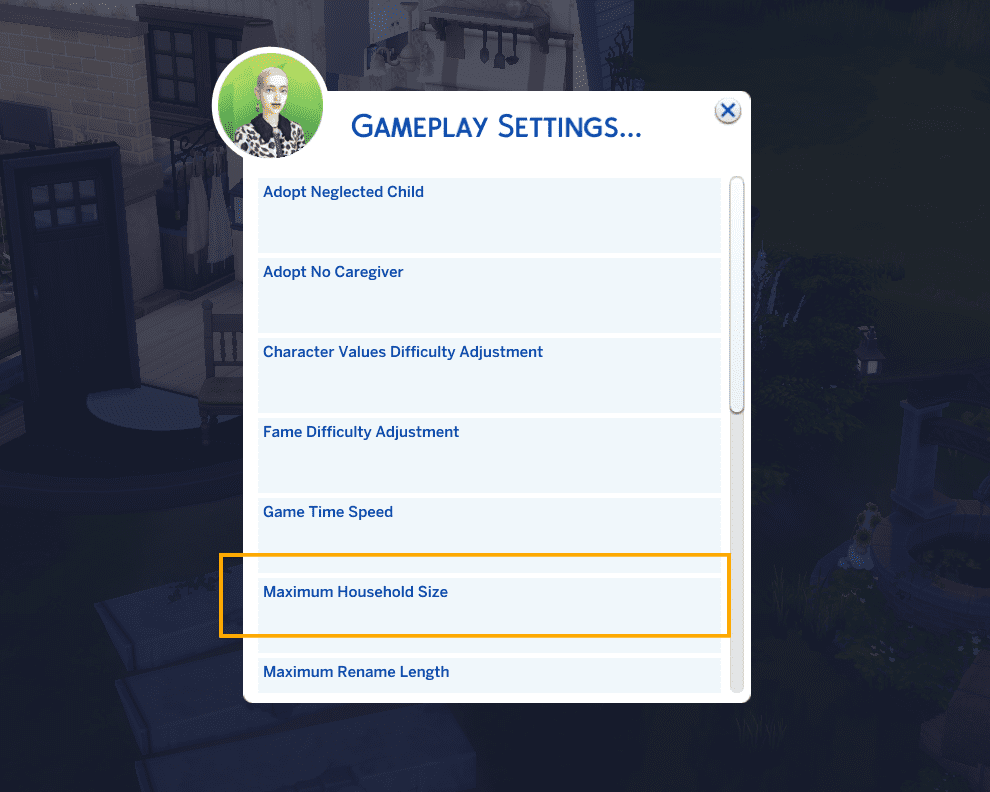
Load all the sims you plan to use onto the lot and just play for a bit. Check if the game lags and whether it feels comfortable for you. If everything works fine – wonderful.
If you encounter unpleasant lags, you can replace some of the characters in the photos with decorative sims. These are mannequins already posed (like runners, gardeners, etc.), and you can place them directly from Build Mode. These are not real playable characters – they are decorations that don’t load your computer.
You can find them, for example, on Pinterest: just search for “Sims 4 deco sims”, and you’ll get tons of results. These decorative sims are perfect for filling in the background and making the scene feel more alive.

Of course, they can also become the main characters of the photo. In that case, it’s important to check them first: place them on the lot and look closely to make sure there are no glitches or weirdness.
Stage 2: Searching for poses, locations, and props
For special shots, it’s important not only to prepare beautiful sims but also to find suitable poses and the perfect location. There are several options for finding both poses and lots.
Where to find poses:
– The main resource for poses is a huge post on Tumblr.It contains all poses sorted into categories, and there are tons of them for every taste. It’s super convenient and quick to find something that fits.
– And, of course, there’s always Pinterest, plus you can check the poses used by your favorite bloggers and creators.
Download the poses you like, unpack the archive, and drop the files into your Mods folder:
Documents – Electronic Arts – The Sims 4 – Mods
Where to find lots:
– The in-game Gallery;
– Again, our beloved Pinterest;
– You can also check thematic groups on Tumblr;
– Or download whole ready-made saves that you liked the look of and use lots from there.
The main thing is not to get lost in all this beauty – don’t waste hours searching for one perfect lot. Save a few and reuse them for future shoots.
Download the lot and place it in your save. If it came as an archive, unpack it and drop the files into your Tray folder.
Documents – Electronic Arts – The Sims 4 – Tray
Stage 3: Creating sims’ looks
This is the hardest and longest stage for every simmer because it’s so hard to stop.
It’s important to plan the concept of your sims’ looks in advance. Of course, it depends on the circumstances: it could be a cozy home shoot or a grand event like a wedding with a dress code.
A great life hack in this case is to borrow beautiful sims from your friends. This way, you won’t have to struggle with creating lots of characters just to fill the frame, and your friends will be happy to see their sims in your work :)
Dress up all the characters the way you want. If you have a lot of participants, it’s very helpful if all their outfits are in the same category (for example, formalwear, swimwear, sportswear) – this will make it much easier to change their clothes later.
And please, don’t waste time on outfits for background characters who will be blurry, it’s just not worth it.
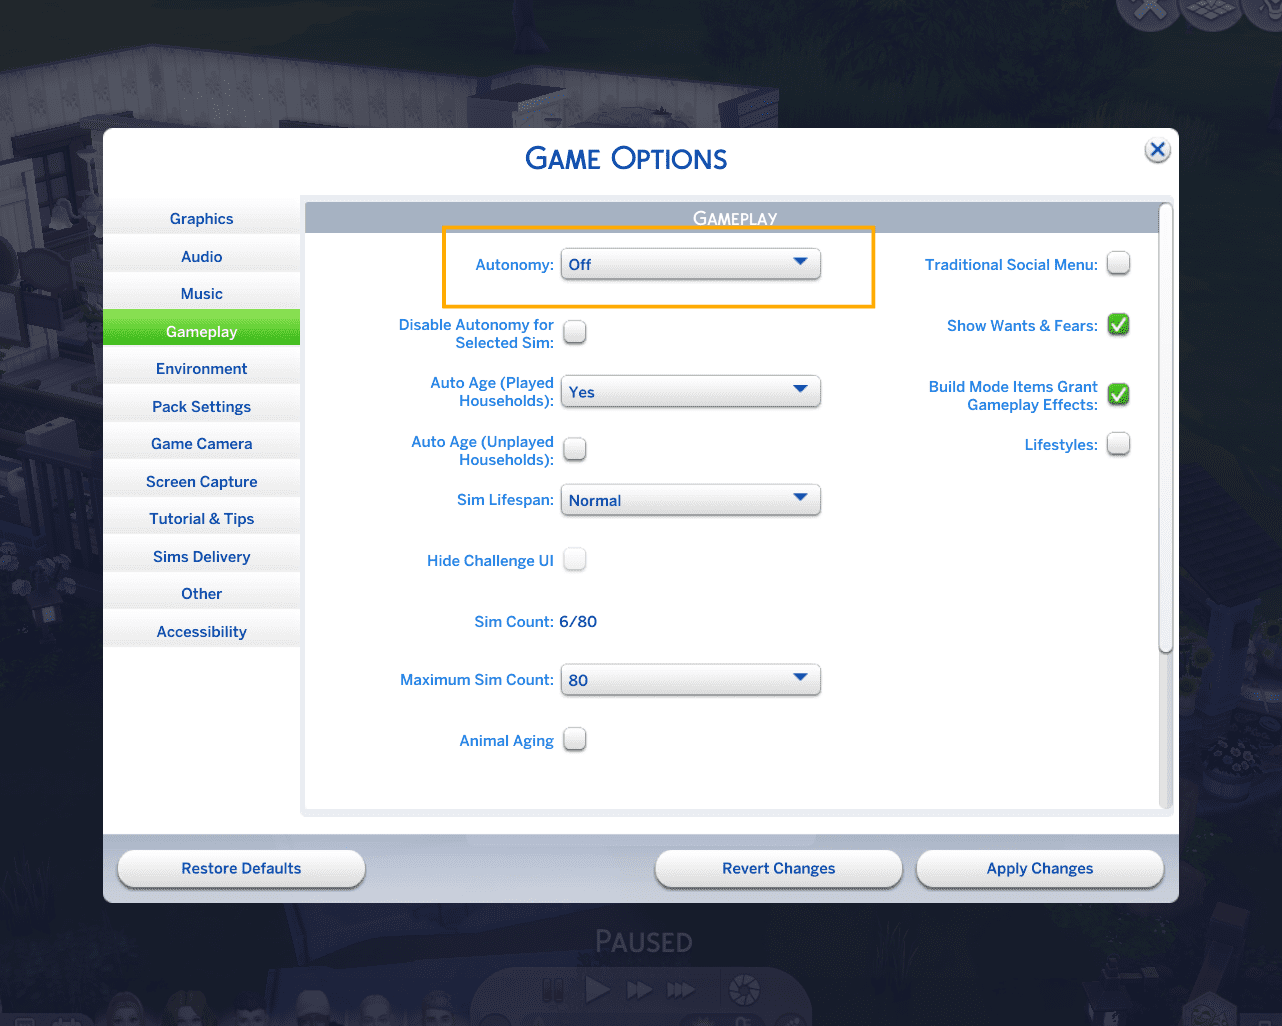
Stage 4: Tweaking game settings
We suggest tweaking a few settings to make the photoshoot much more comfortable:
1. Open basic game settings and disable sim autonomy so they don’t run off;
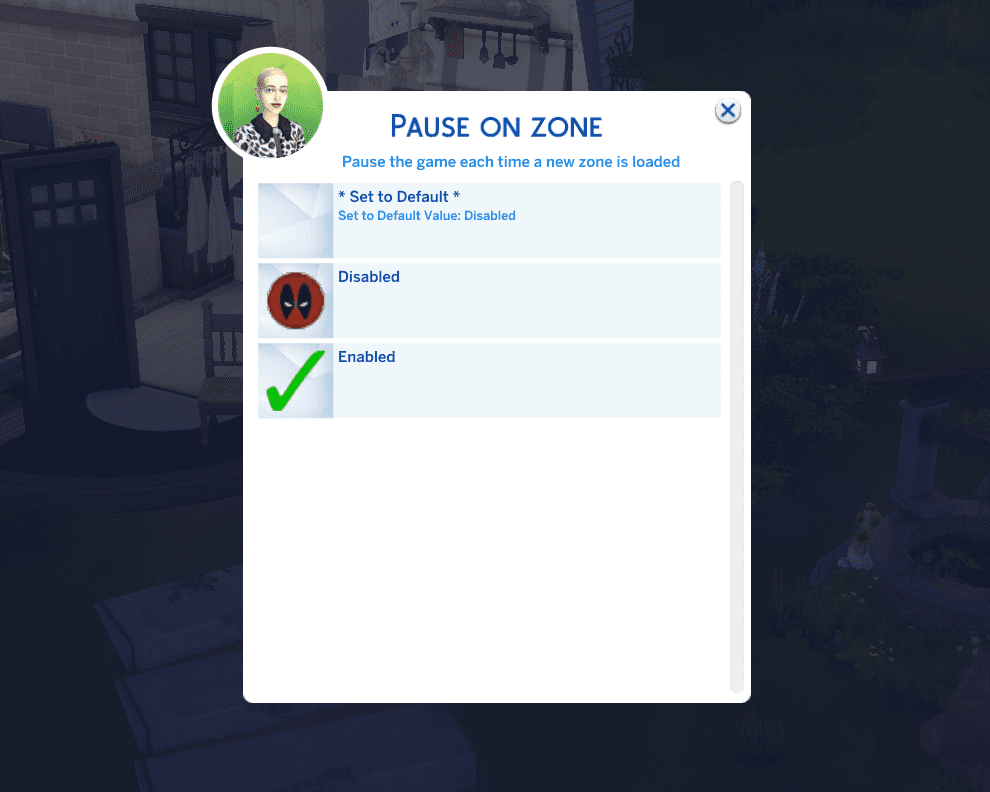
2. While on the lot, use any computer to open MCCC and enable “Start game paused” (this also helps keep sims in place);
Computer – MC Command Center – MCCC settings… – Gameplay Settings – Pause on zone
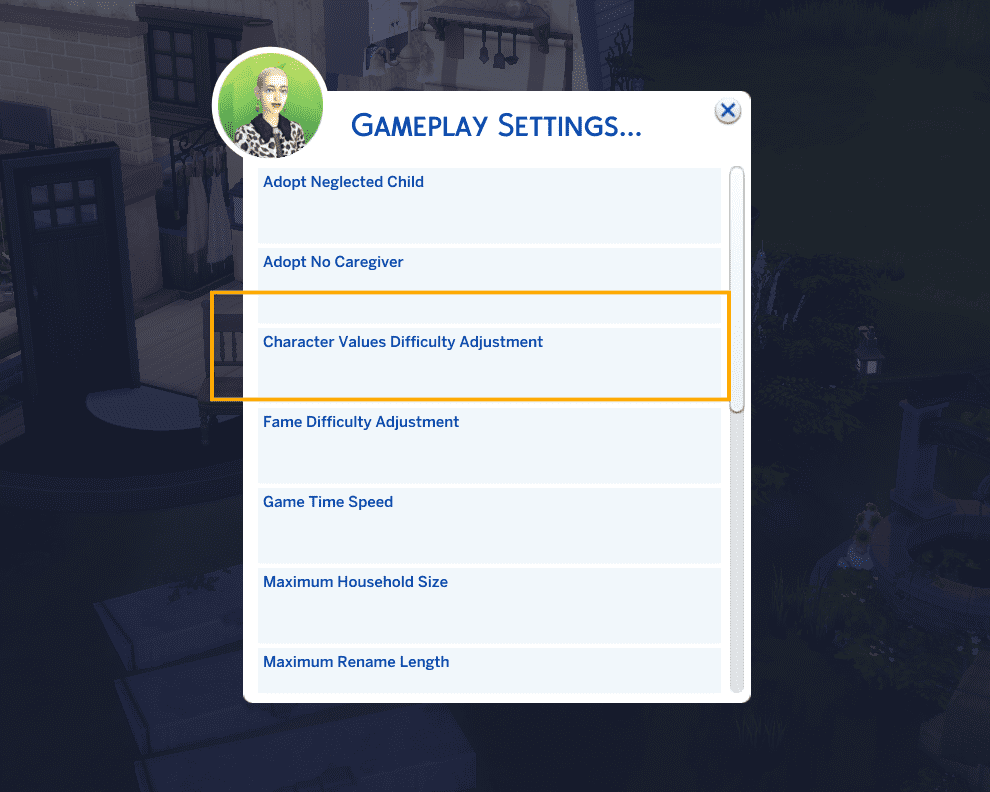
3. Also in MCCC, set the need decay rate to the minimum:
Computer – MC Command Center – MCCC settings… – Gameplay Settings – Character values difficulty adjustments
4. Enter the cheat to enable free object placement: Ctrl + Shift + C and type “bb.moveobjects on”.
Stage 5: Gathering all the sims on the lot
Gathering sims for a small, cozy photoshoot is no big deal, but if you have 10, 20 or even more sims, you need to think about optimization. There are several ways to do this, just choose whichever is most convenient for your situation.
Method 1. Gathering sims through the in-game club system
Pros:
– Sims stay in one place.
– You can make them all do exactly what you want at the same time (for example, sit at a table and chat, dance, etc.).
Cons:
– You need to spend some time creating clubs and adding all the members.
– You’ll have to wait a bit for all the club members to show up at the lot.
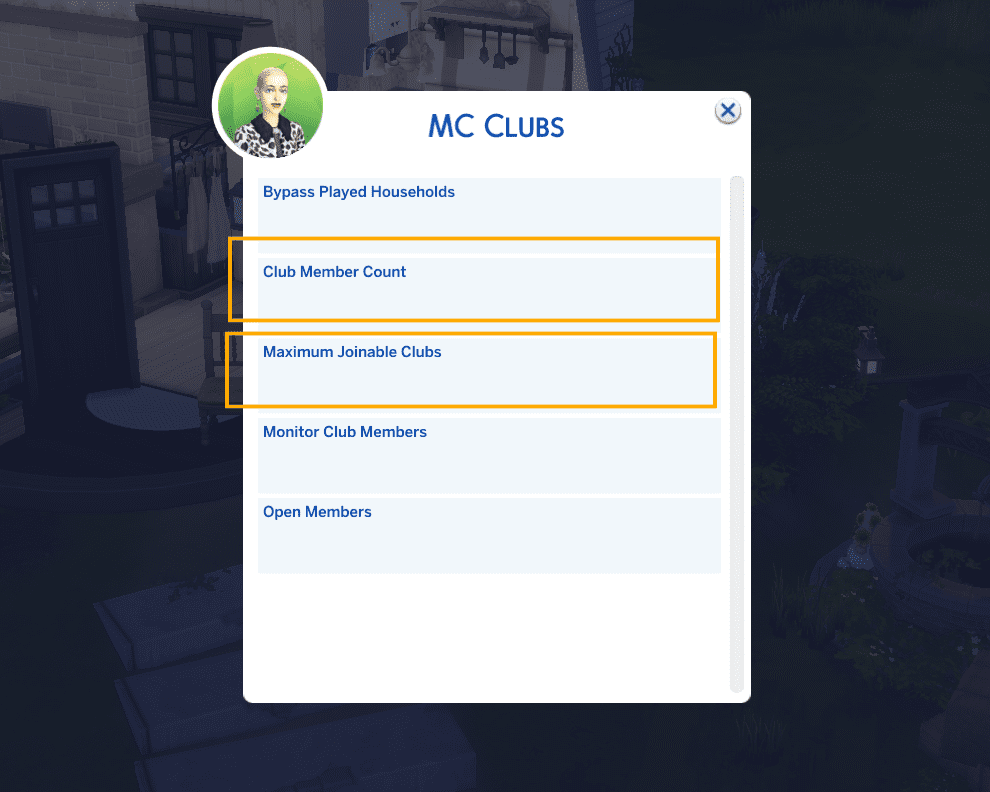
There’s a limit to the number of sims in a club, so if you’re doing a big shoot, you’ll need to increase the maximum club size using MCCC:
Computer – MC Command Center – MC Clubs – Club member count
You might also need to increase the number of clubs a single sim can join:
Computer – MC Command Center – MC Clubs – Maximum joinable clubs
Method 2. Gathering sims through MCCC and the mailbox
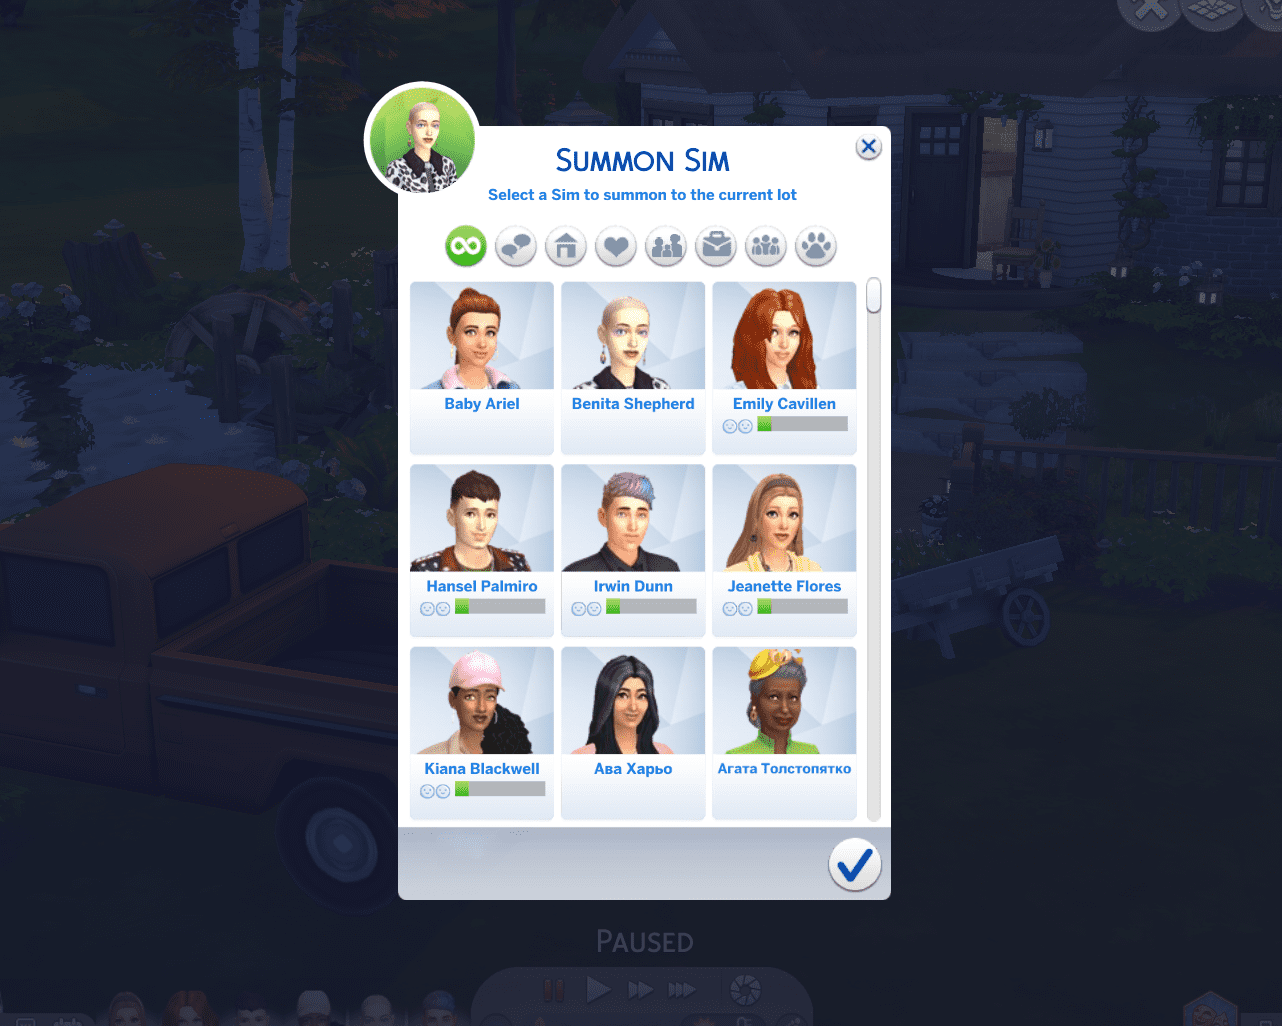
Just click the mailbox and summon each sim one by one using MCCC.This method isn’t the most convenient, because you have to invite each sim individually, and then wait for them all to arrive.
Mailbox – MC Command Center – MC Cheats – Sims/NPC households cheats – Summon Sim – List all sims
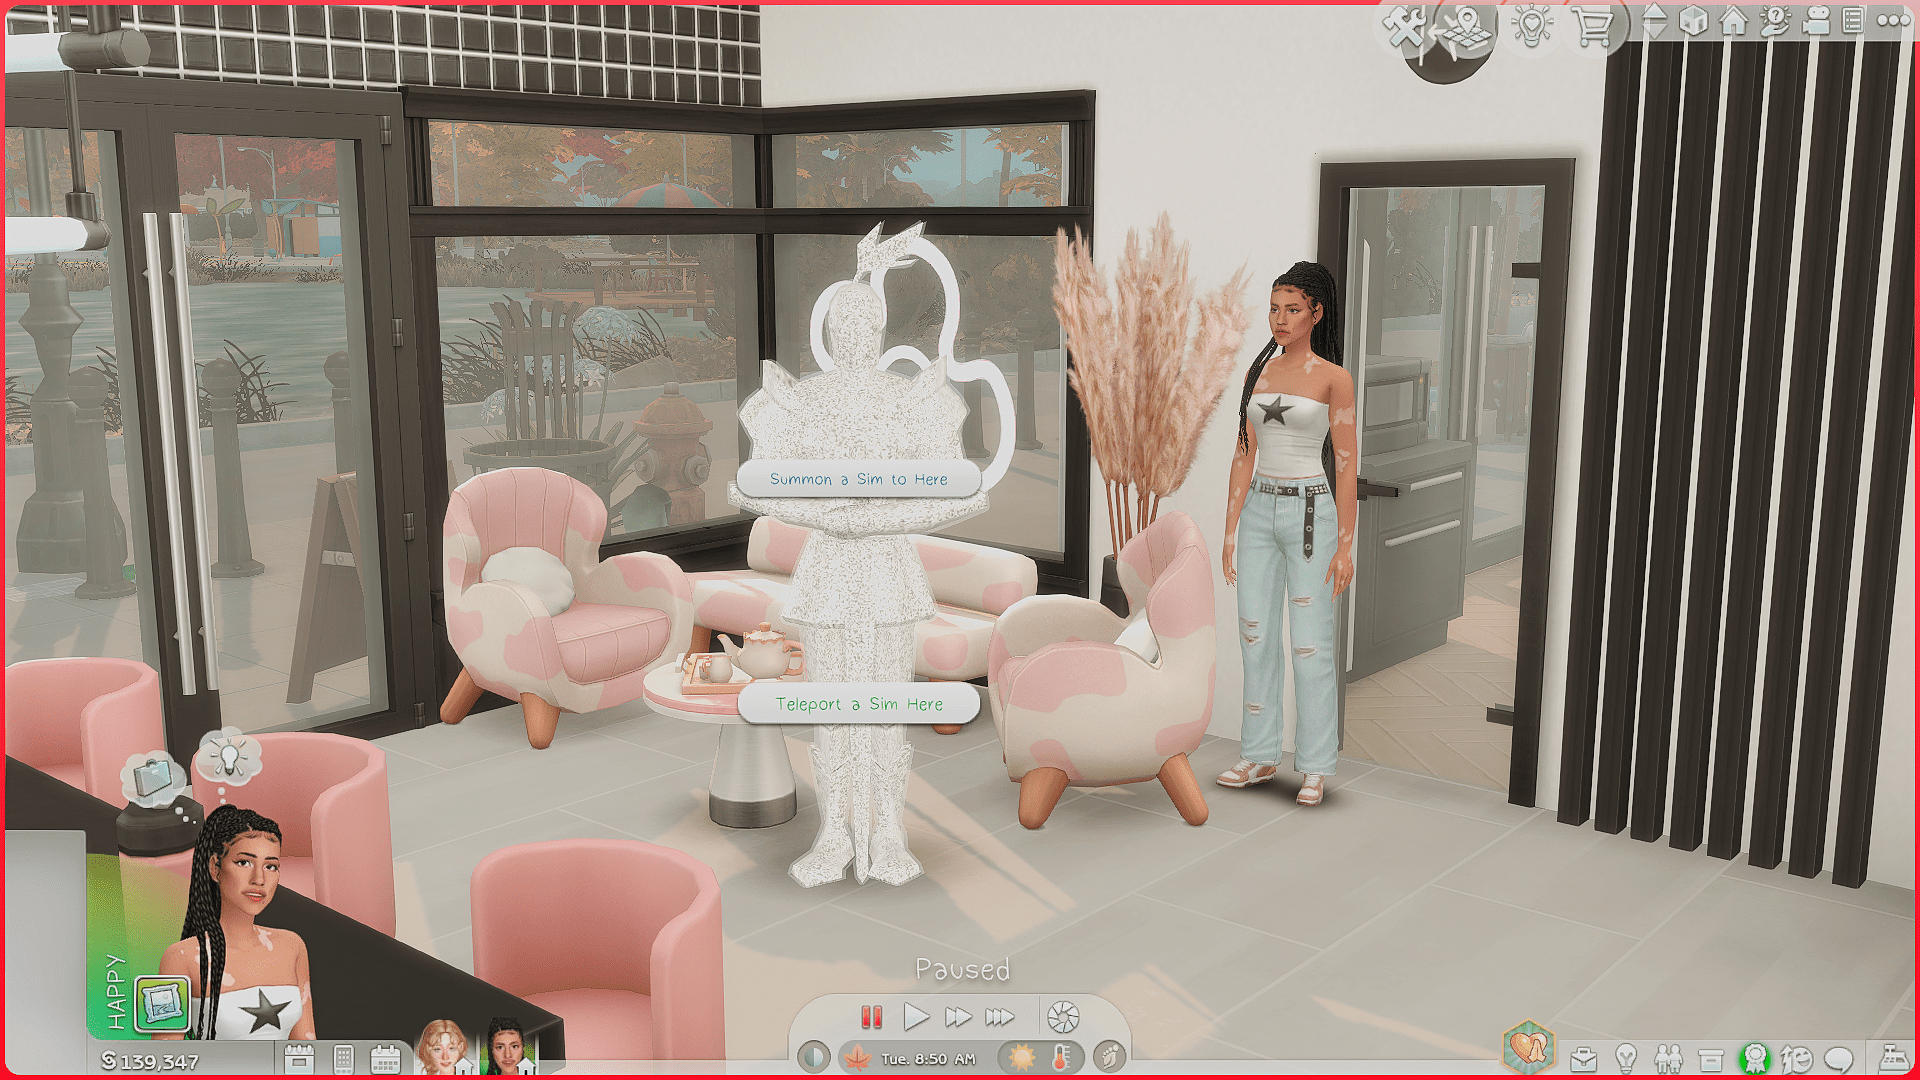
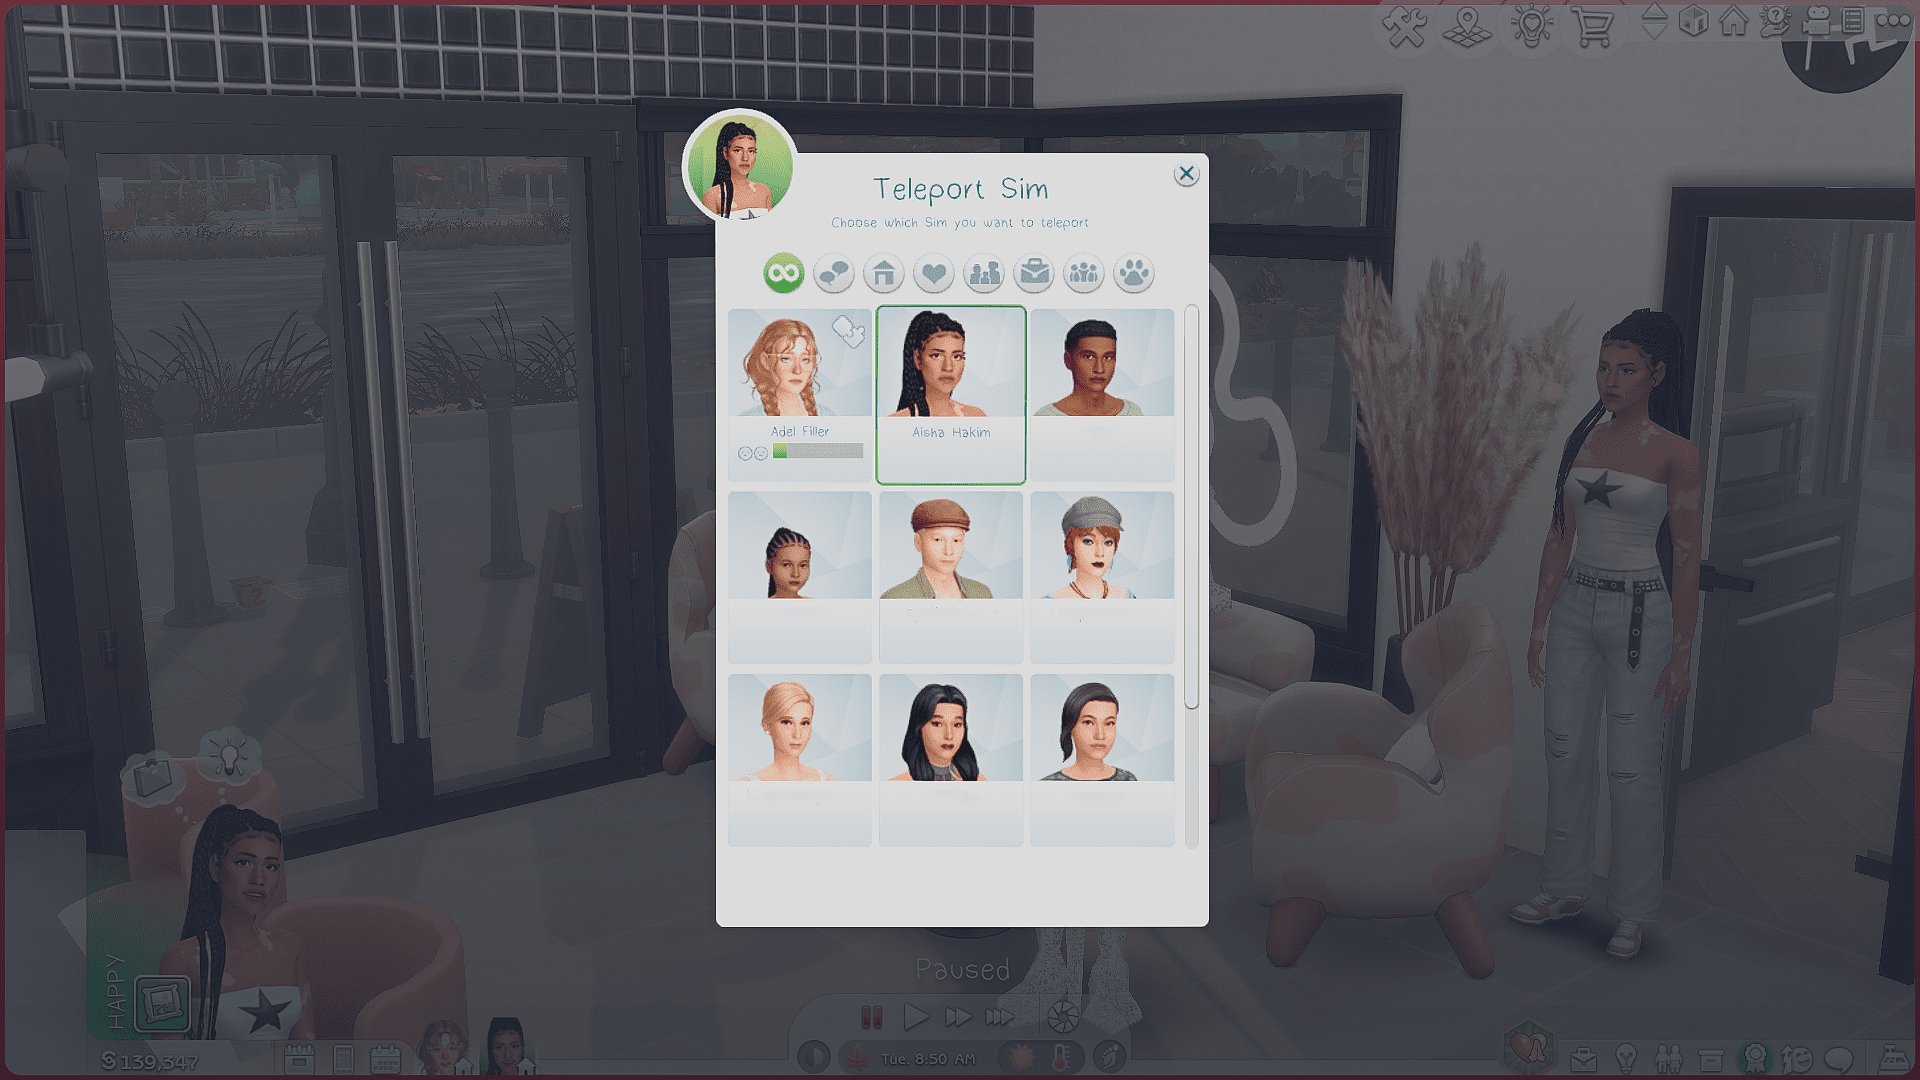
Method 3. Teleporting sims using the Knight Statue
You’ve probably seen this statue in videos and screenshots. It’s the most popular tool for teleporting sims directly to a specific spot. Download the teleport statue by Scumbumbo and place it in your Mods folder.
You’ll find the statue in Build Mode, under “Kitchen” – “Decorations”
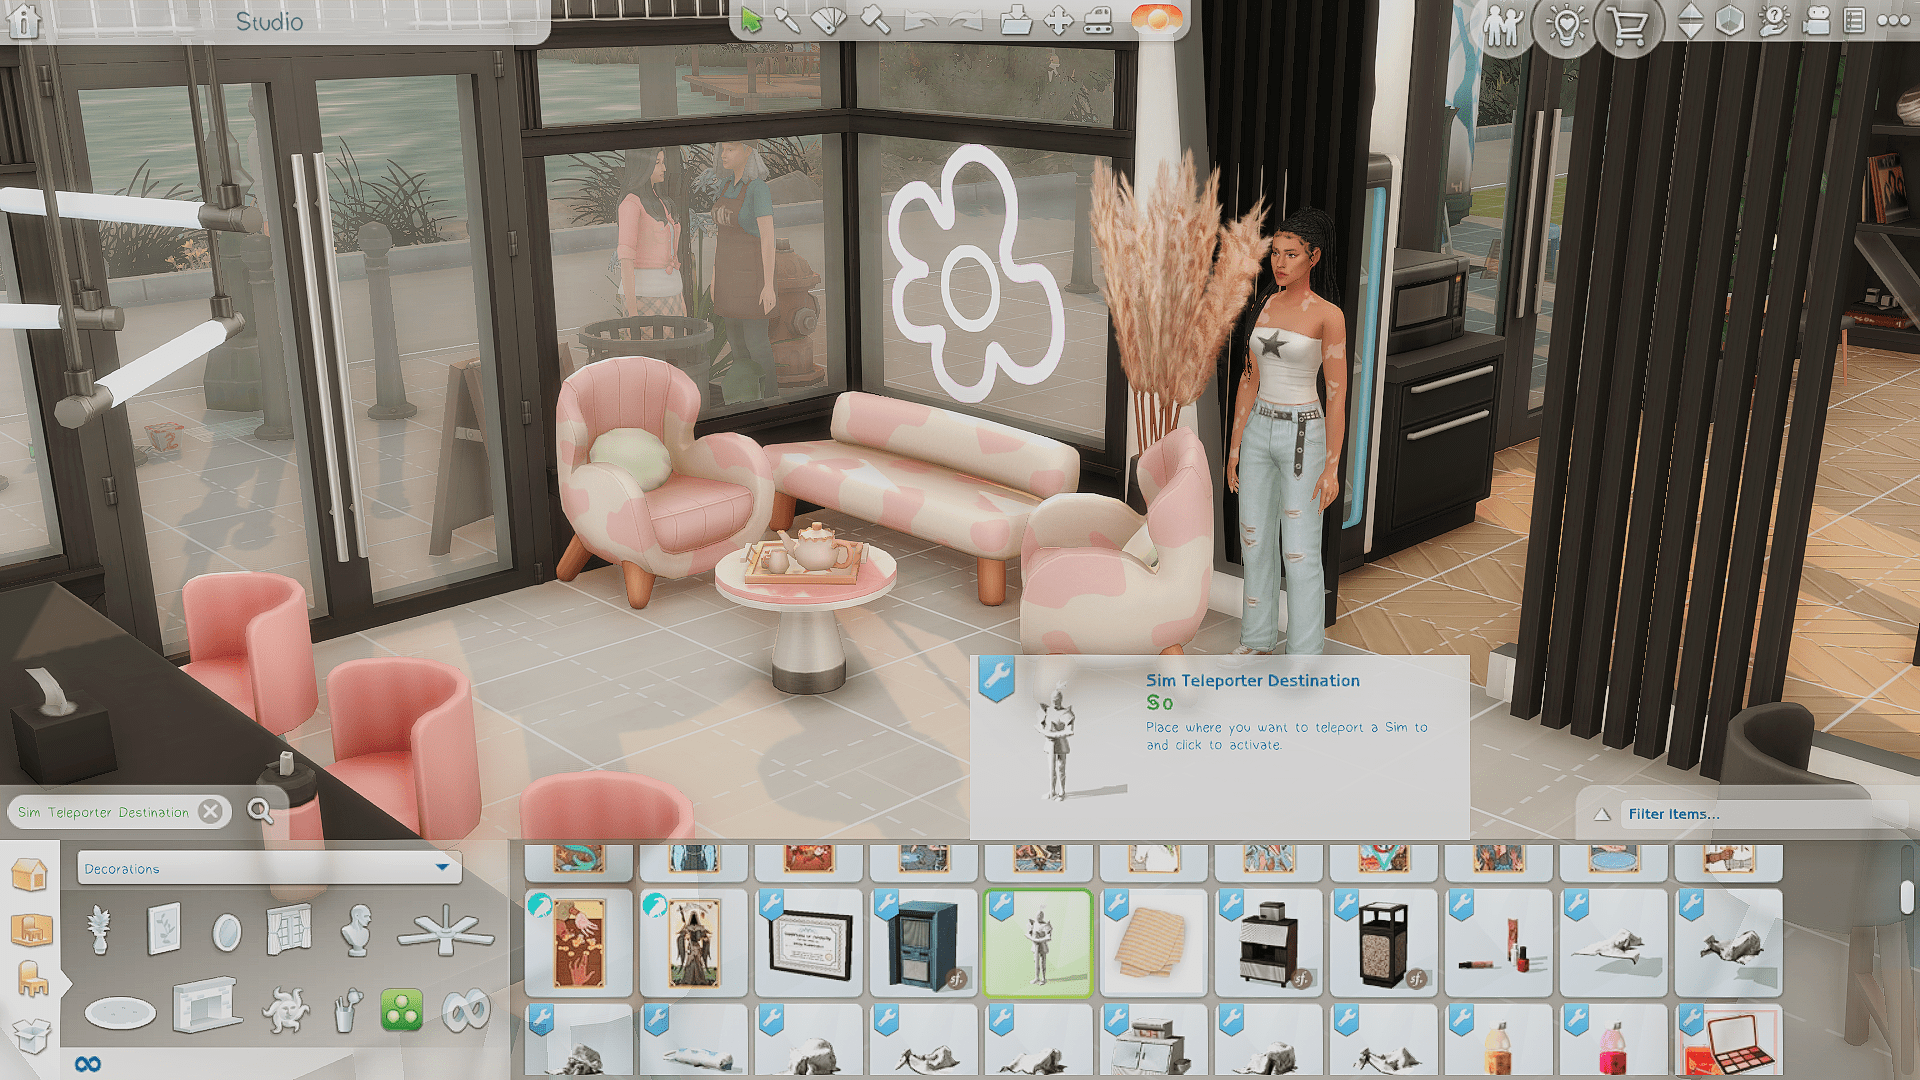
Place as many statues as you need (one for each sim you want to teleport). Click on a statue and select "Teleport a Sim Here" to move a sim directly onto the lot. Repeat for each statue.

The big advantage of this method is that you can place lots of sims exactly where you need them, right from the start.
The downside is that it’s a bit time-consuming since you have to teleport each sim individually.
Method 4. Teleport to the current sim through MCCC
This is the fastest method: just click any sim on the lot, open MCCC, and teleport any sim directly to them.
Sim commands – Teleport commands – Teleport multiple Sims to this Sim – Teleport worlds Sims to this Sim – Teleport Sim now!
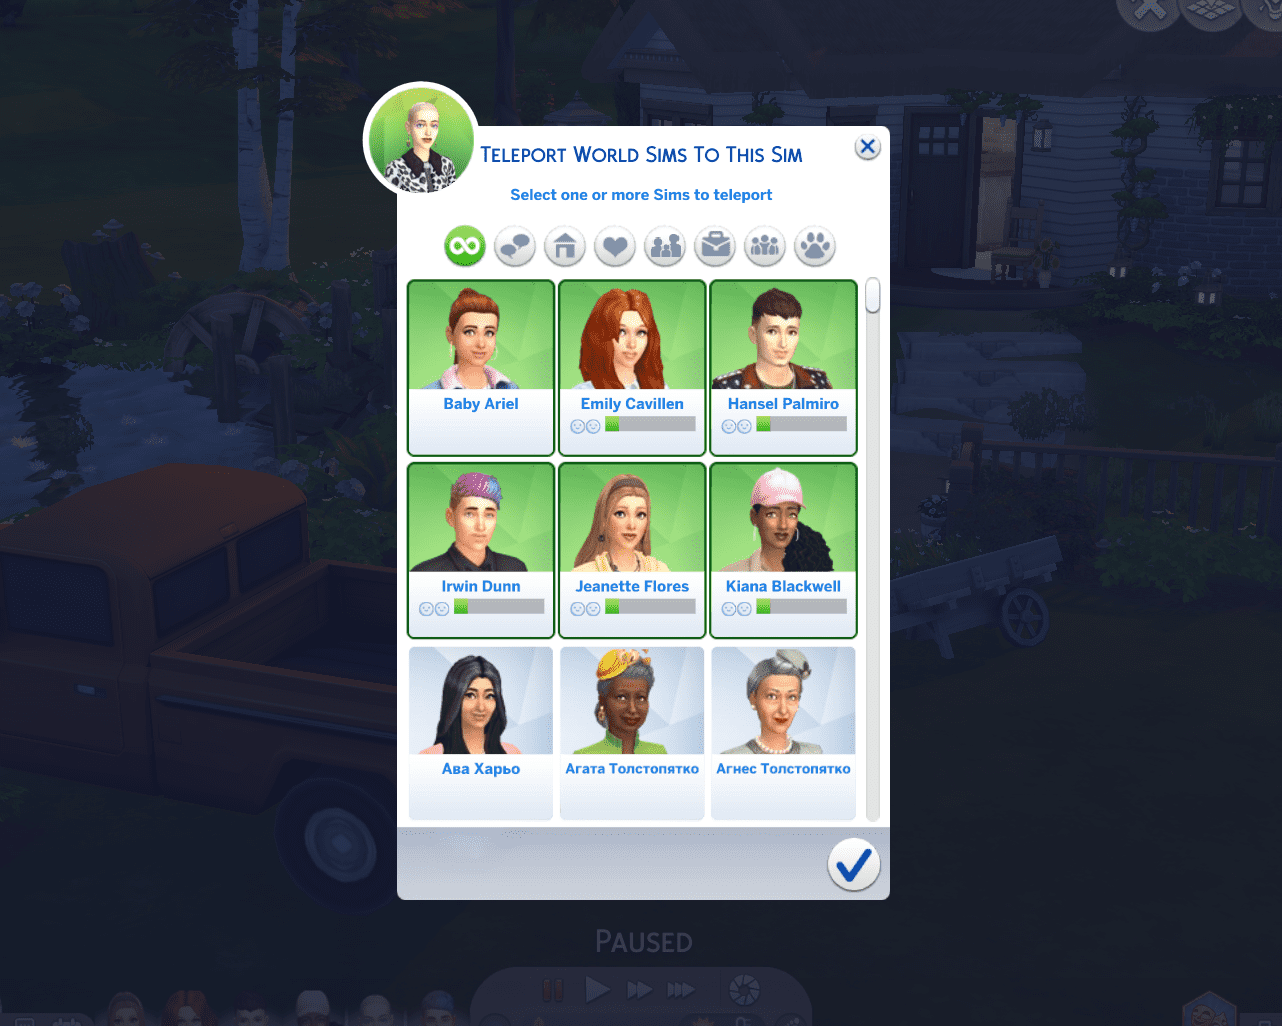
You can teleport a whole bunch of sims at once – super convenient! Just don’t freak out when they all land on top of each other in one spot.
Once they’re there, use the Control Any Sim mod by TitanNano to instantly take control of everyone and prevent them from wandering off.
Stage 6: Dressing up the models
You can change outfits for a few sims directly using the in-game “Change Outfit” option.
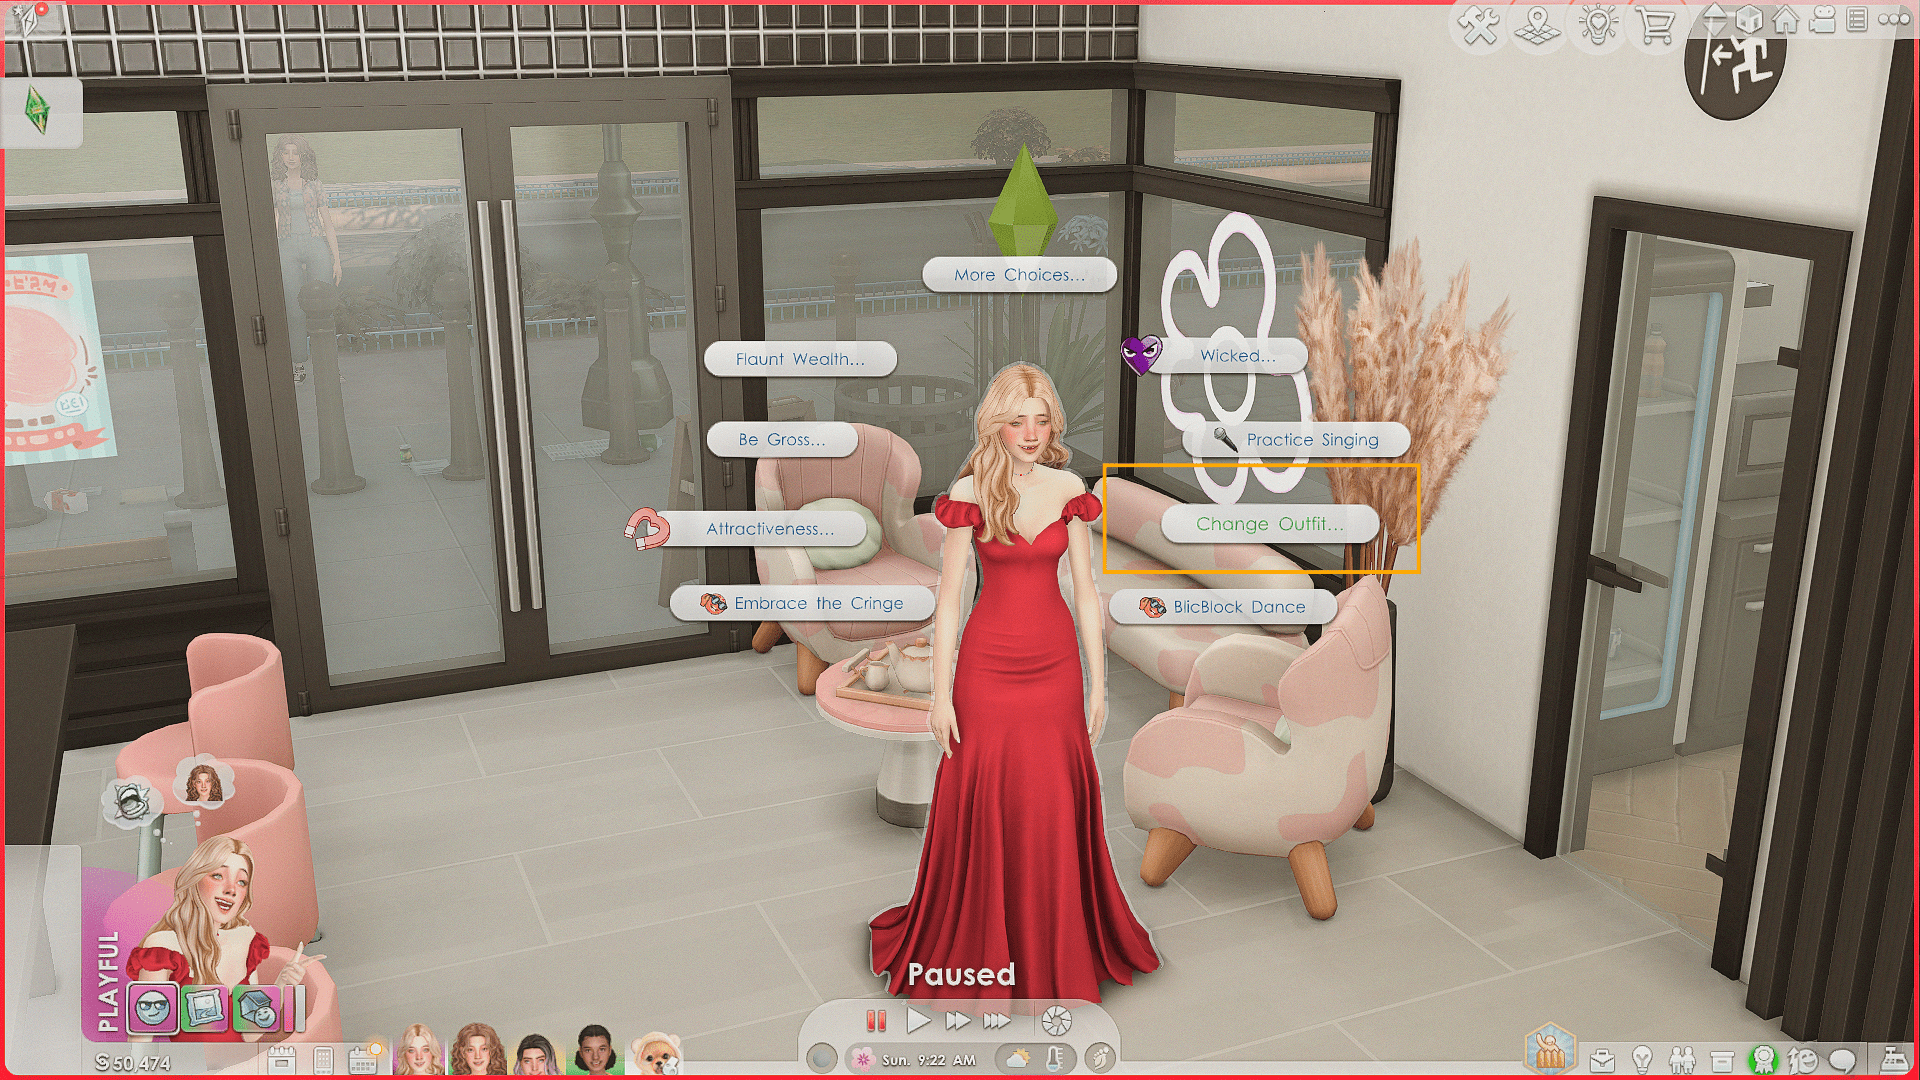
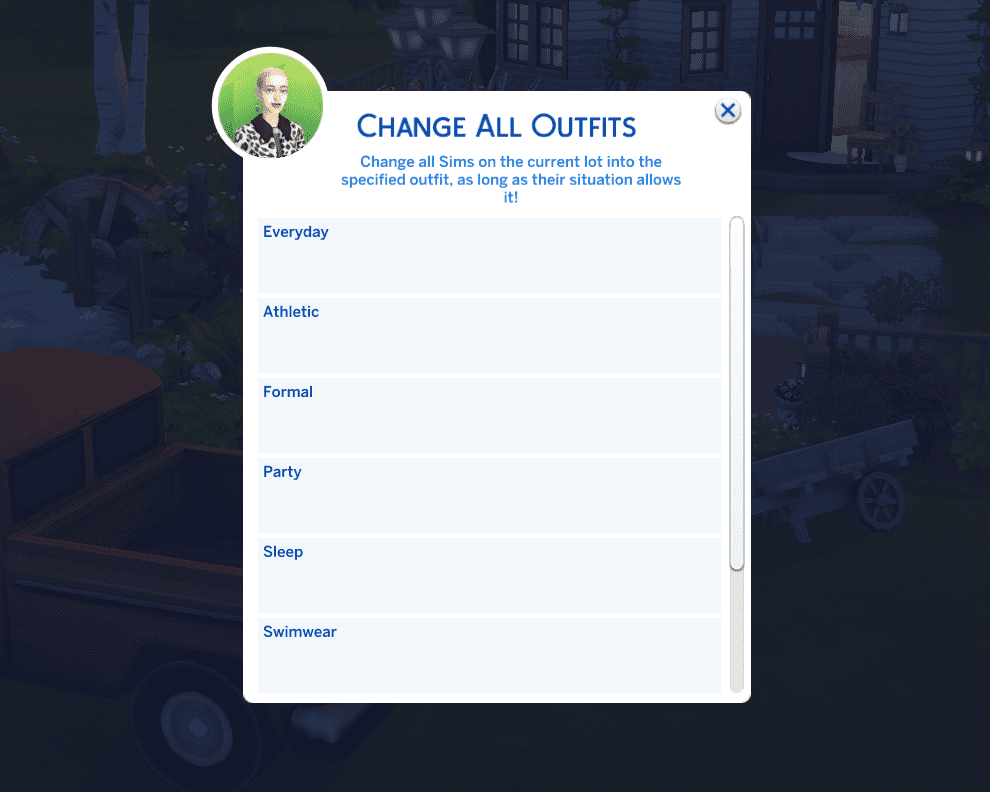
But if you have a large group, it’s much faster to change everyone at once through MCCC:
Mailbox – MCCC – Sims Cheats/NPC-cheats – MC dresser – Change all outfits
That’s why we suggested earlier to prepare all the outfits in the same category – thank us later!
If someone accidentally ends up in the wrong outfit, you can manually fix it with “Change Outfit” as usual.
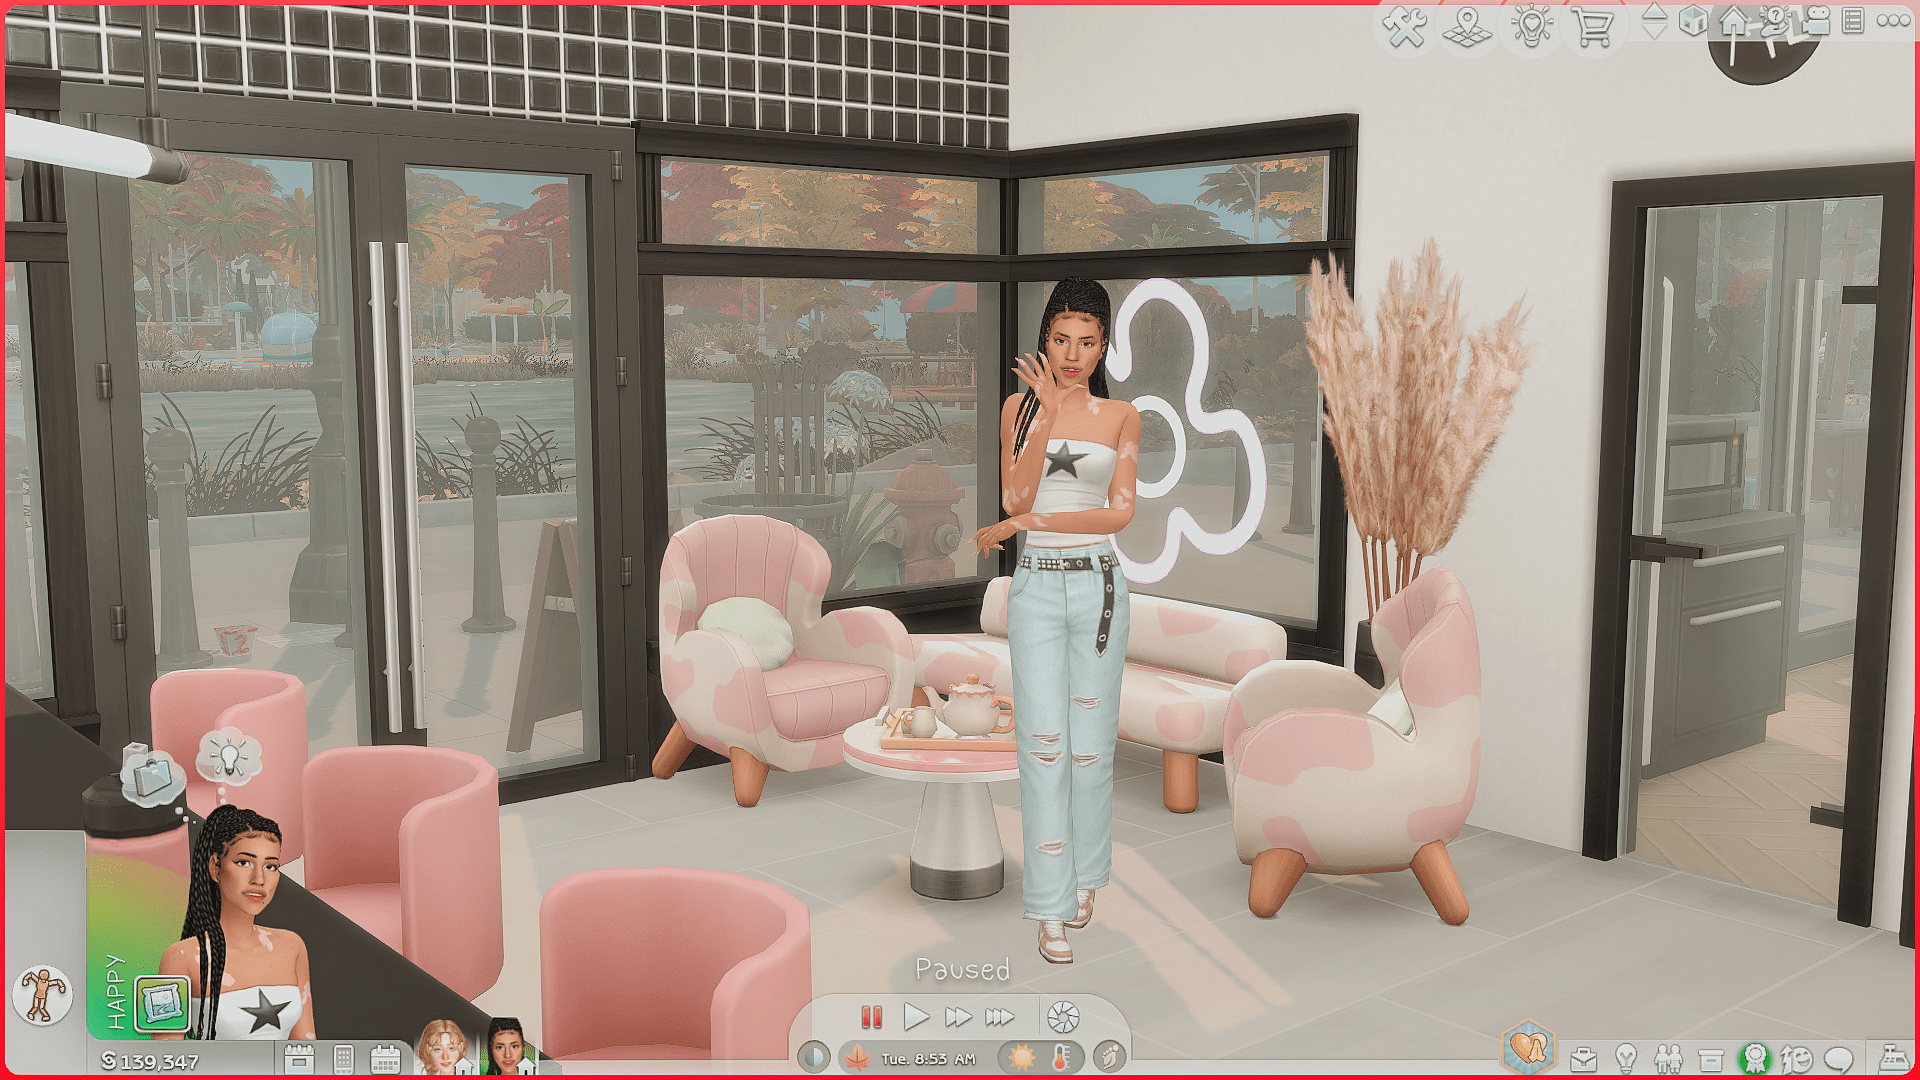
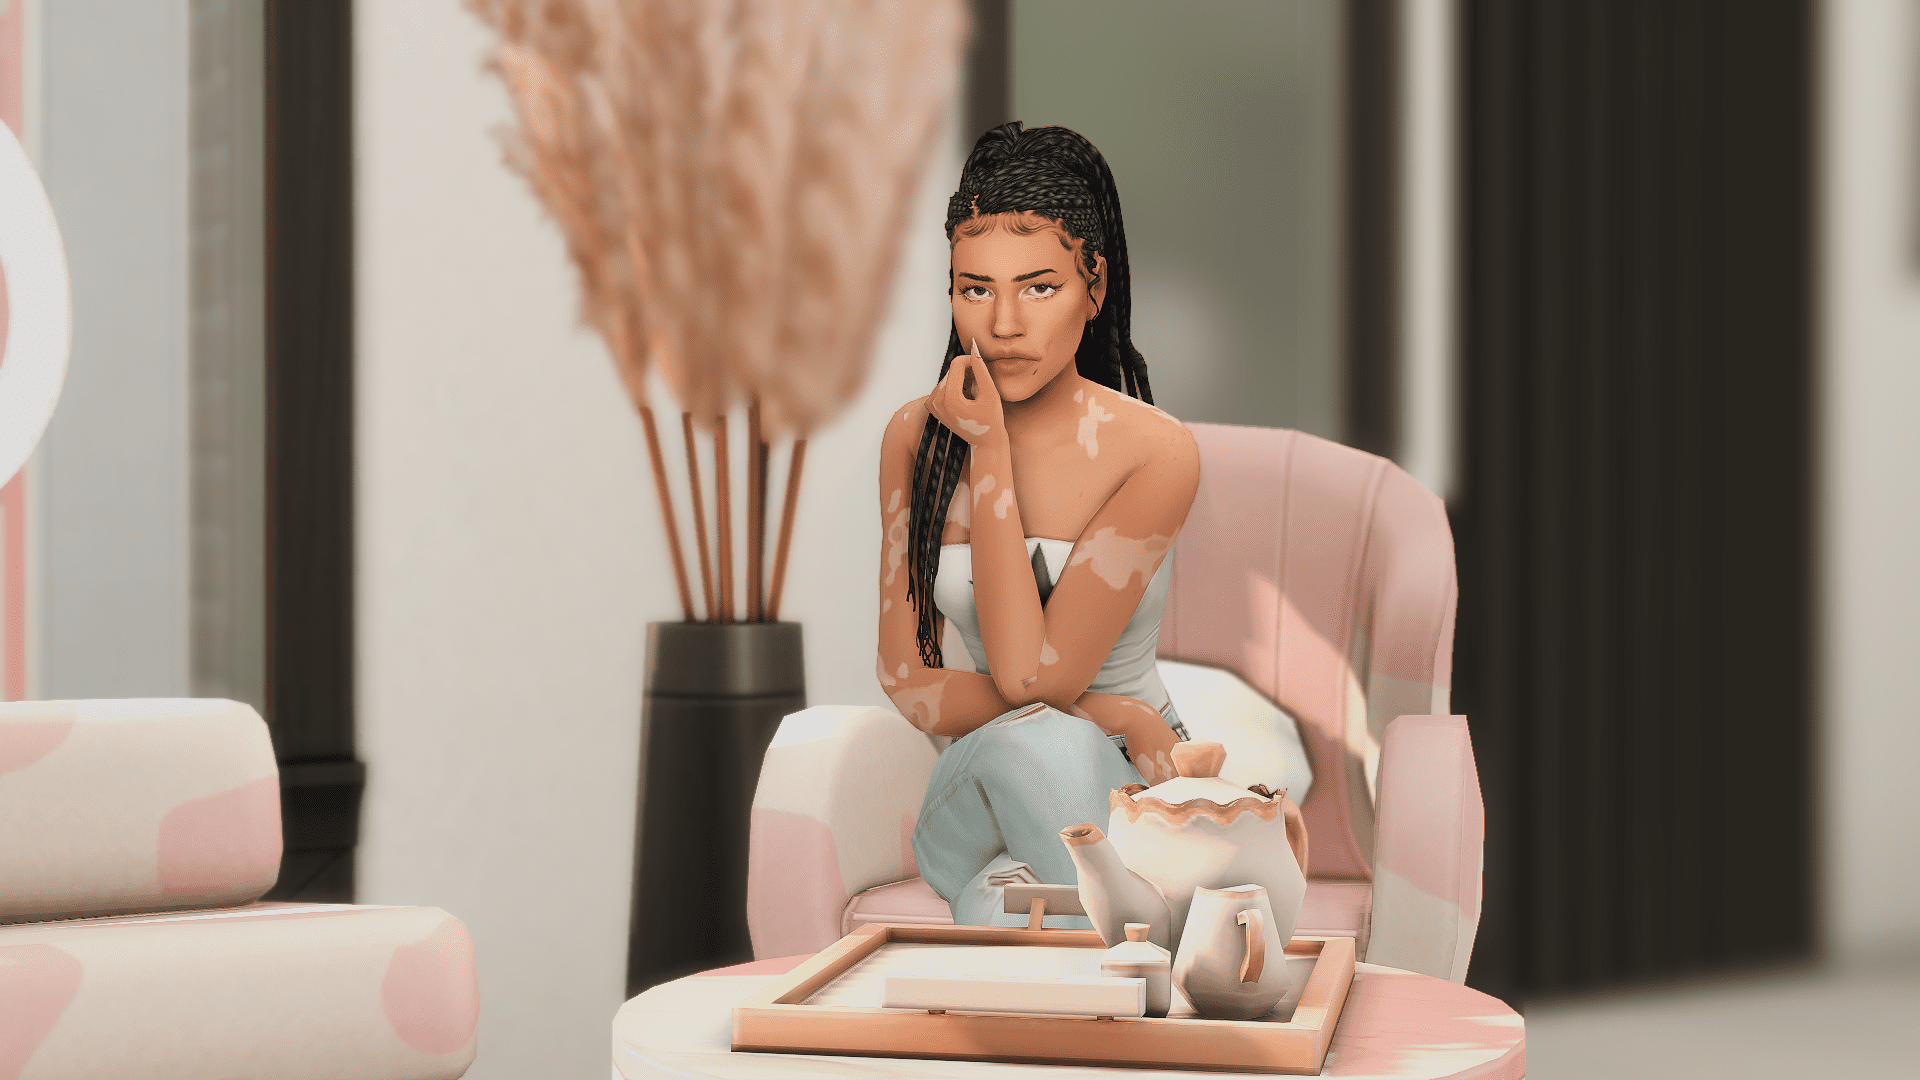
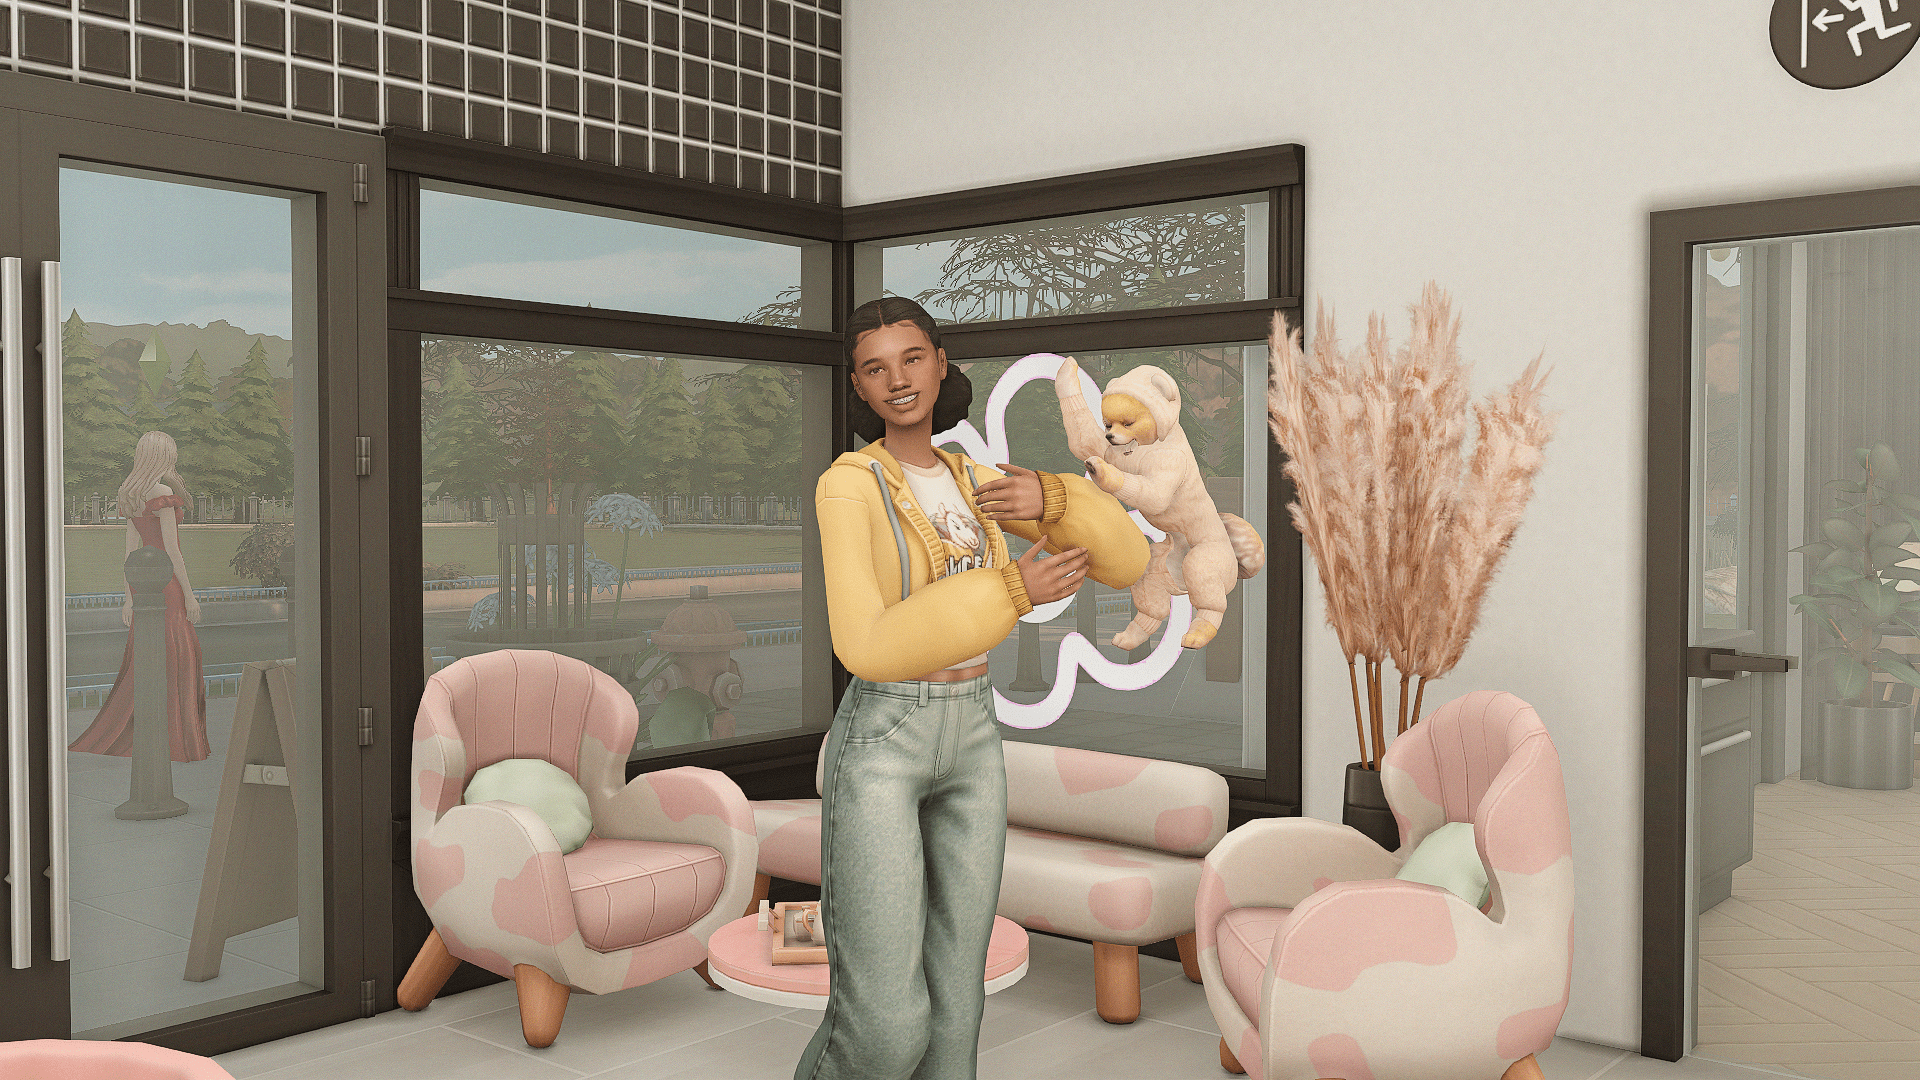
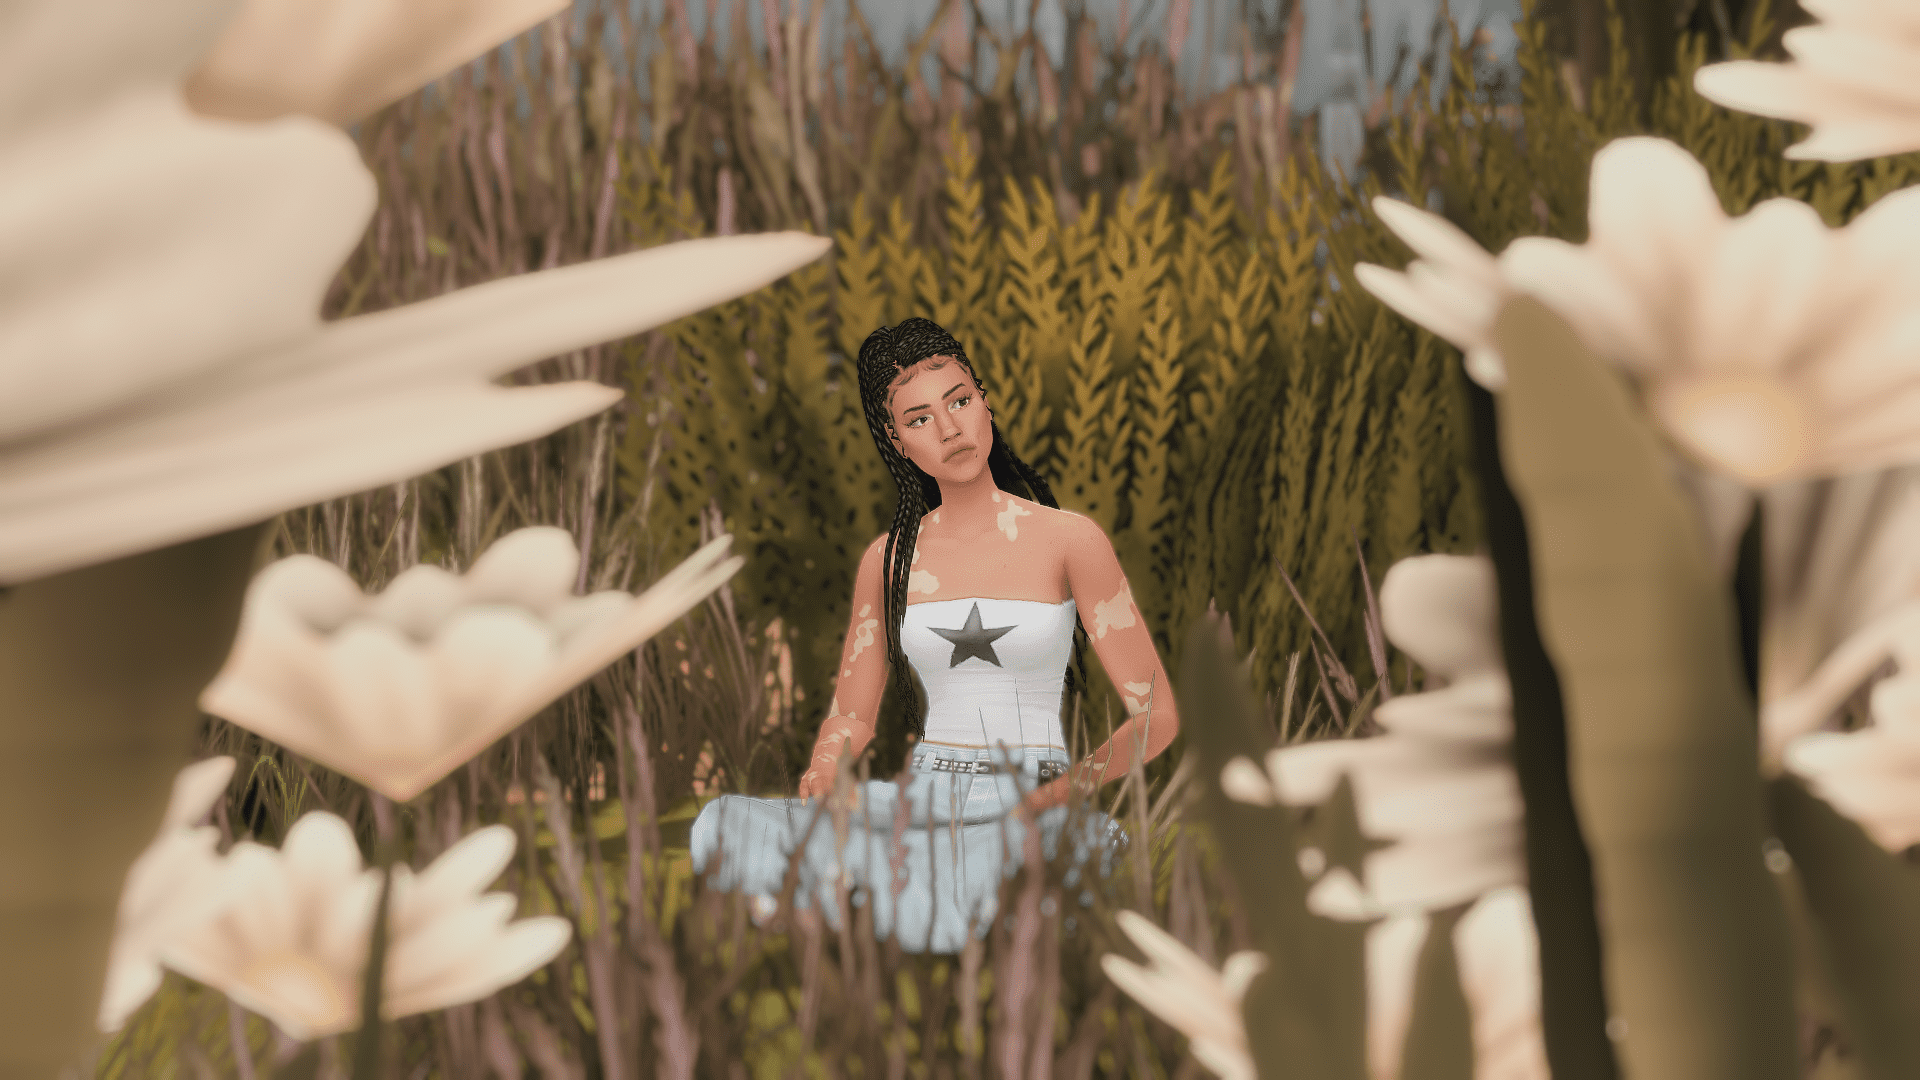
Stage 7: Posing the sims
Now for the most exciting part!
First, it’s very important to teleport all your sims into the same spot – this part is crucial!
You can do this using the familiar Knight Statue method:
1. Place the right number of statues in one spot.
2. Teleport each sim to their own statue.
Alternatively, you can teleport all the sims directly to one sim using MCCC:
Sim commands – Teleport commands – Teleport multiple Sims to this Sim – Teleport worlds Sims to this Sim – Teleport Sim now!
Either way, you’ll end up with a pile of sims literally standing inside each other. If the sims next to each other are supposed to have separate poses, you don’t need to stack them in the same spot, just place them side by side.
Now, let’s move on to actually posing them.
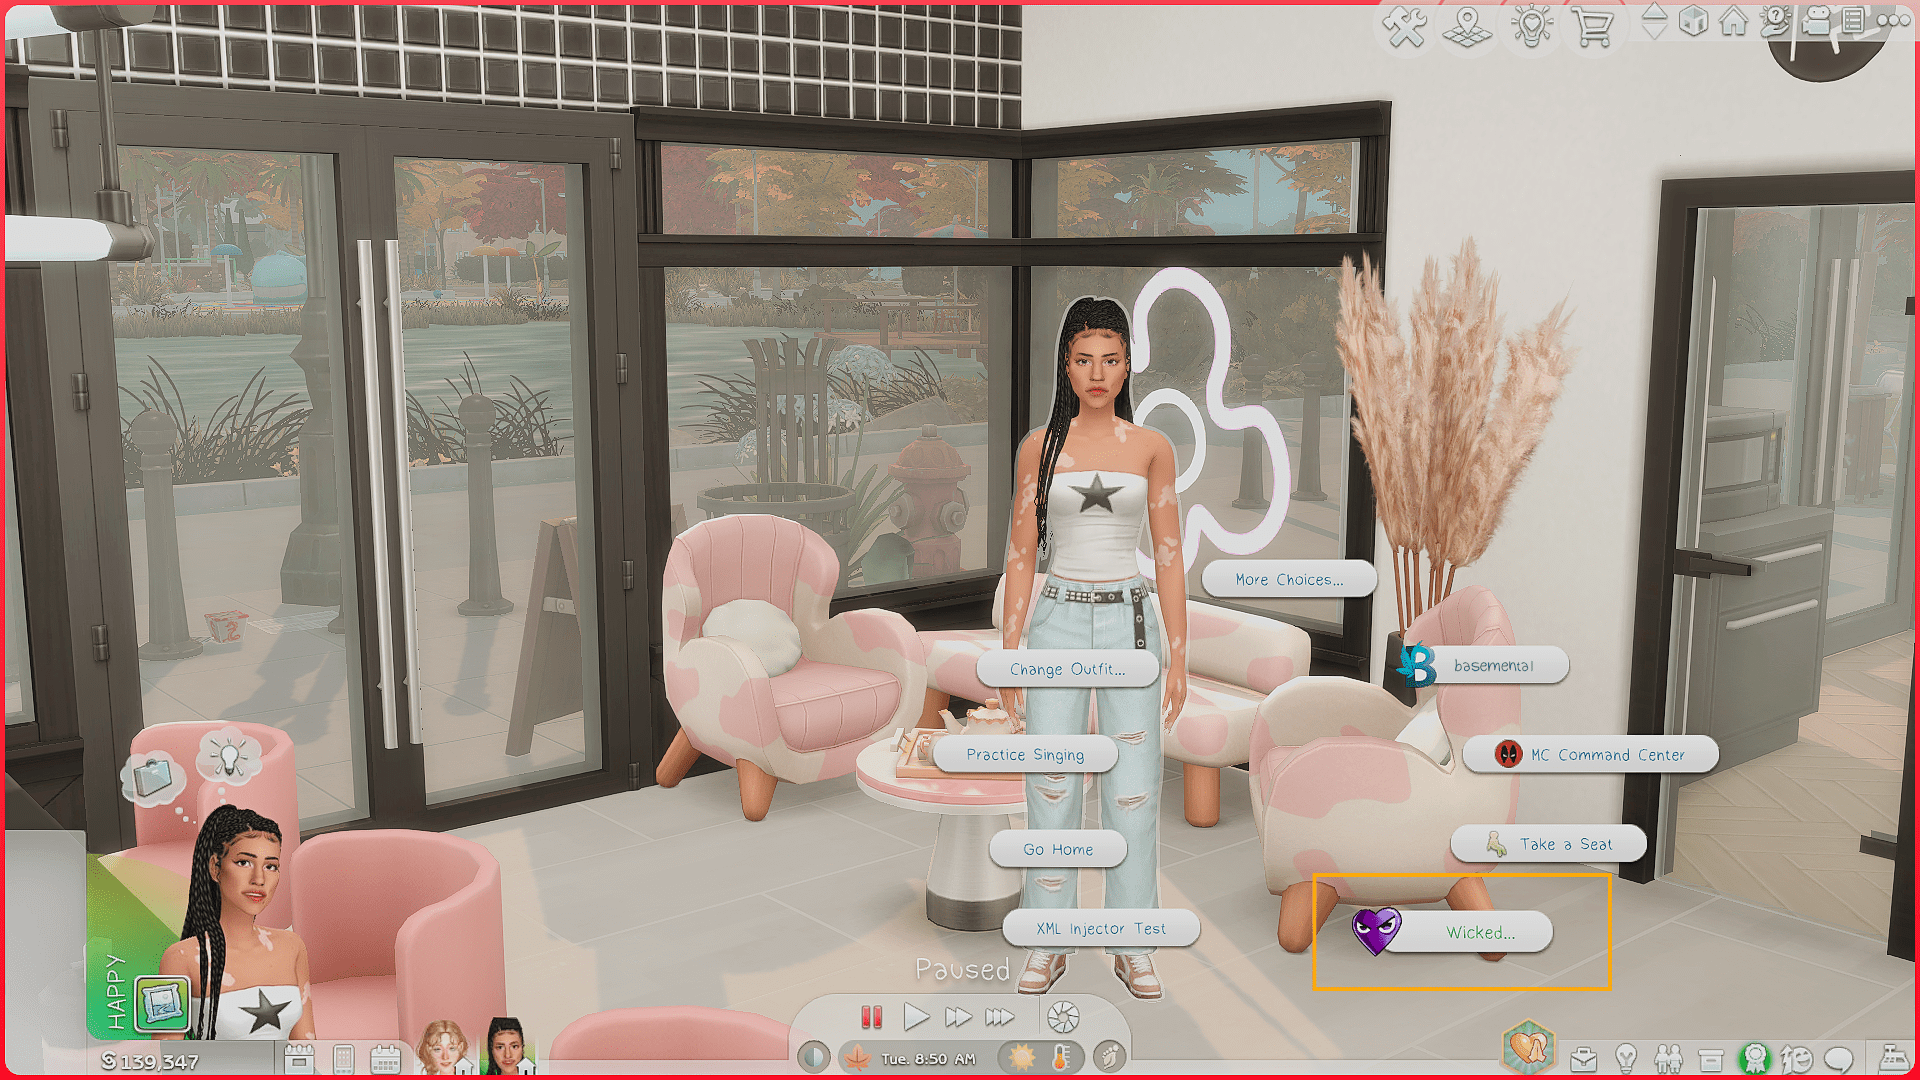
There are two main tools for posing: Andrew’s Pose Player and Wicked Whims by Turbodriver.
Wicked Whims
Wicked Whims is much more convenient, but it only works for teens and older, you can’t pose kids or pets with it.
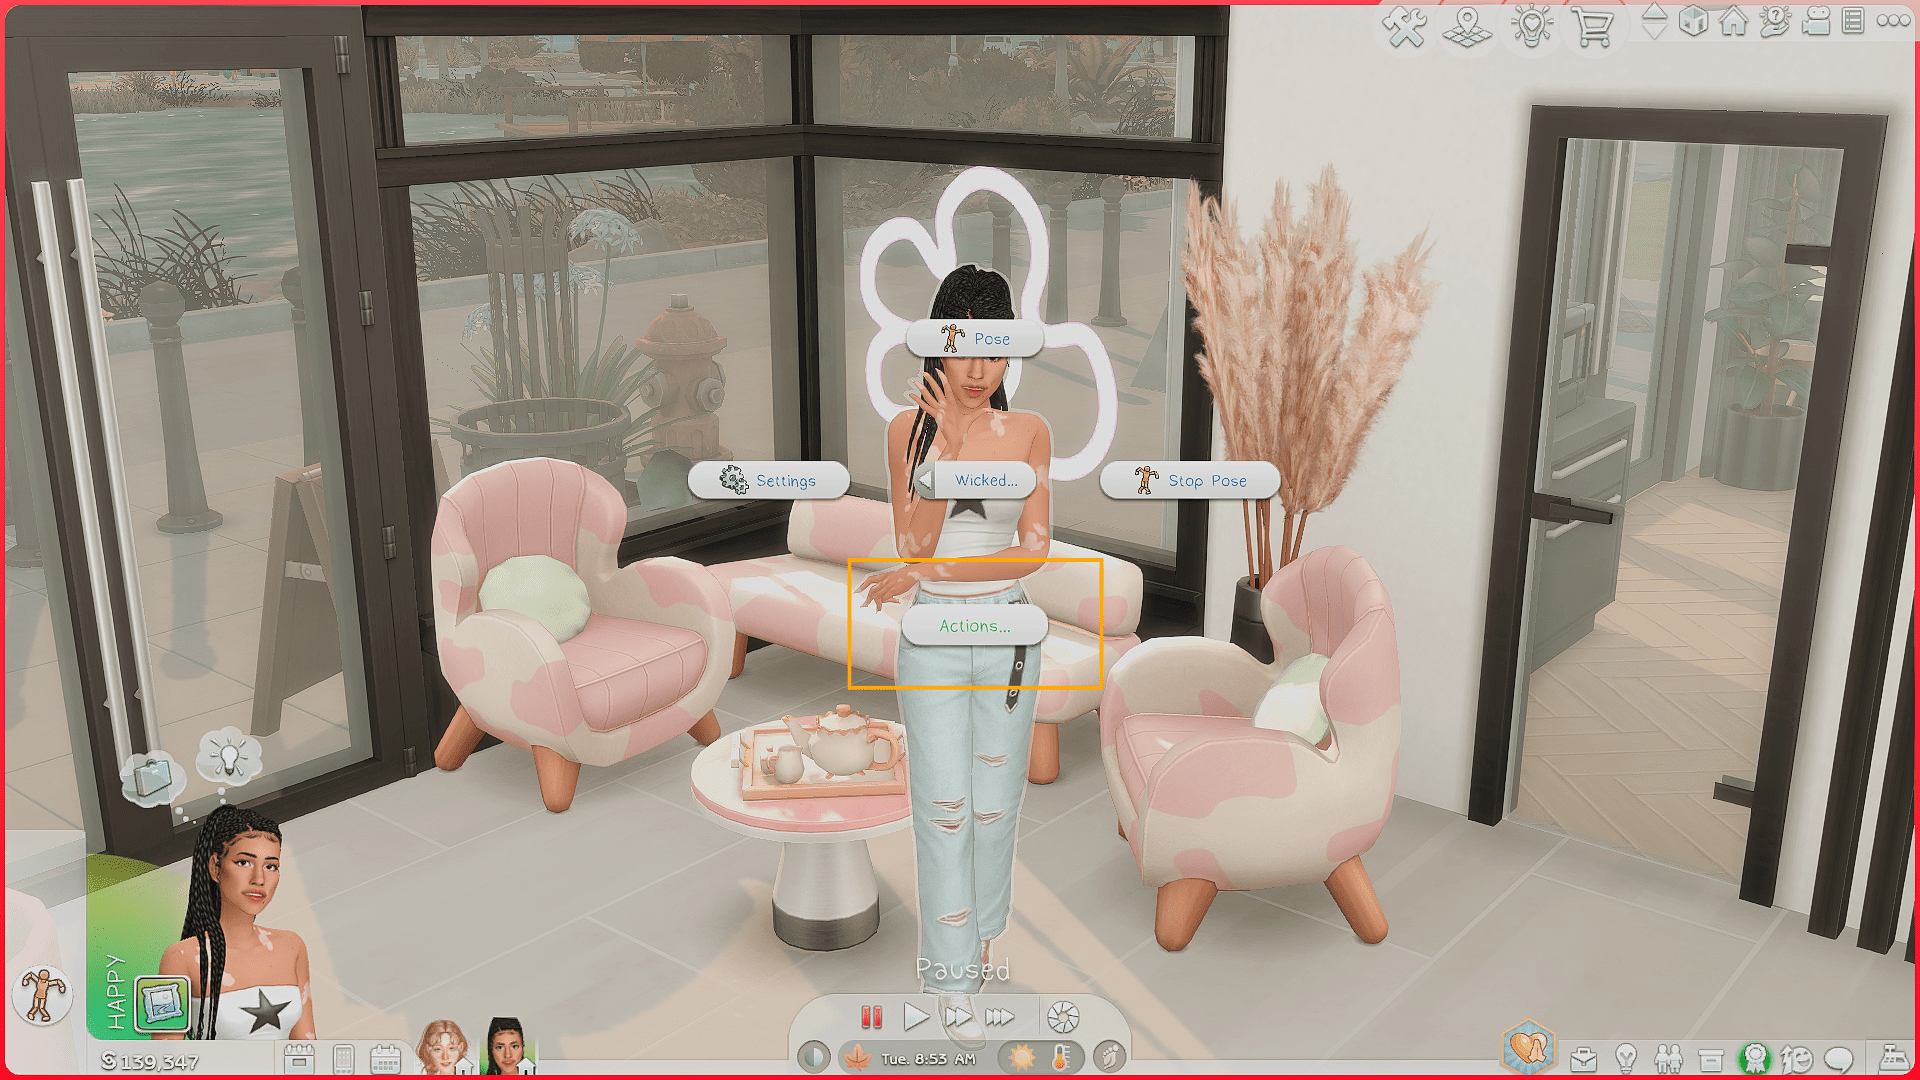
Here’s how to pose using Wicked Whims:
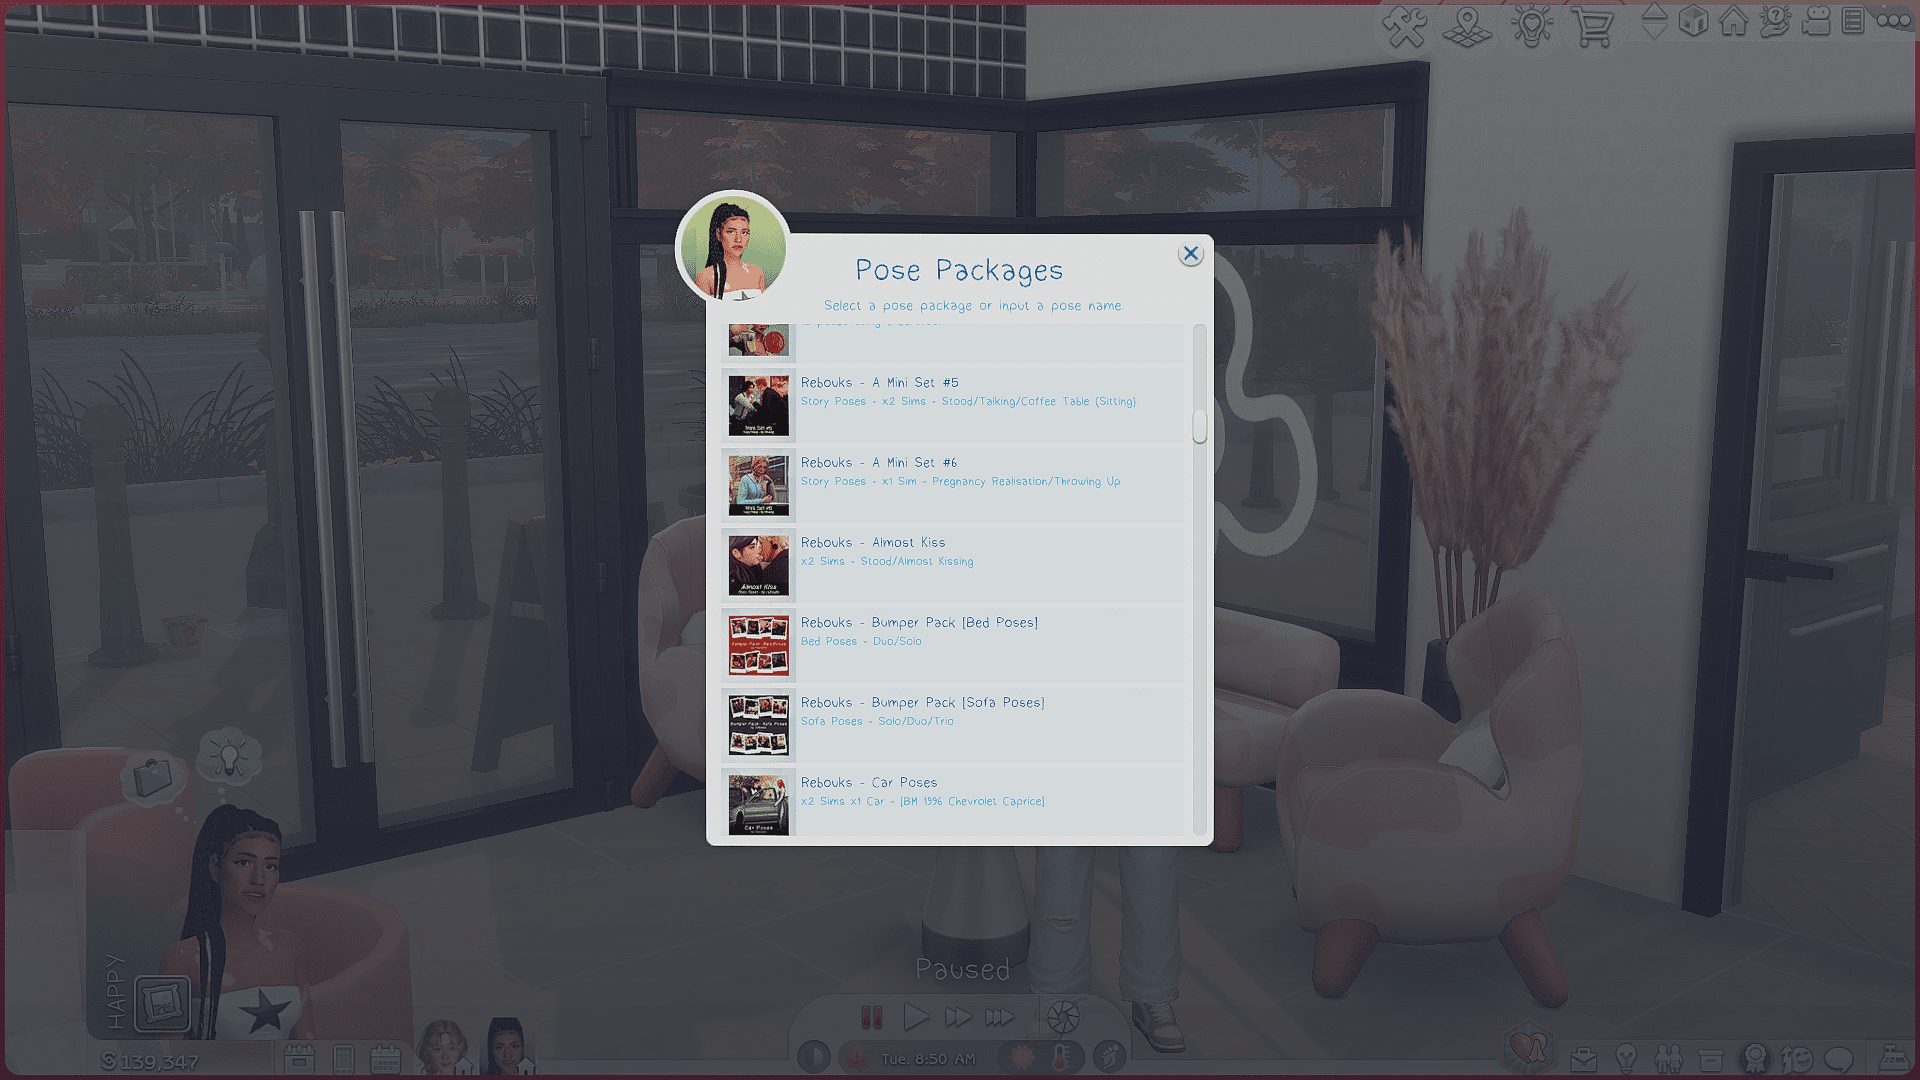
Click on the sim – Wicked – Pose

You’ll either see the last pose pack you used or a list of all installed pose packs. Find the specific pose you want to use.
If you have a large pose collection, we recommend using TwistedMexi’s mod that lets you search poses by name.
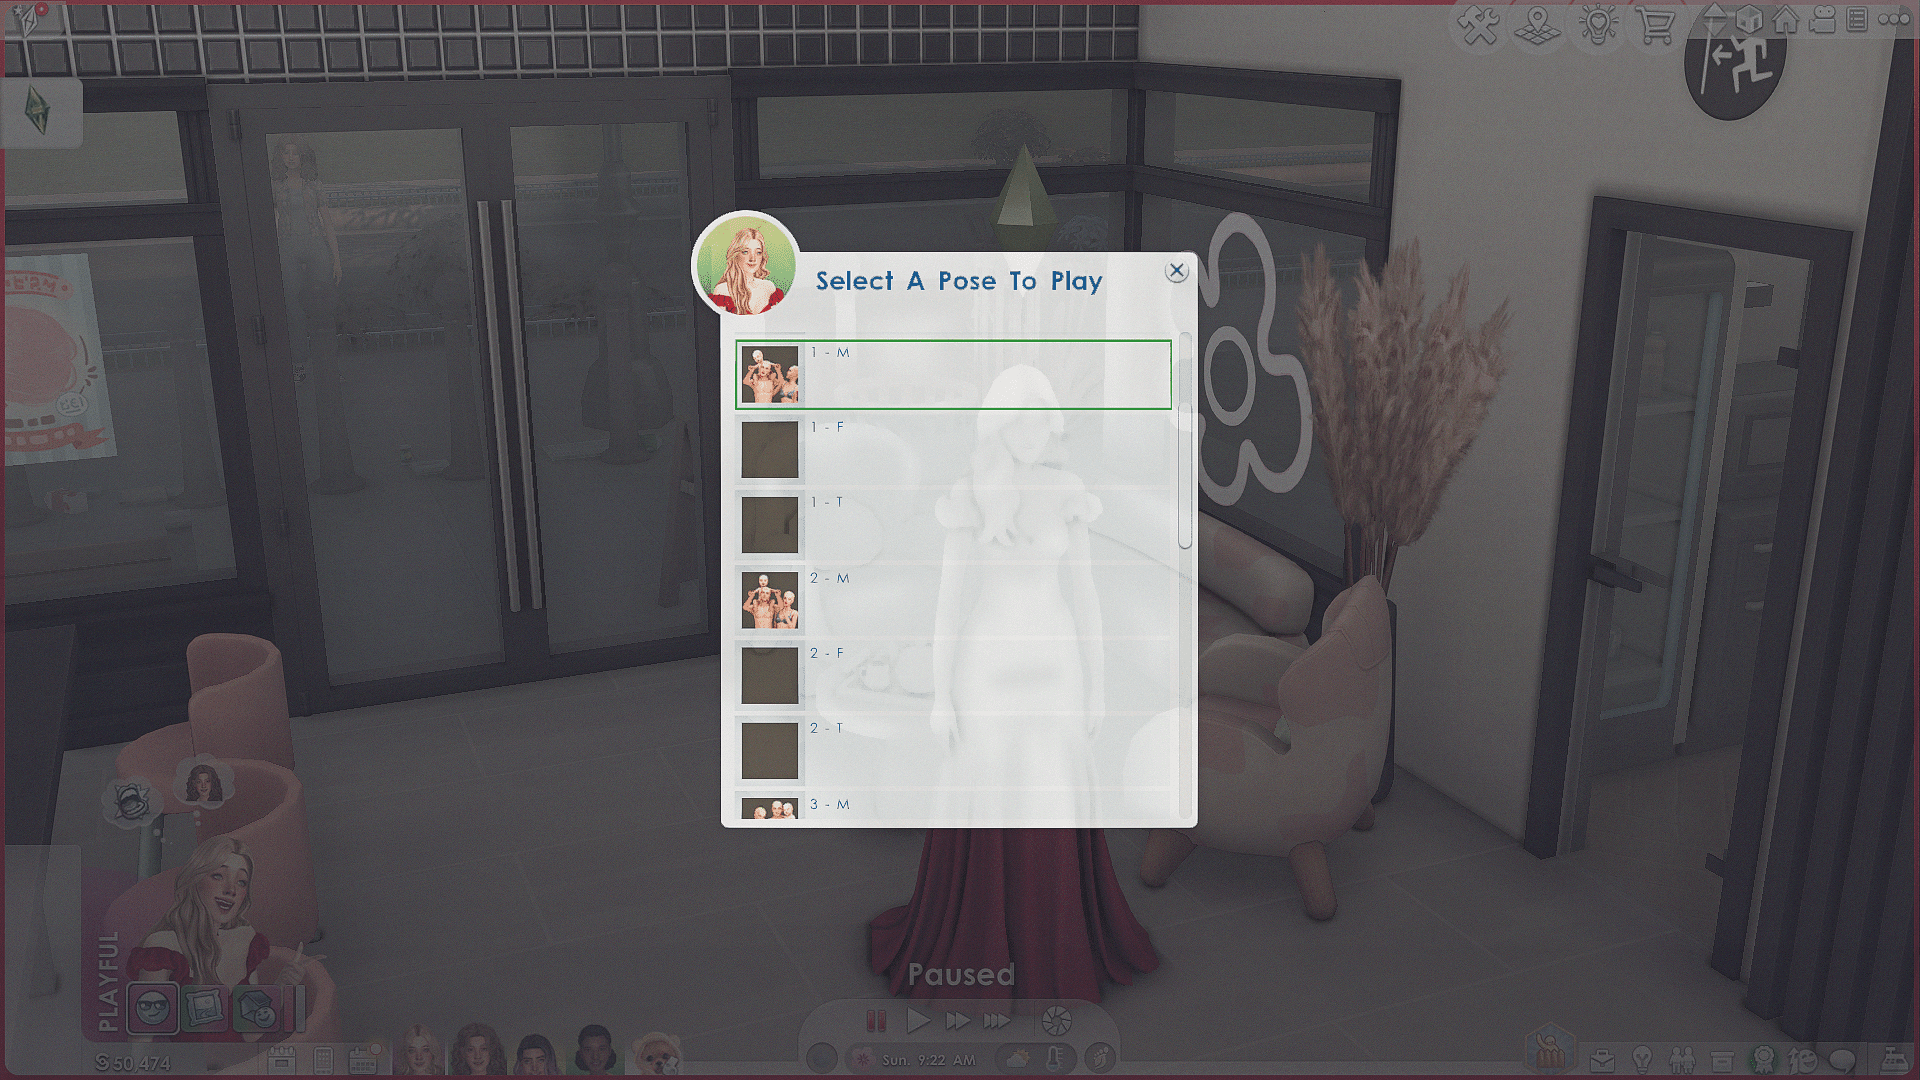
Choose the desired pack – Select the specific numbered pose from the pack
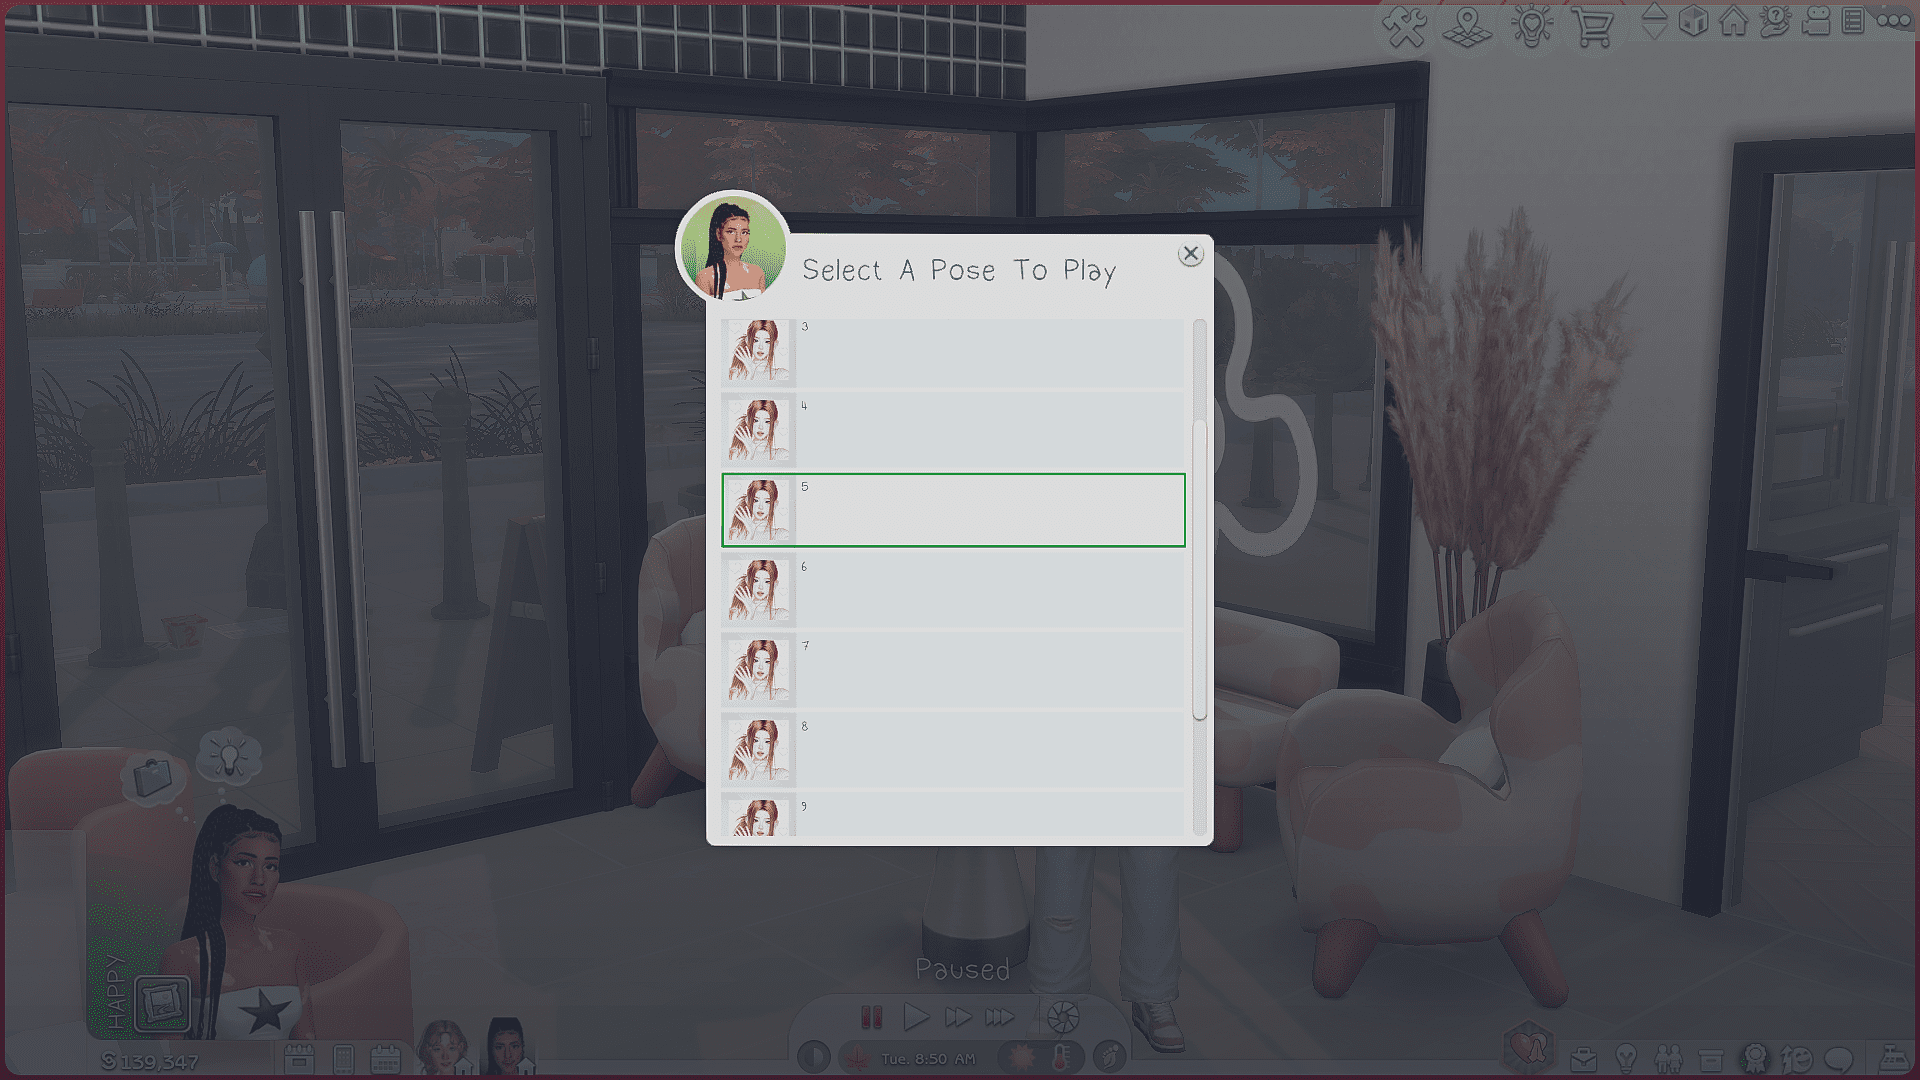
For multi-sim poses, you’ll see several versions labeled F (female), M (male), T (toddler), etc. Be sure to choose the correct letter for each sim so they snap into place correctly.
If something feels off (like sims floating or clipping), you can reposition them using Wicked Whims’ built-in positioning feature:
Click on the sim – Wicked – Actions – Enable Positioning
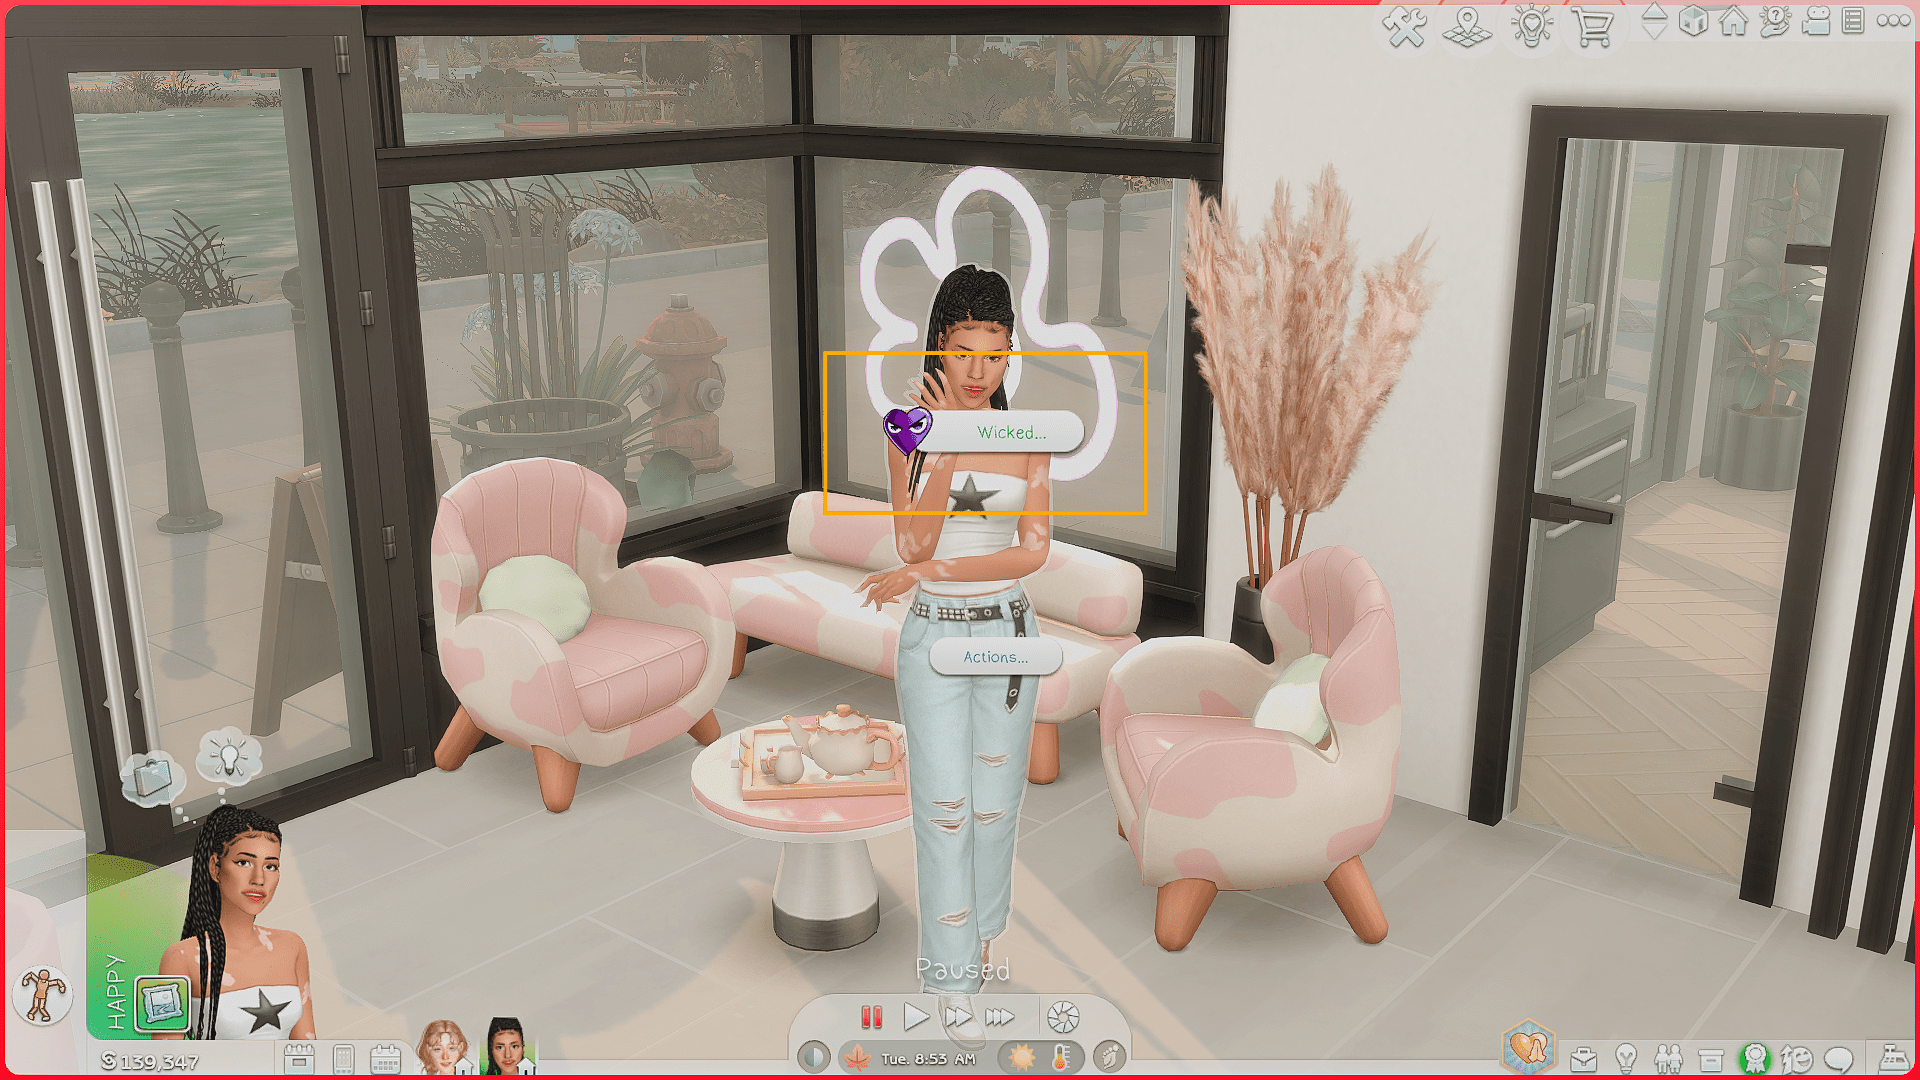
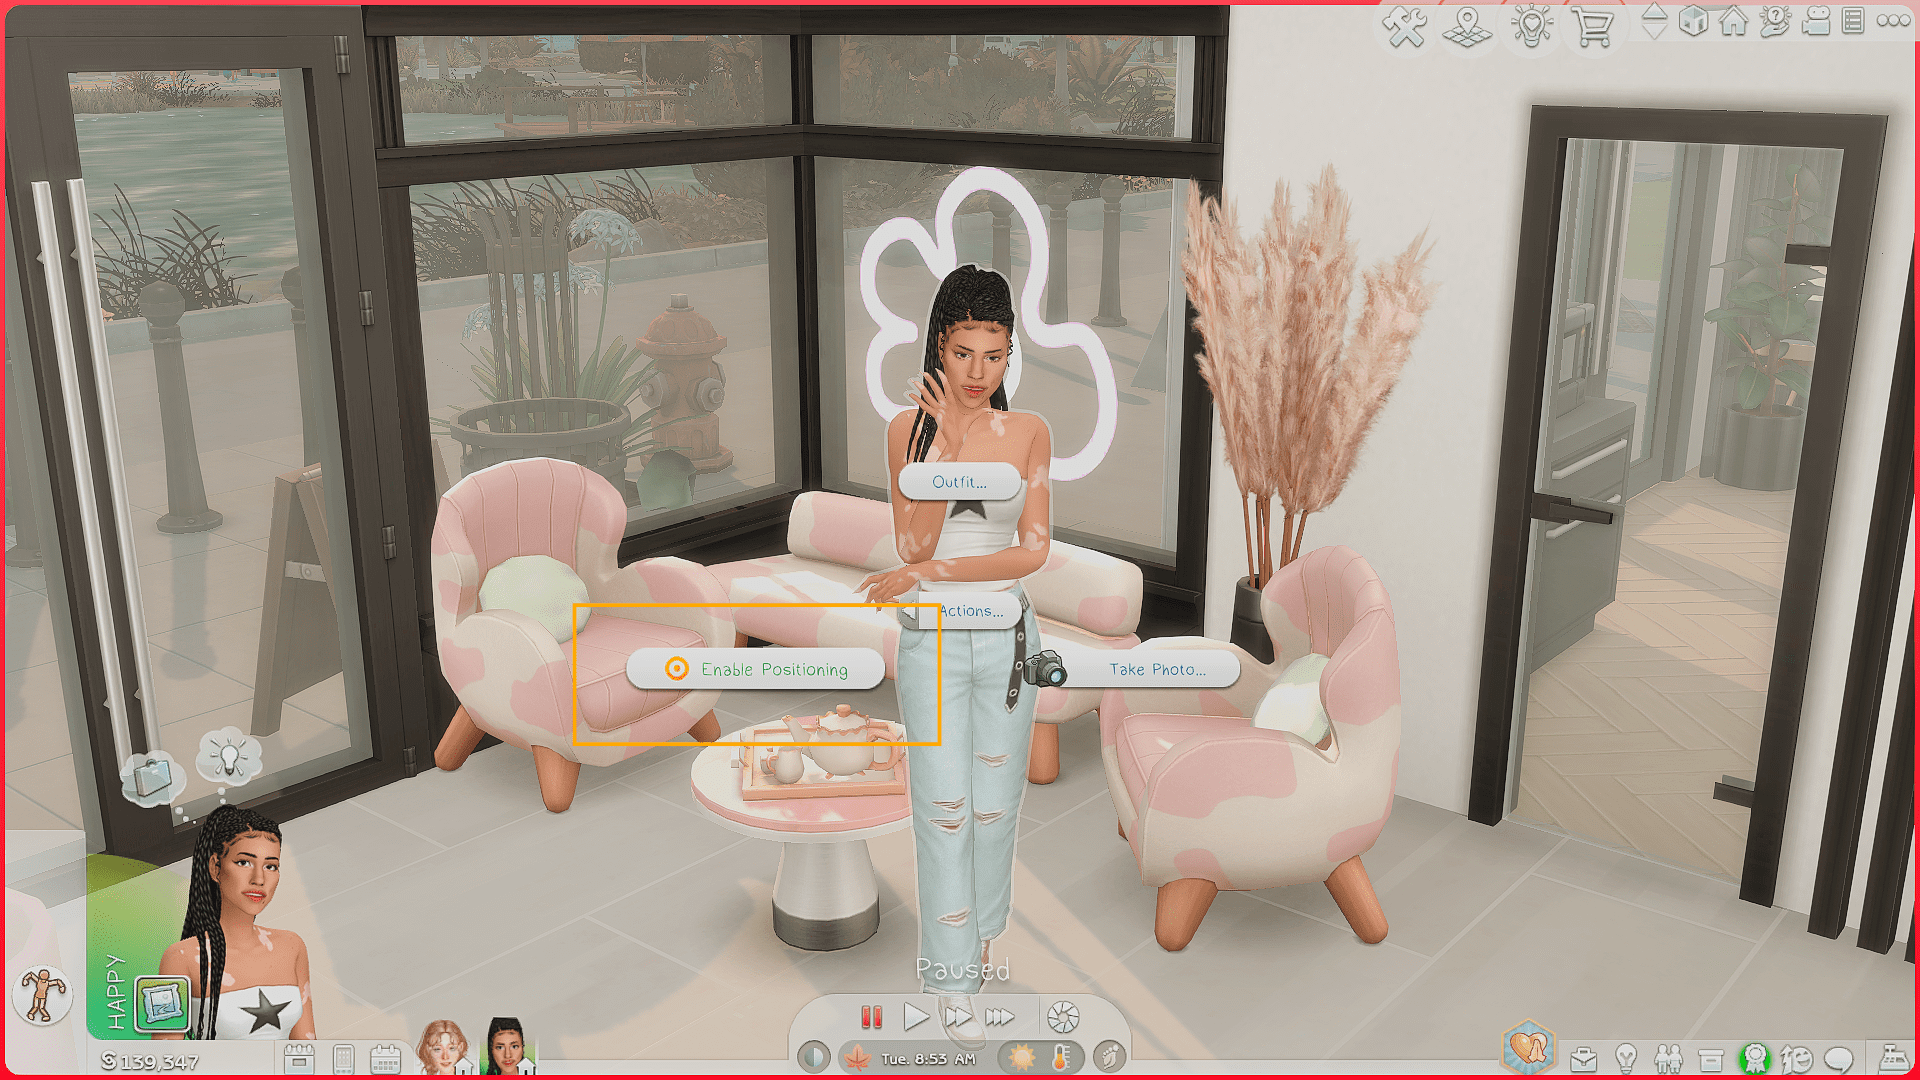
This brings up directional arrows you can use to move the sim around, rotate them, raise/lower them.
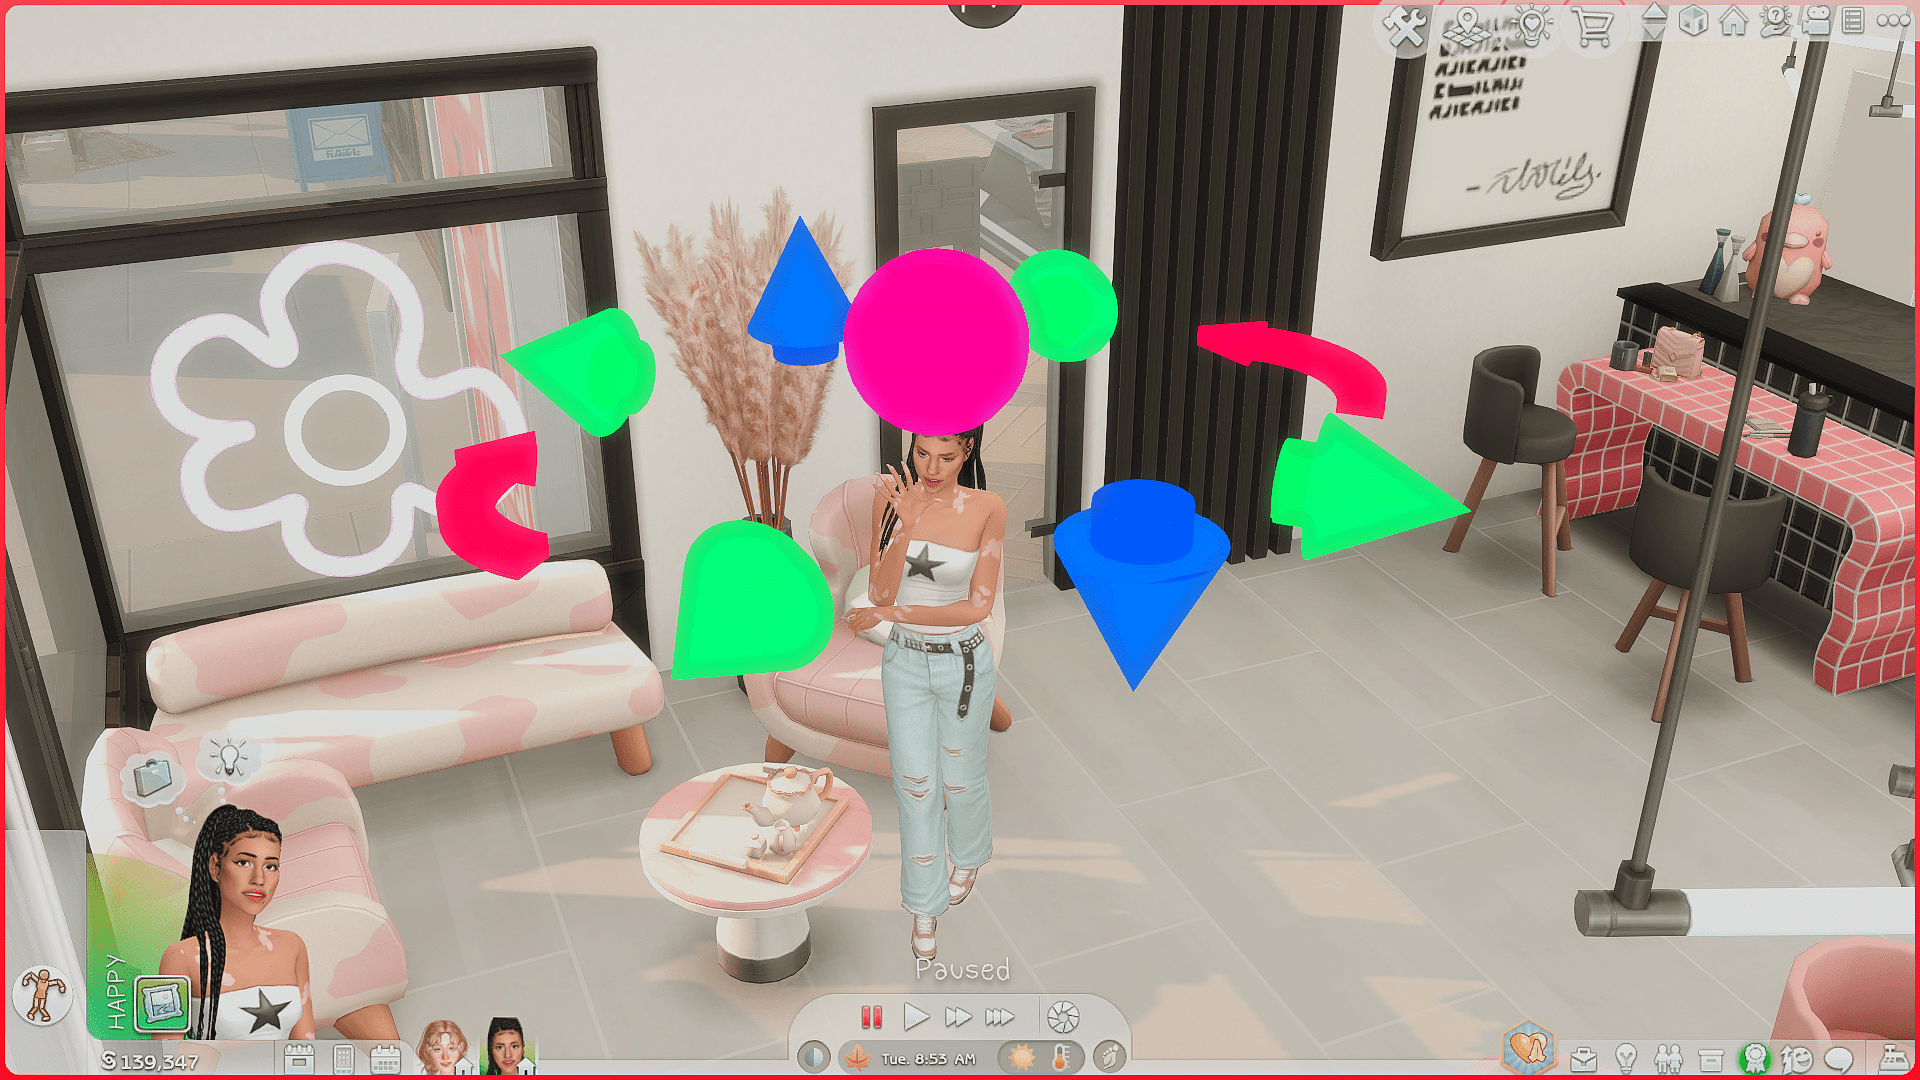
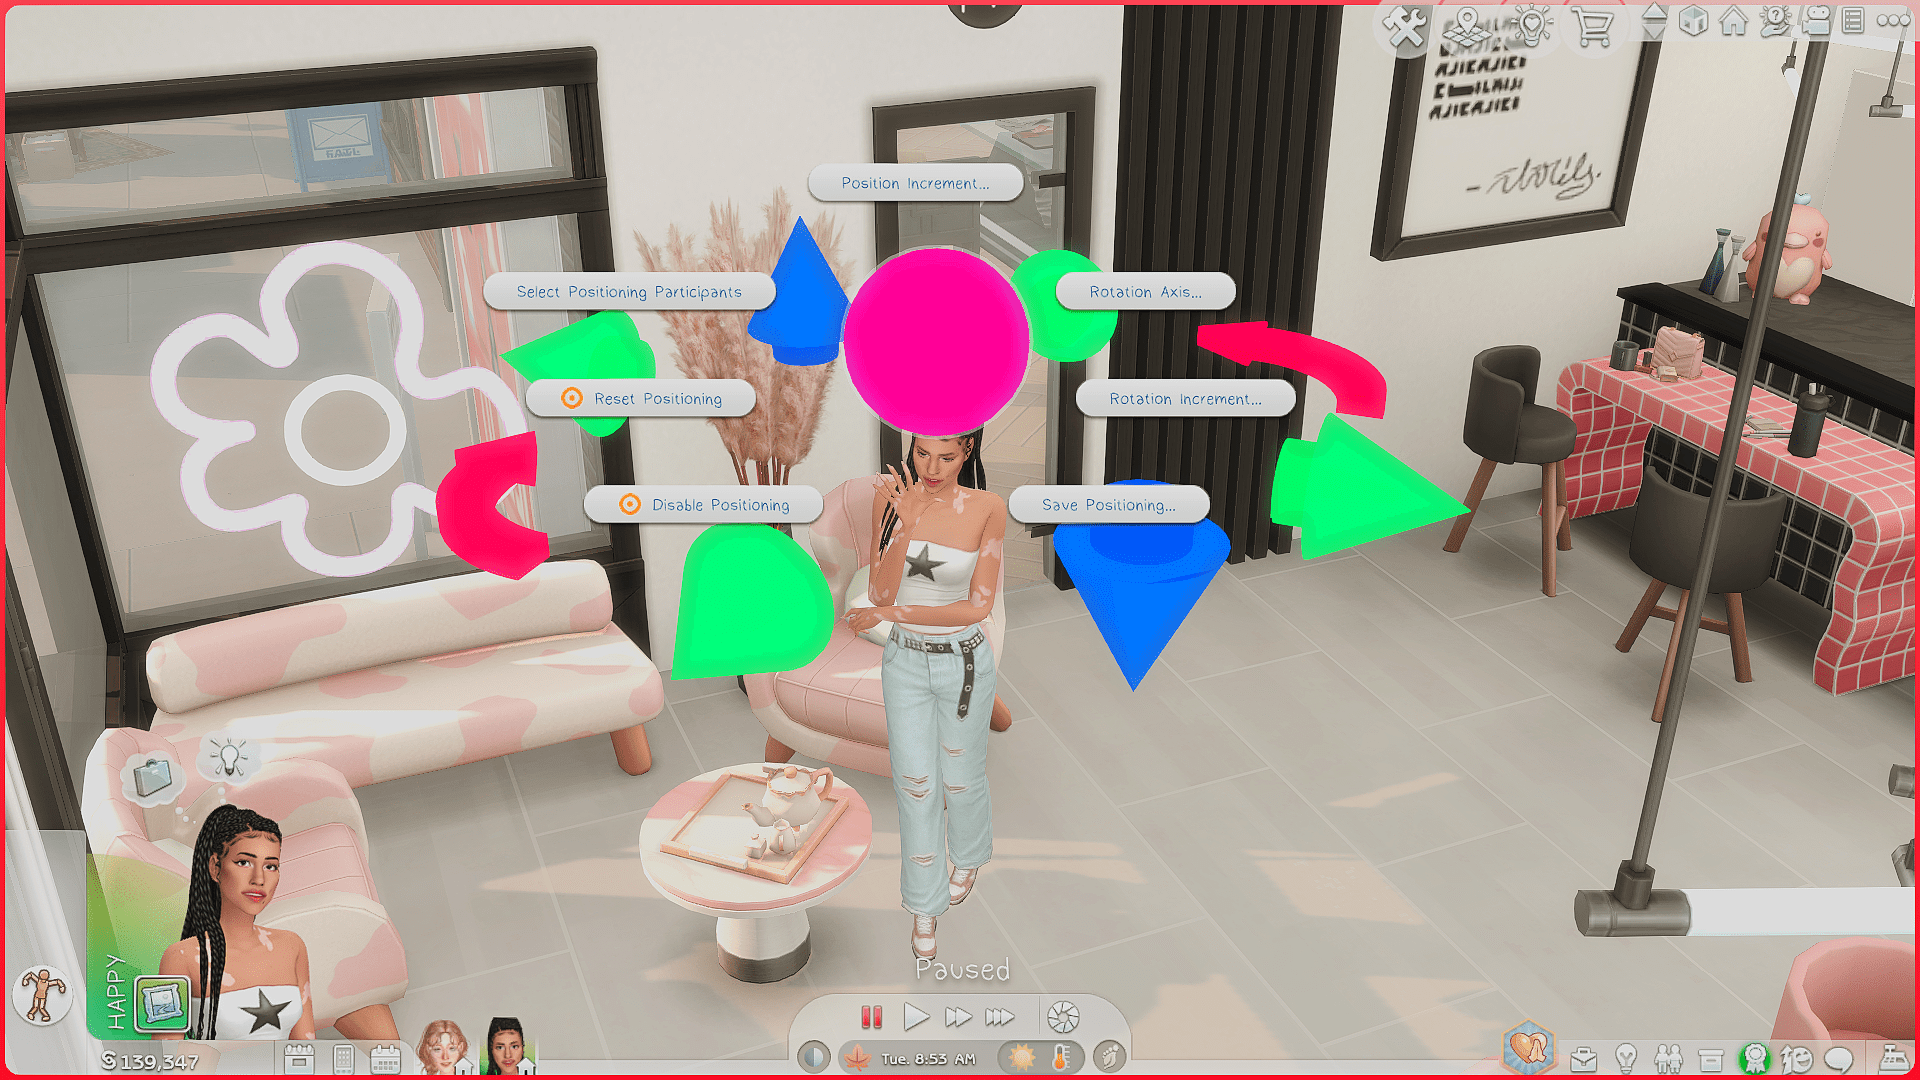
You can even move sims off-screen if they aren’t needed for a particular shot.
These arrows are also perfect for adjusting height differences, like if one sim looks unnaturally short or tall in a pose.
Absolute must-have feature!
Another great thing about Wicked Whims is that you can change outfits directly after posing, in case you have a last-minute wardrobe change.
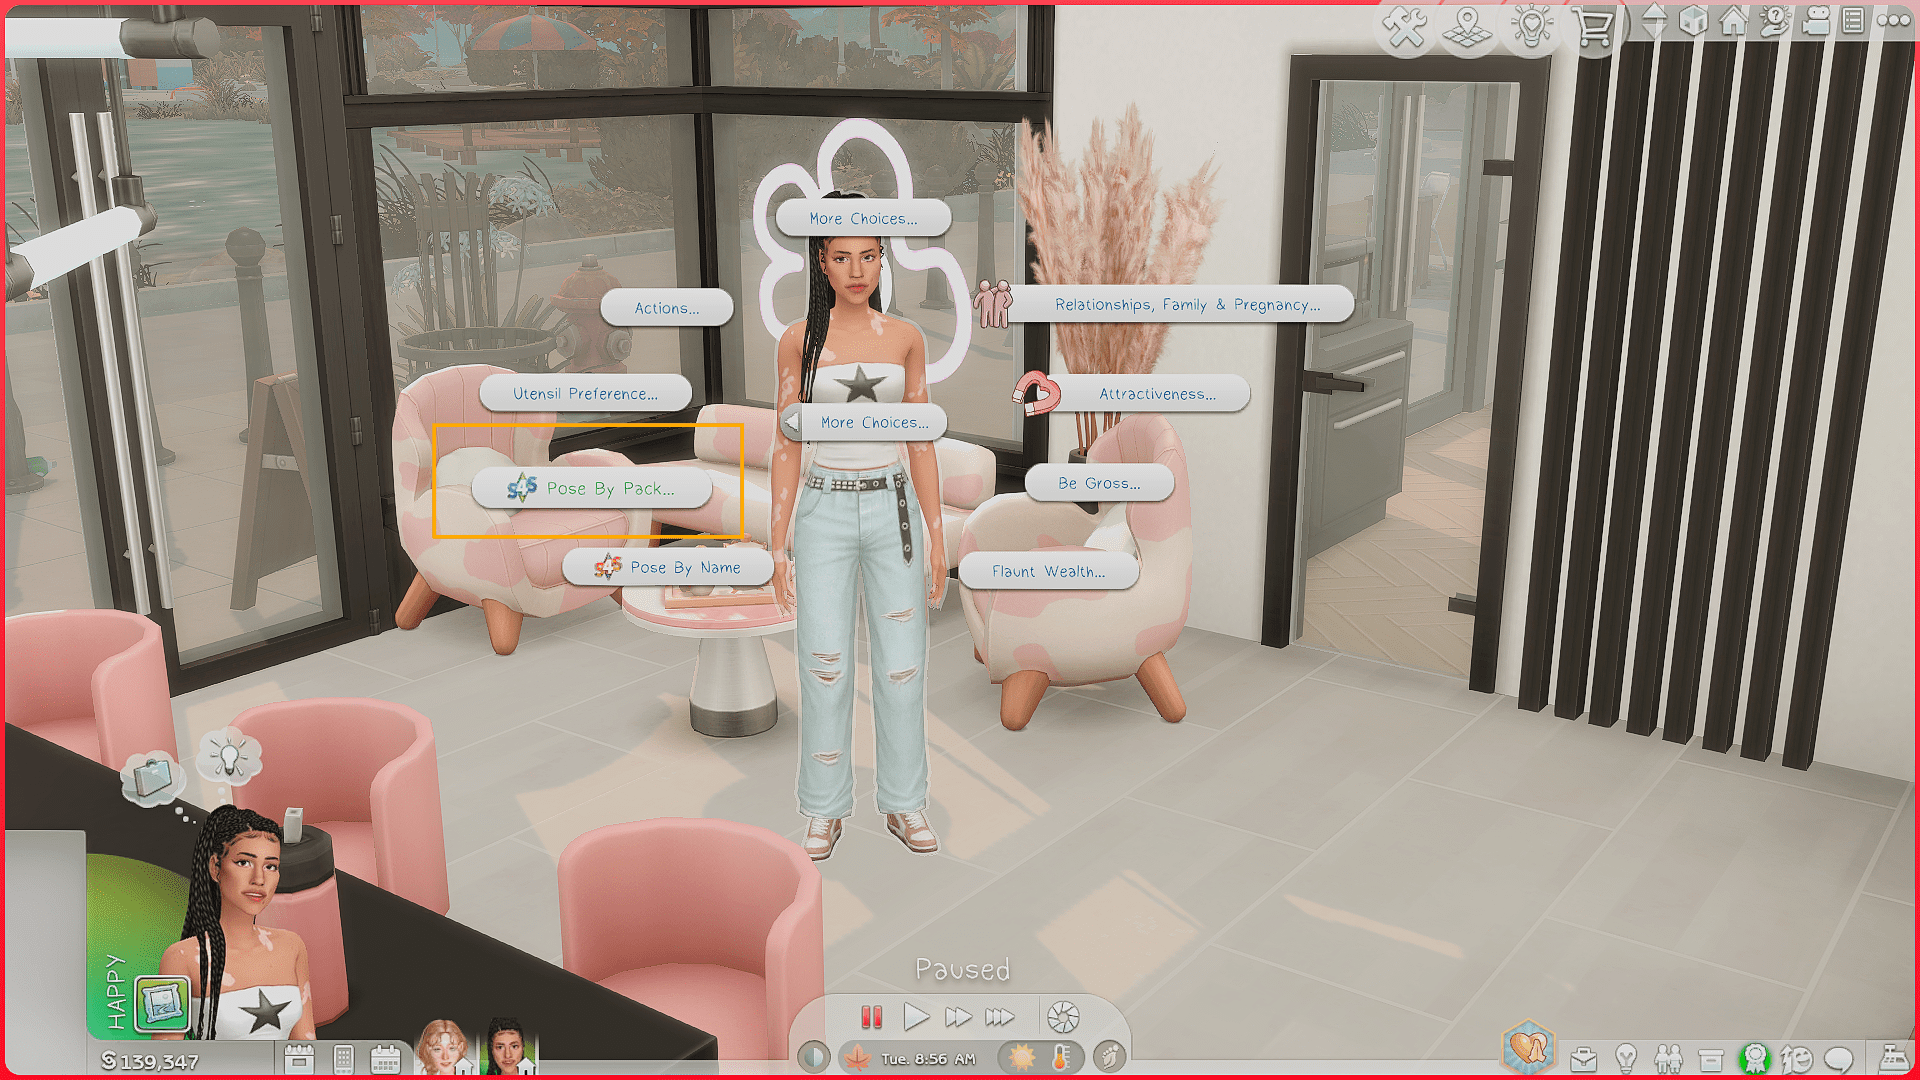
Pose Player
Unfortunately, Pose Player isn’t as convenient, but you’ll still need it sometimes.
Drawbacks:
– No handy positioning arrows like WickedWhims
– If you enter Build Mode during a shoot, all poses reset
– Works best when combined with TwistedMexi’s TOOL mod
When to use Pose Player:
– Photoshoots with kids or pets
– Older poses that aren’t compatible with Wicked Whims
After teleporting the sims into position:
Click on the sim – Pose by Pack – Choose pack and pose
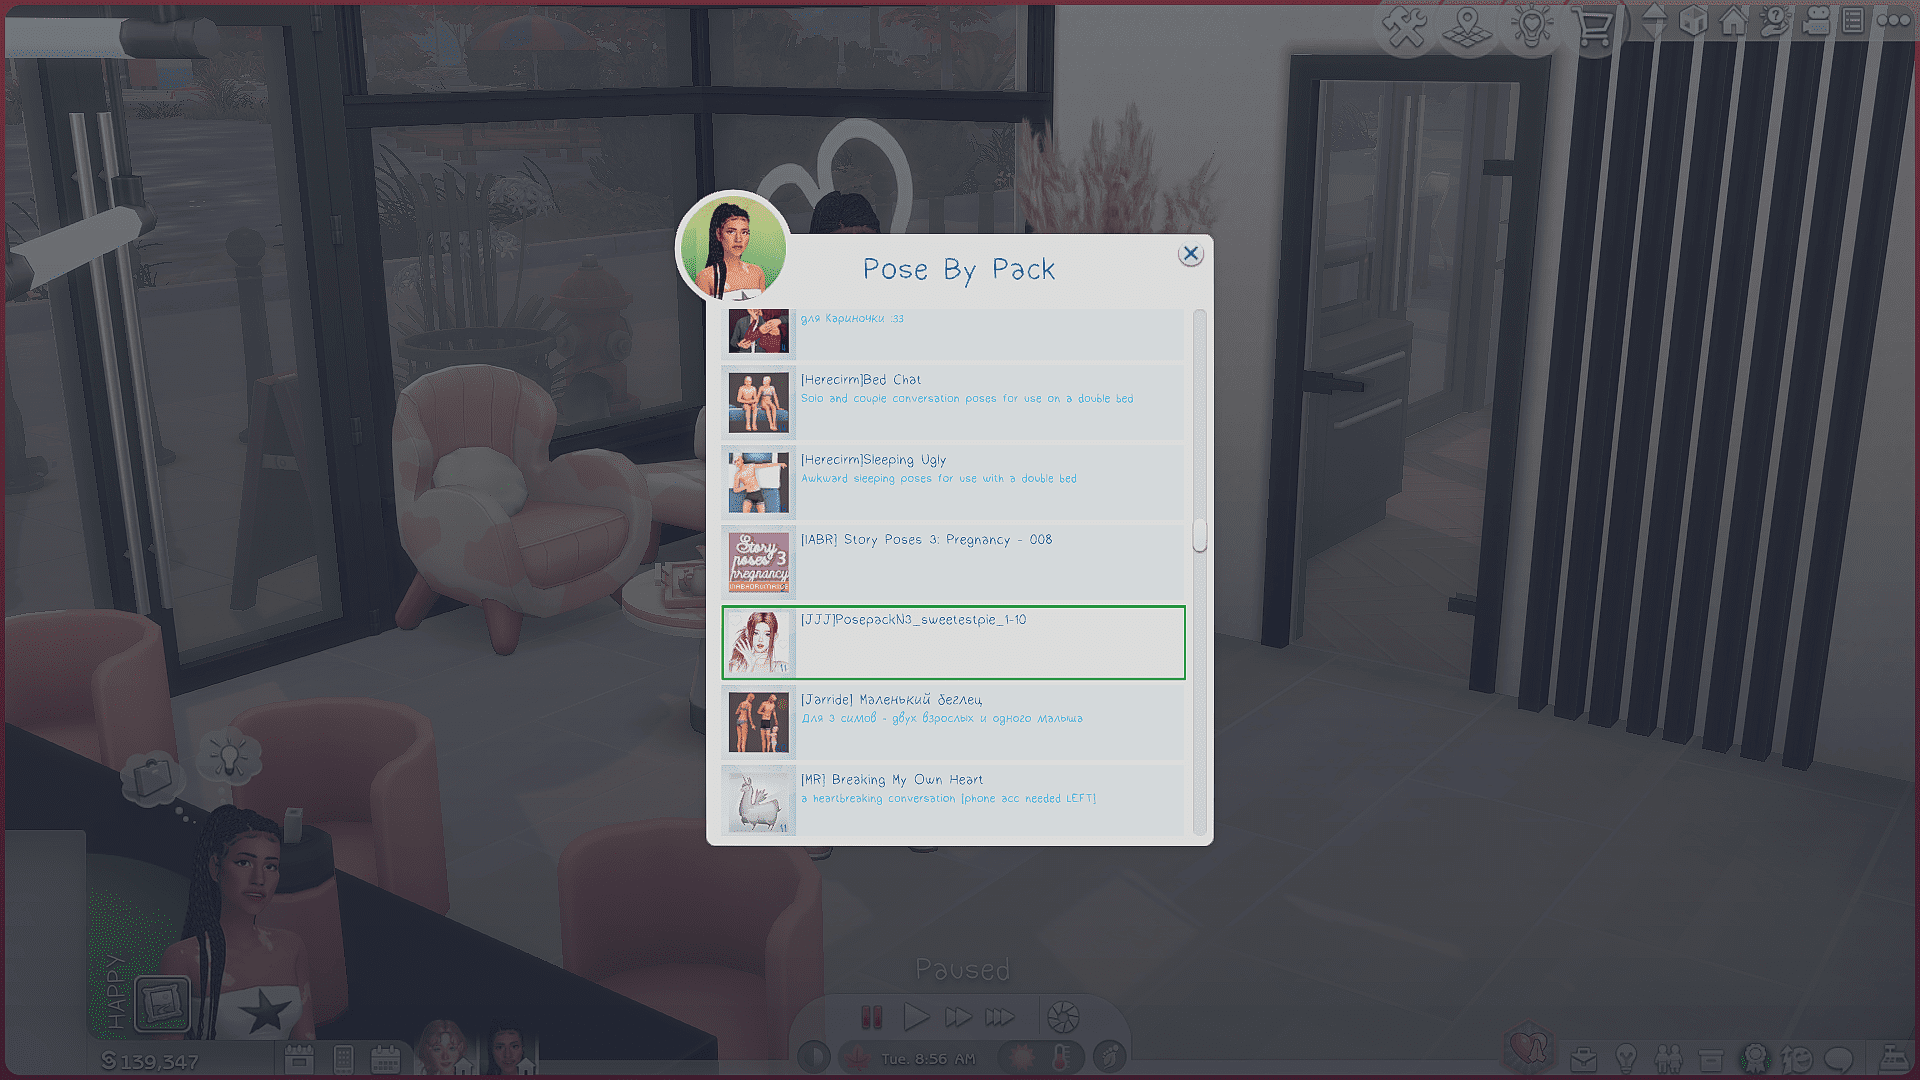
Pose Player also works with TwistedMexi’s pose search mod.
Choose the pack – Select the specific numbered pose
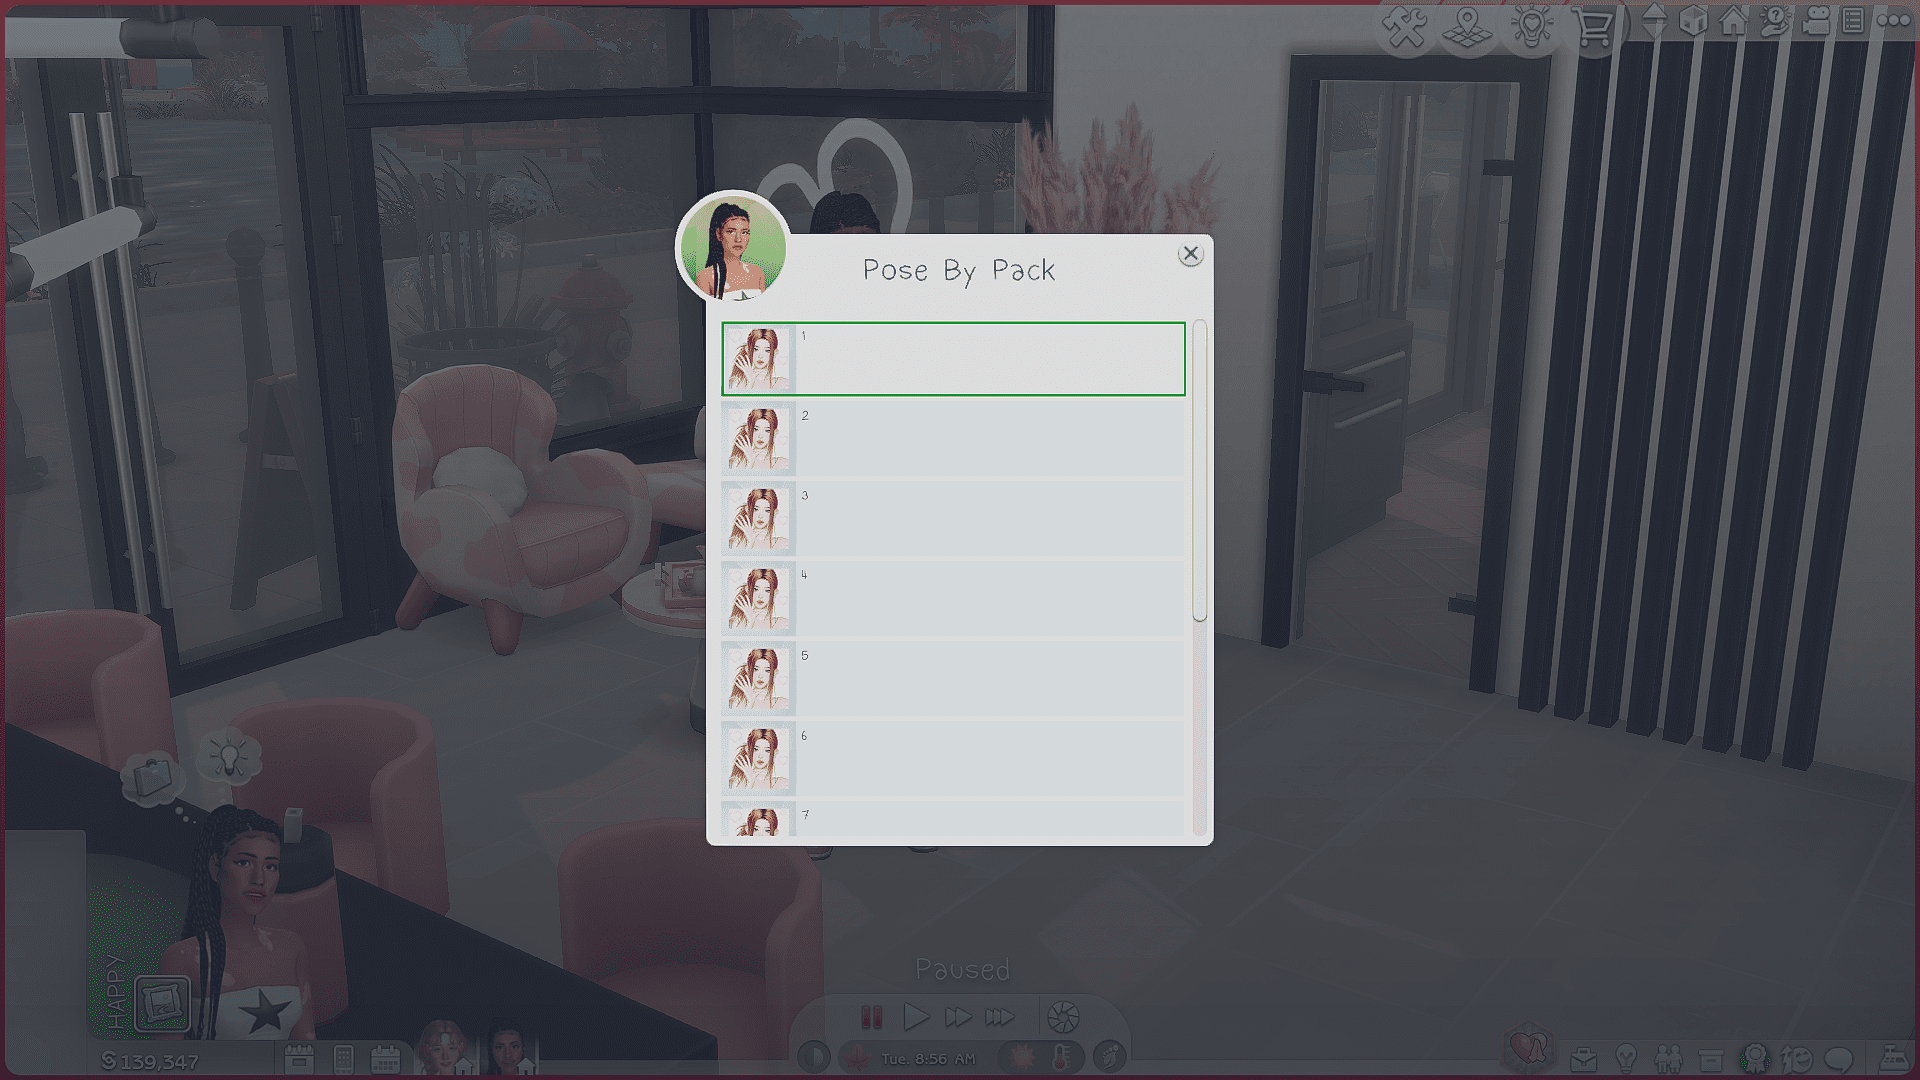
For multi-sim poses, pick the correct letter version (F, M, T, etc.) for each sim.
For large group shots, Pose Player can be annoying because it always opens with the full list of all your poses – you have to manually scroll to find the right pack every time. Wicked Whims remembers the last used pack, which speeds things up a lot.
With Pose Player, you can queue up several poses for each sim and switch between them by canceling actions in the action queue (lower left corner).
Pose Player works much better if you use it together with the TOOL mod. This helps offset the lack of positioning arrows.
With TOOL, you can move posed sims (including kids and pets) anywhere you want, and you can move them all at once.
If you need to shift the whole group a little to the right/left or closer to the camera:
Click the sim – TOOL – Active Sim – Hold Alt and drag with the mouse
Sims can move horizontally, vertically, rotate – the whole deal, but TOOL uses coordinates, so it takes a little practice.
You might also like...

Combination of Pose Player and Wicked Whims
Pose the parents with Wicked Whims and the kids/pets with Pose Player.You can even mix poses from different packs: then use Wicked Whims positioning to scoot everyone into place until the composition looks perfect.
This hybrid method gives you endless creative freedom.
A few tips for posing sims:
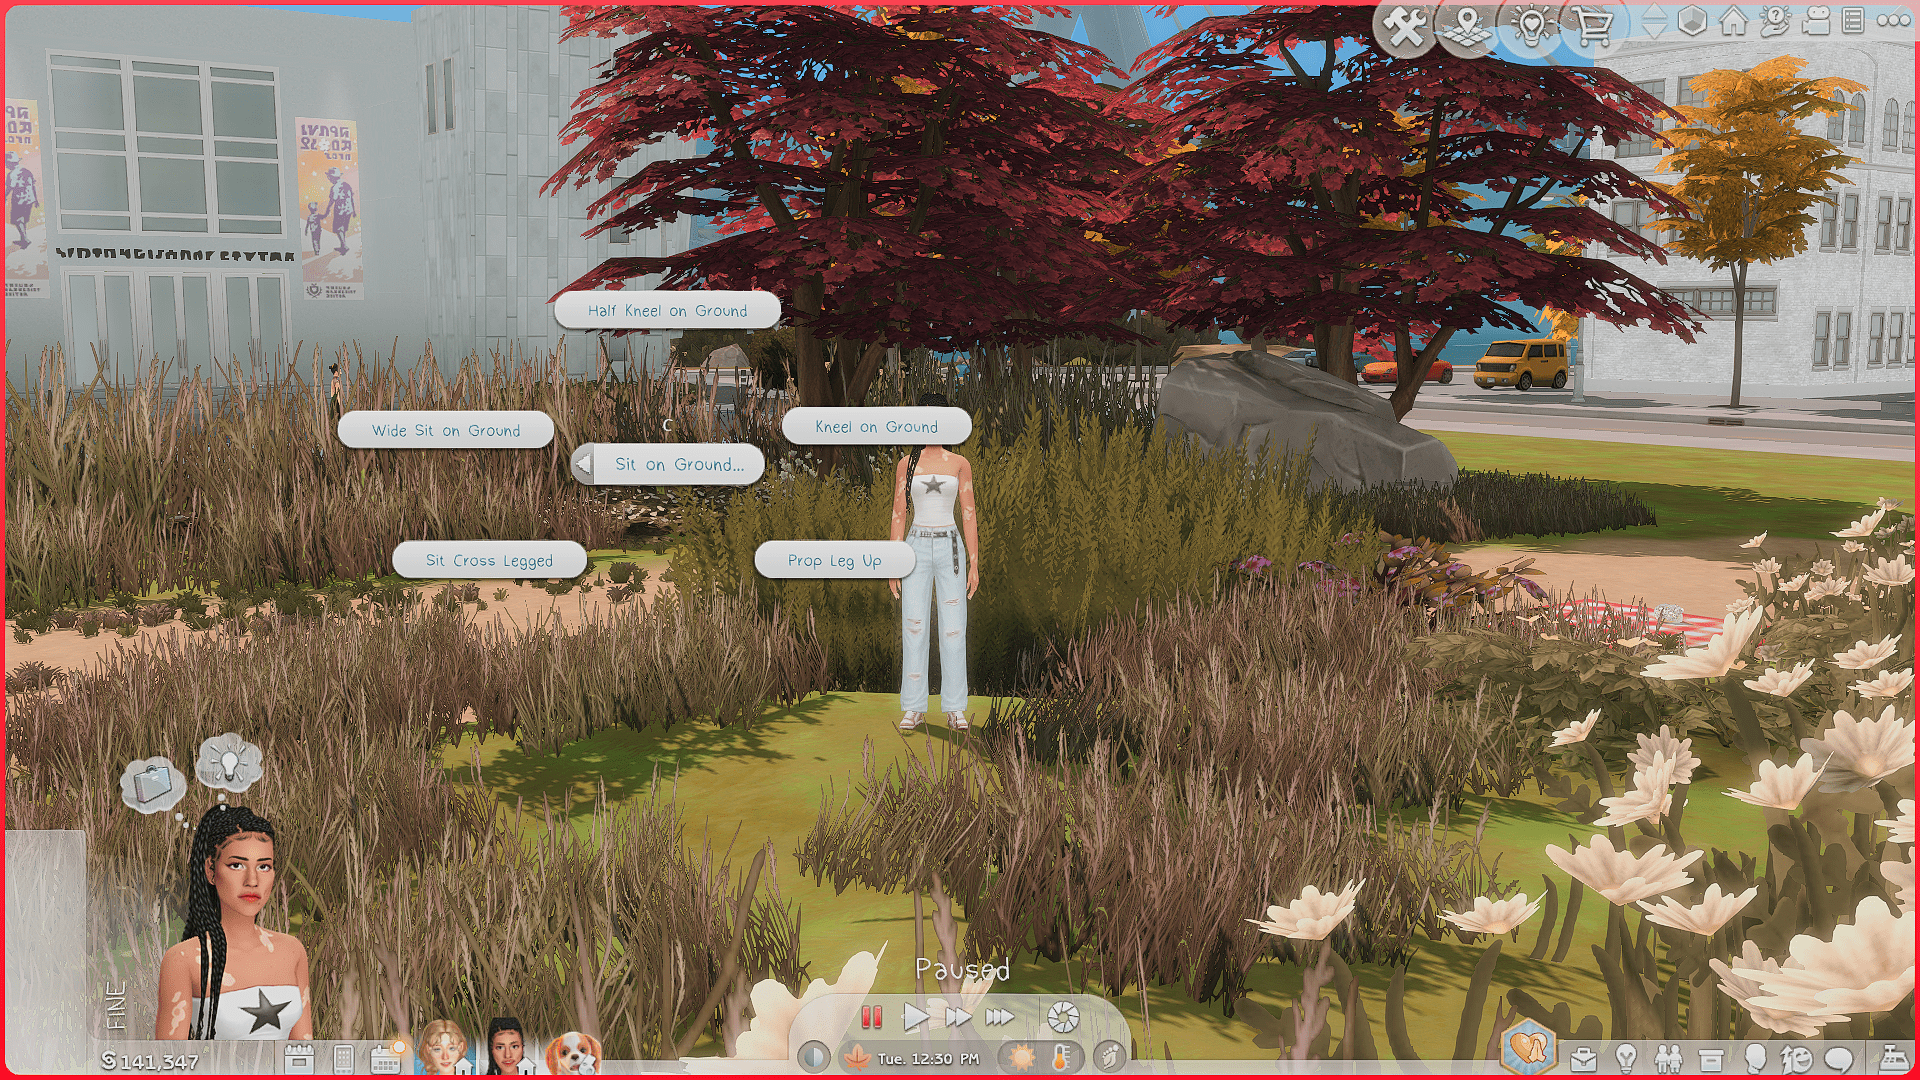
1. If your sim needs to be sitting in the pose, here’s a little life hack.First, click on a chair (or whatever surface they’ll sit on), select the “Sit” action, then open Wicked Whims’ pose menu and select the pose. Unpause the game, and the sim will sit exactly where you need them.
2. If you’re using a multi-sim pose where two or more sims are sitting or lying down together, the Knight Statue trick works best. Place the exact number of statues directly in the center of the furniture (like a couch or bed). Then teleport the sims to these statues and assign the poses as usual.

3. We already mentioned how important it is to teleport all sims to the exact same spot when using group poses. Here’s what happens if you skip this step :)
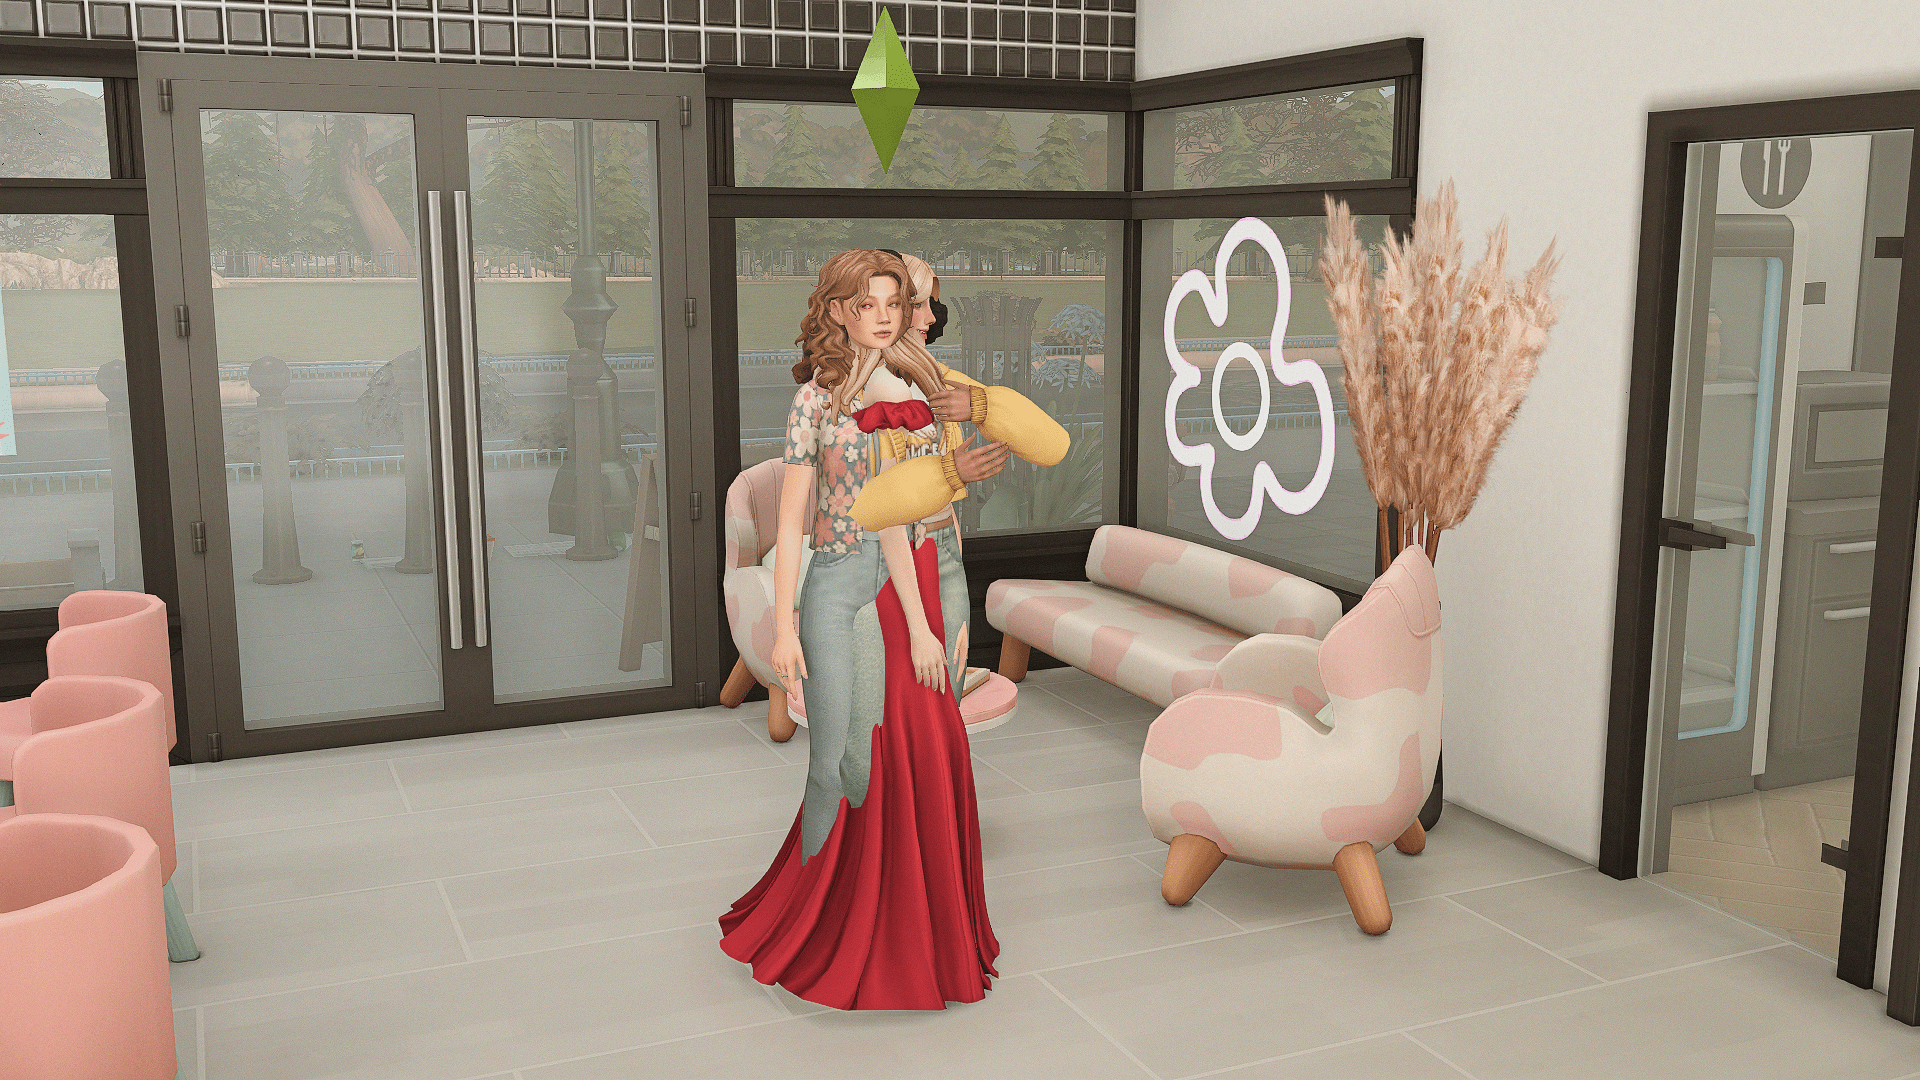
4. For a cleaner frame during the photoshoot, it’s logical to remove the plumbob. We explained exactly how to do this in a separate article – check it out if you need help.
Stage 8: Time of day and weather
It would look strange if a student rave happened right in the middle of the day. The time of day and weather should match the story you’re trying to tell.
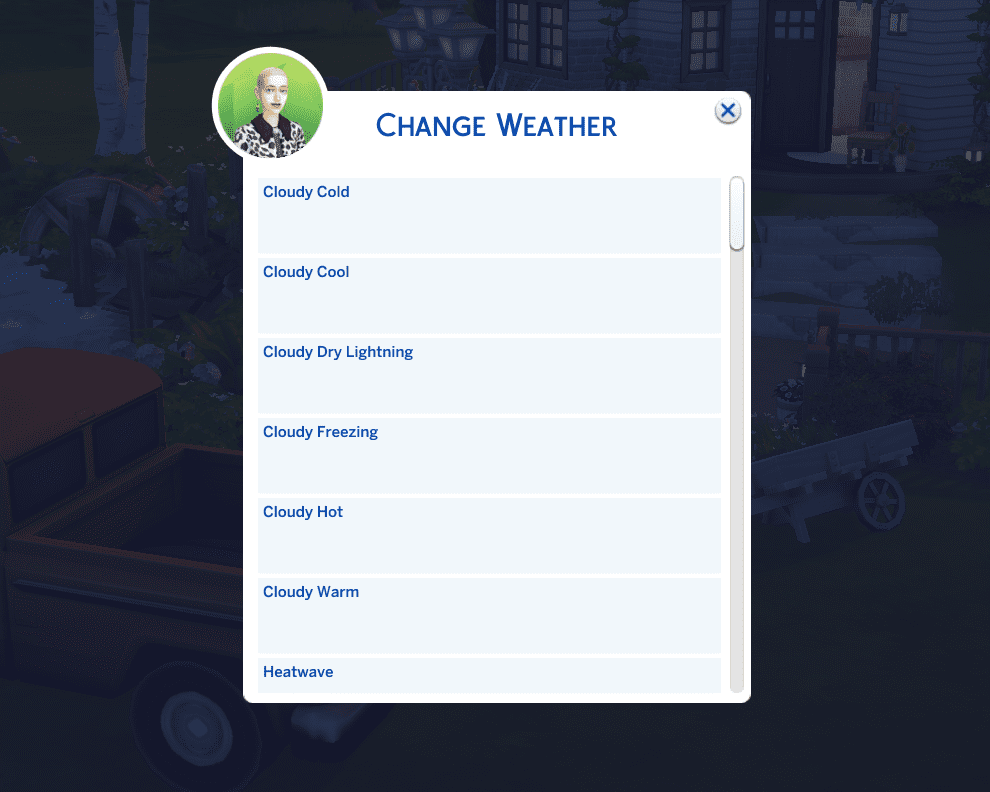
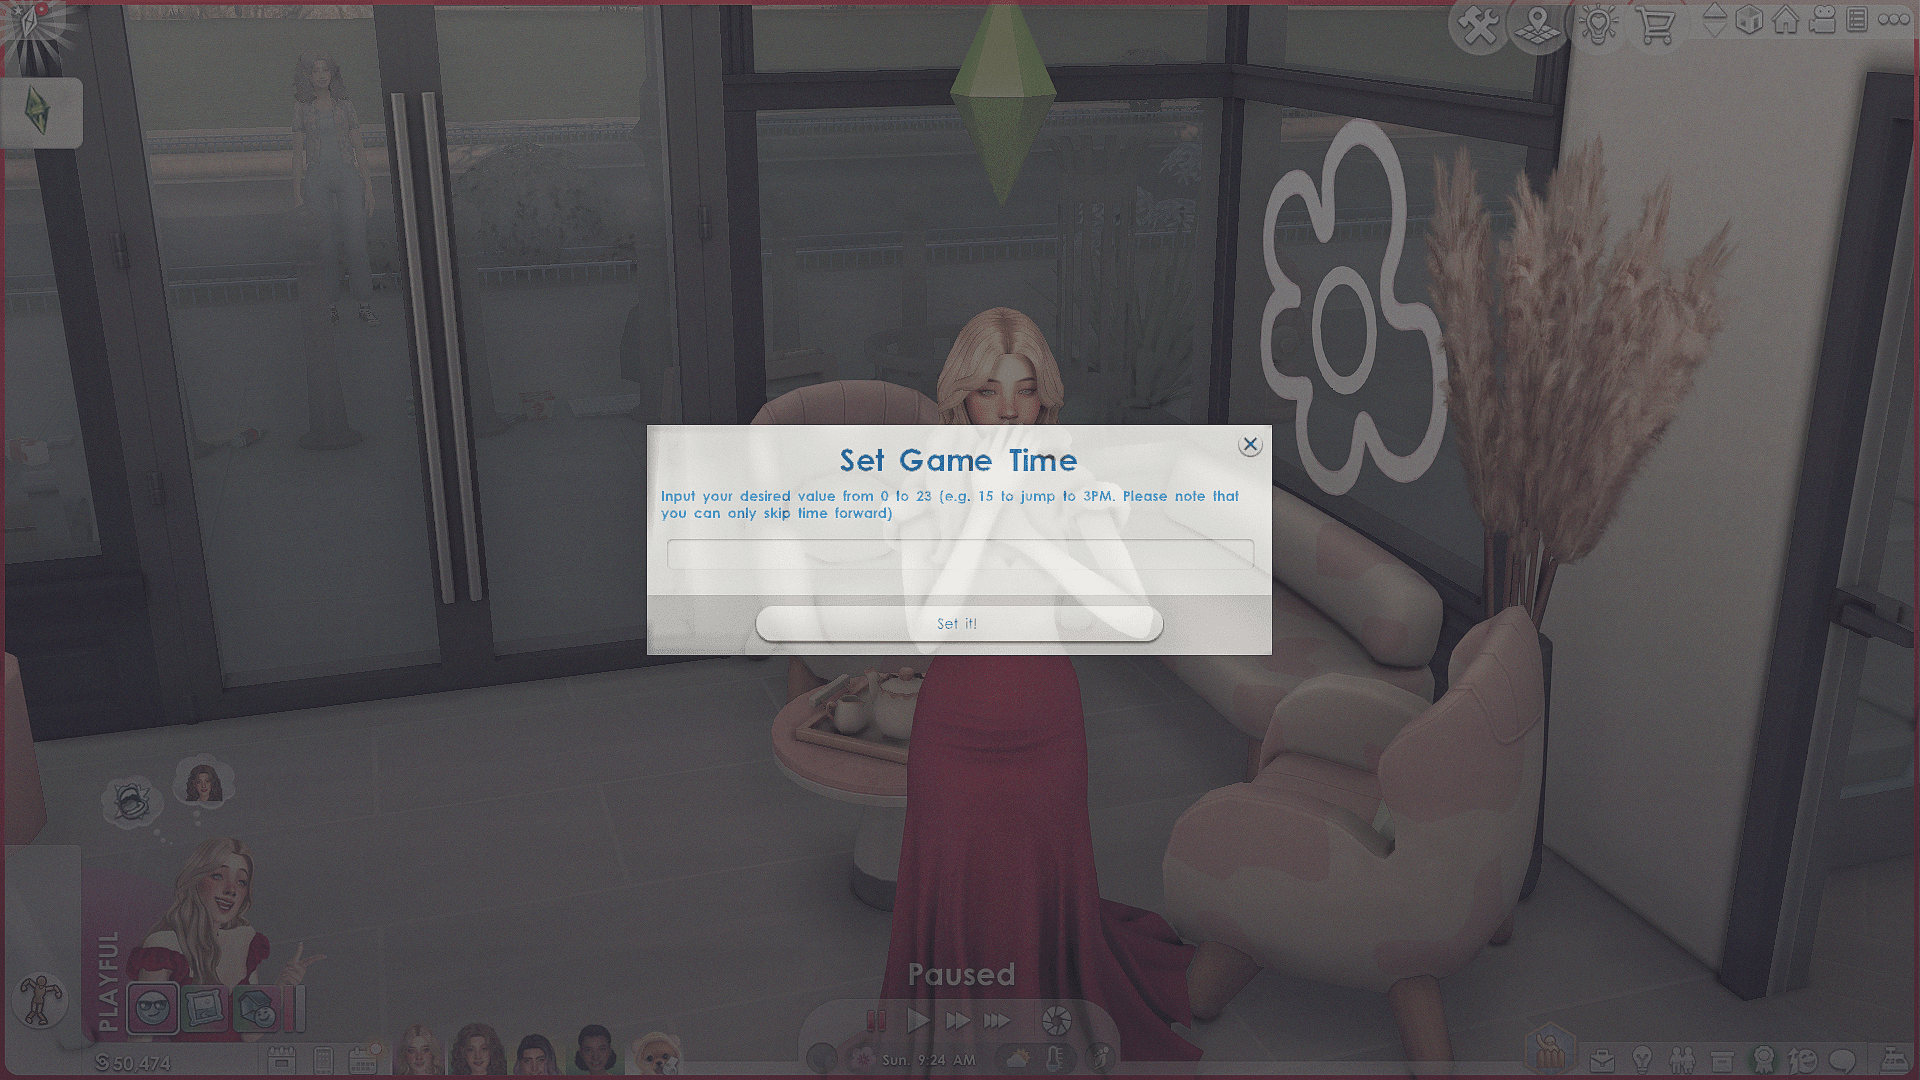
You can set the exact time using MCCC. Click on the mailbox and choose the desired time. You can do the same for the weather.
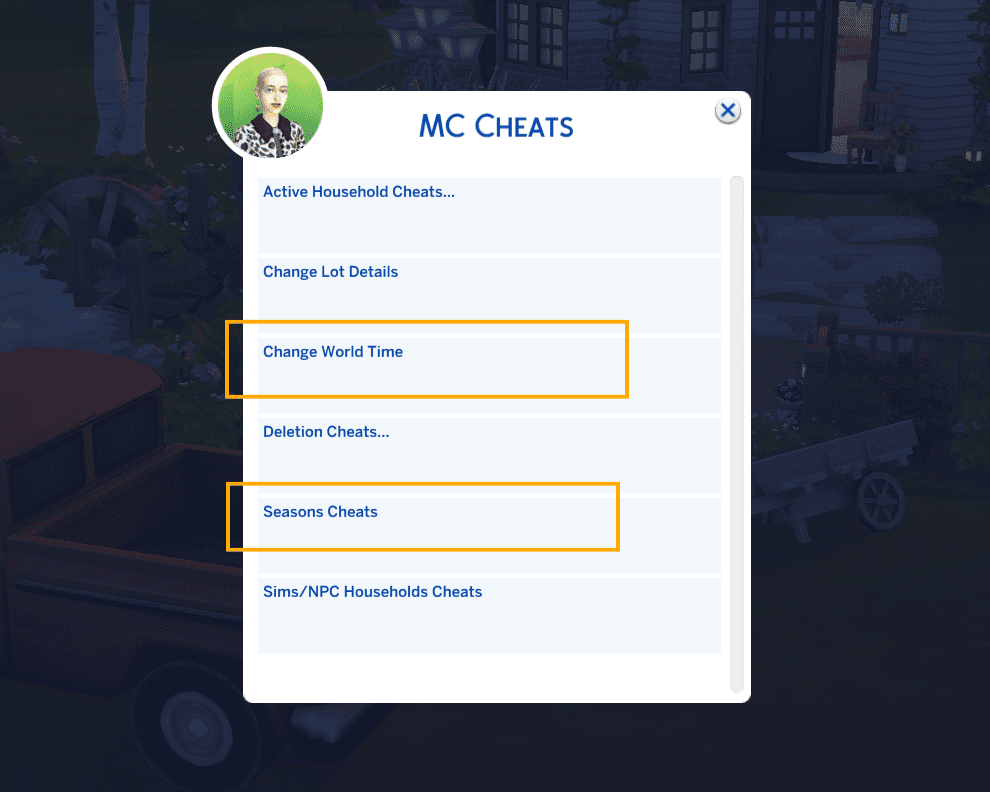
MC Cheats – Change world time
MC Cheats – Season cheats – Change weather
Or you can use UI Cheats by weerbesu: this mod allows you to simply click on the time or weather icons in the game’s interface and change them instantly.
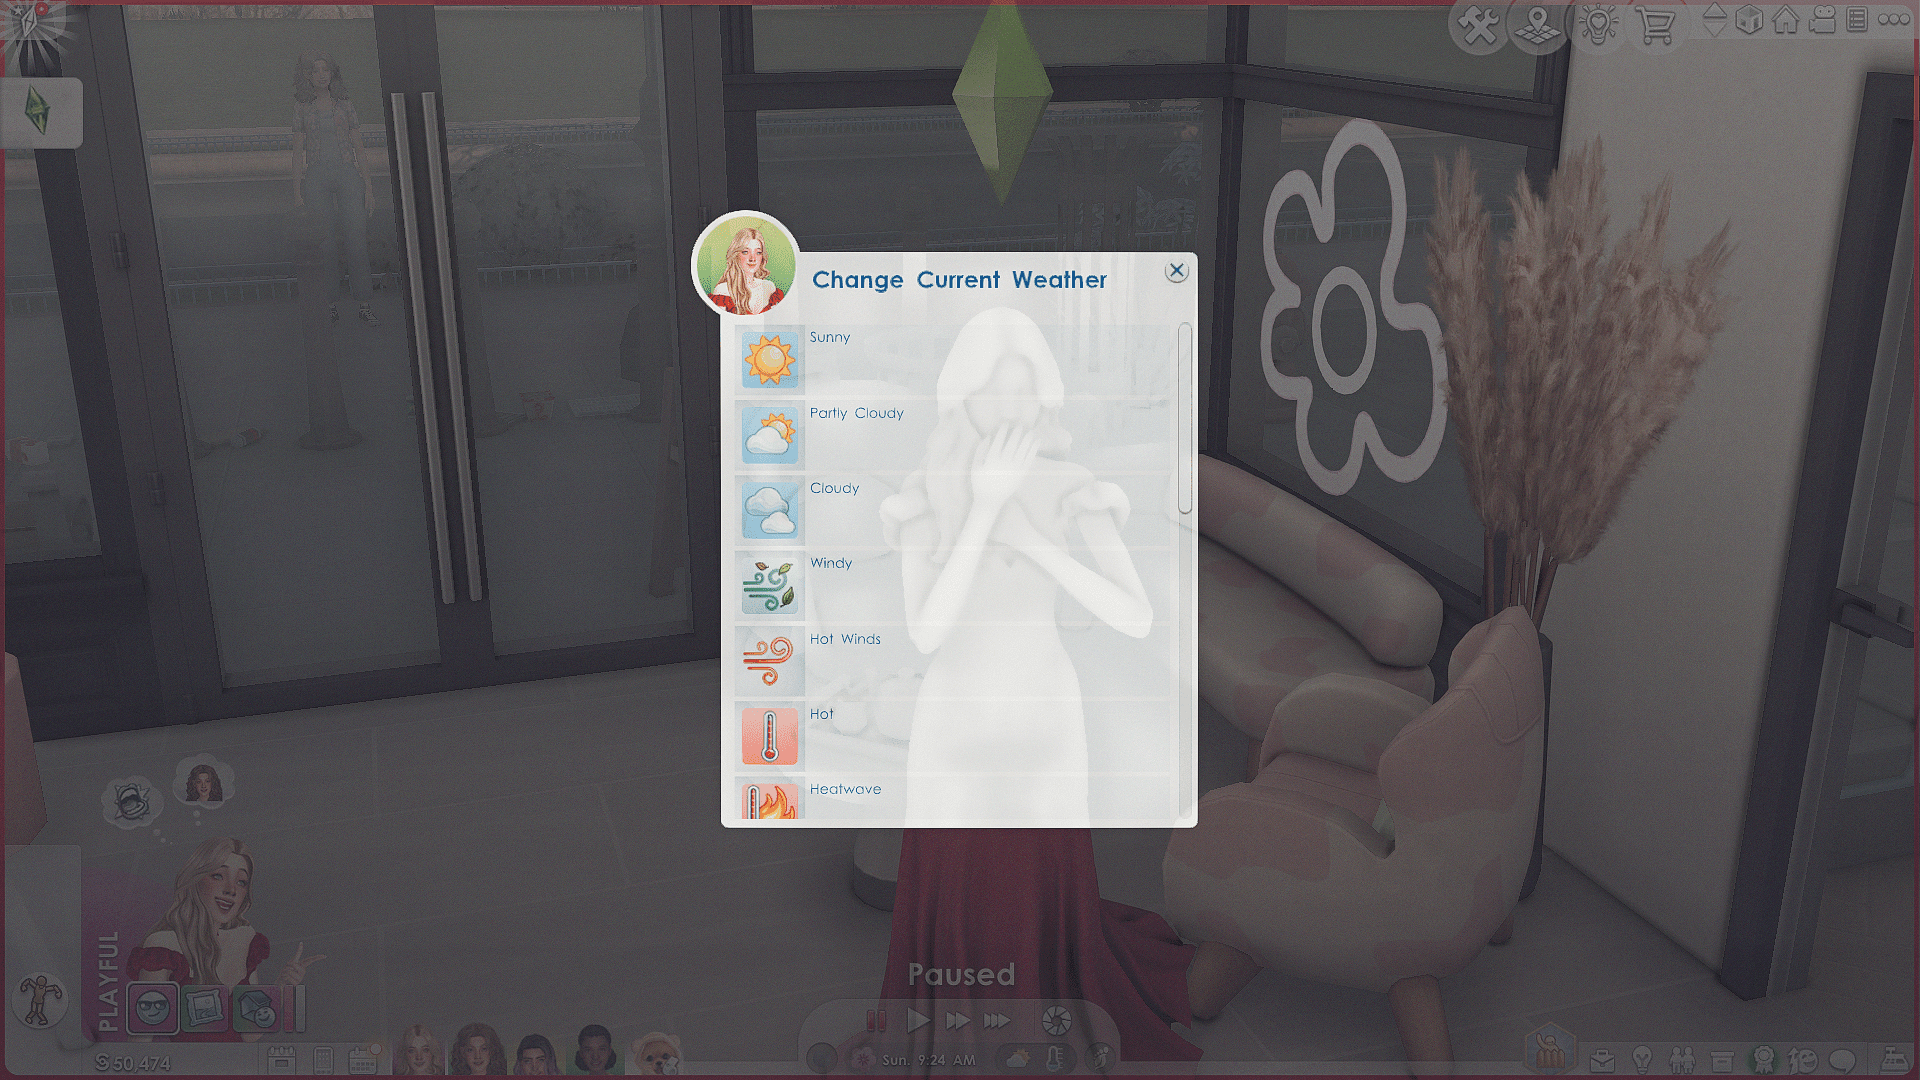
And don’t forget: when shooting outdoors, always turn your sims to face the sun (if the time of day allows). This will give you the best lighting and make your screenshots much prettier.
Stage 9: What to use for taking screenshots?
Again, there are several options, it all depends on your goals and the mods you use.
If you have GShade or ReShade enabled, then always take screenshots directly through GShade/ReShade. If you just press "C" in-game, you’ll get a plain screenshot without any of the beautiful filters applied. Obviously, we don’t want that.
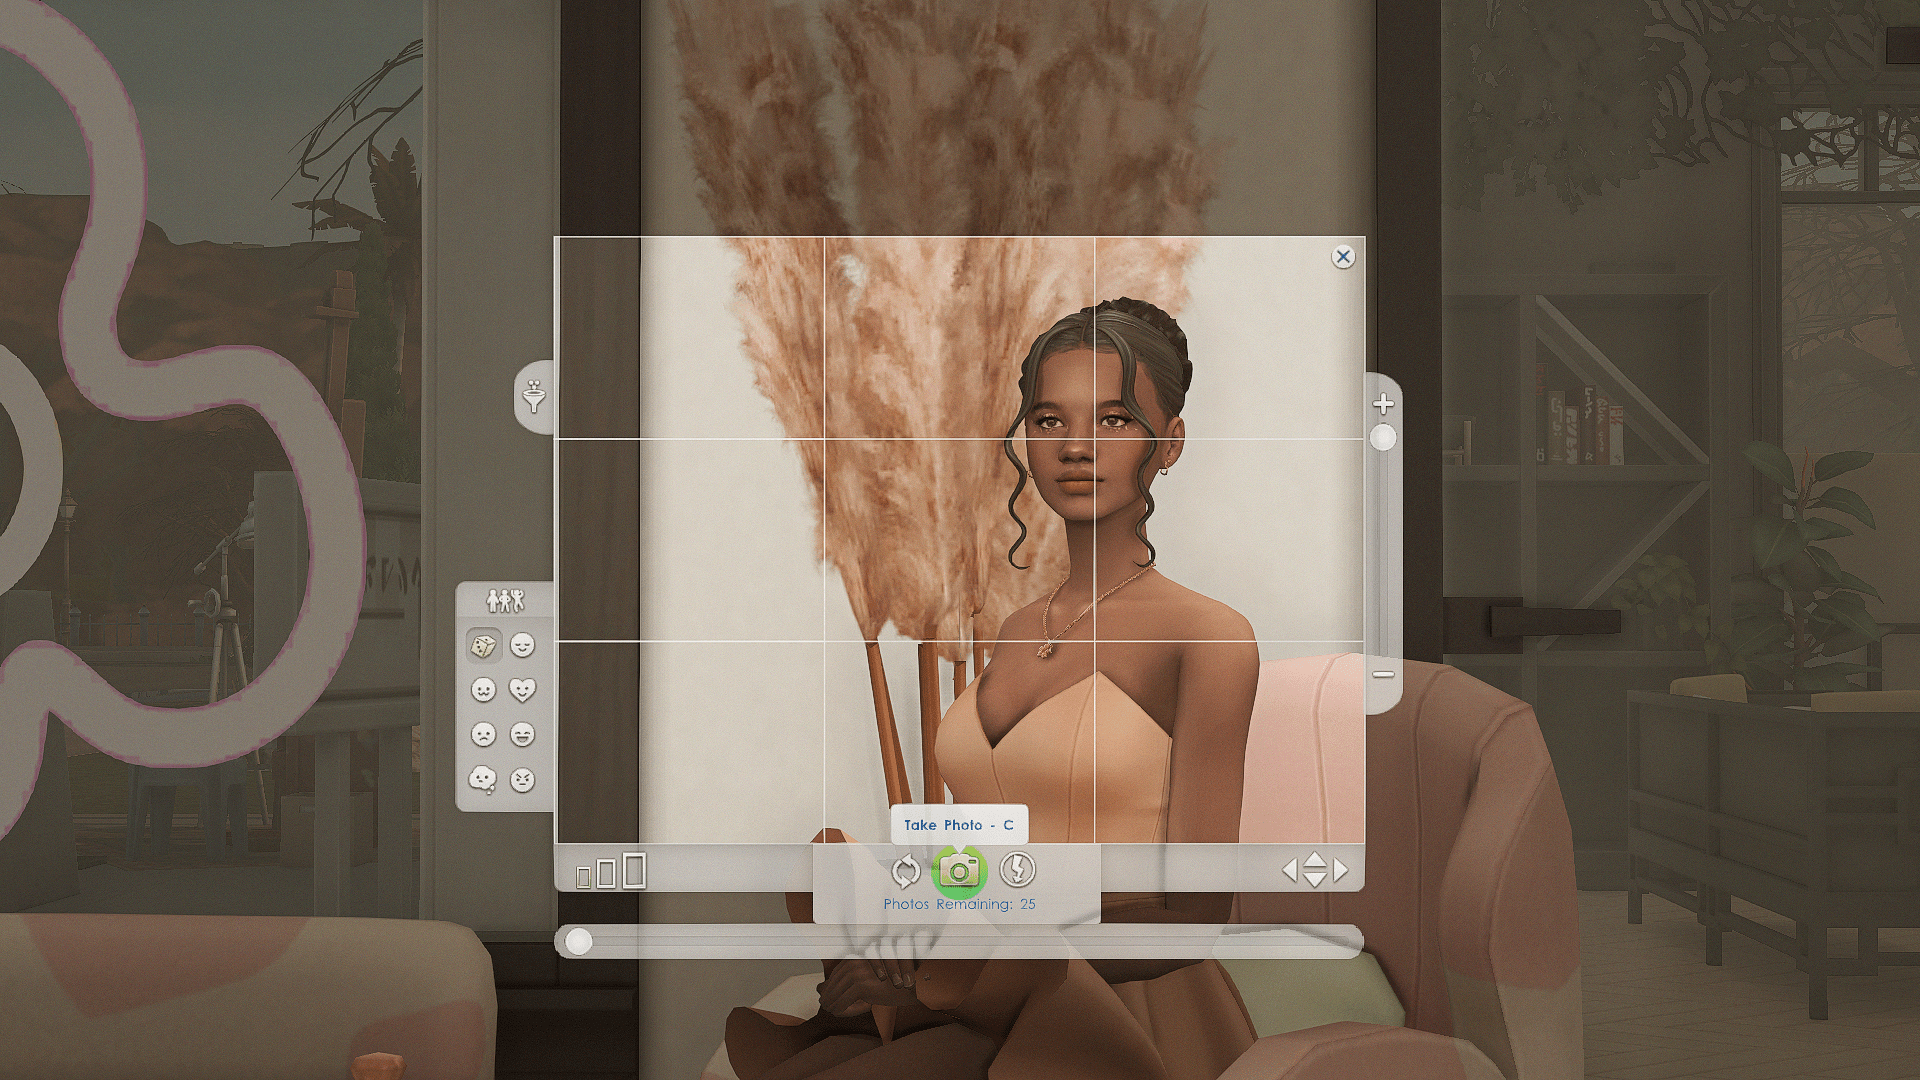
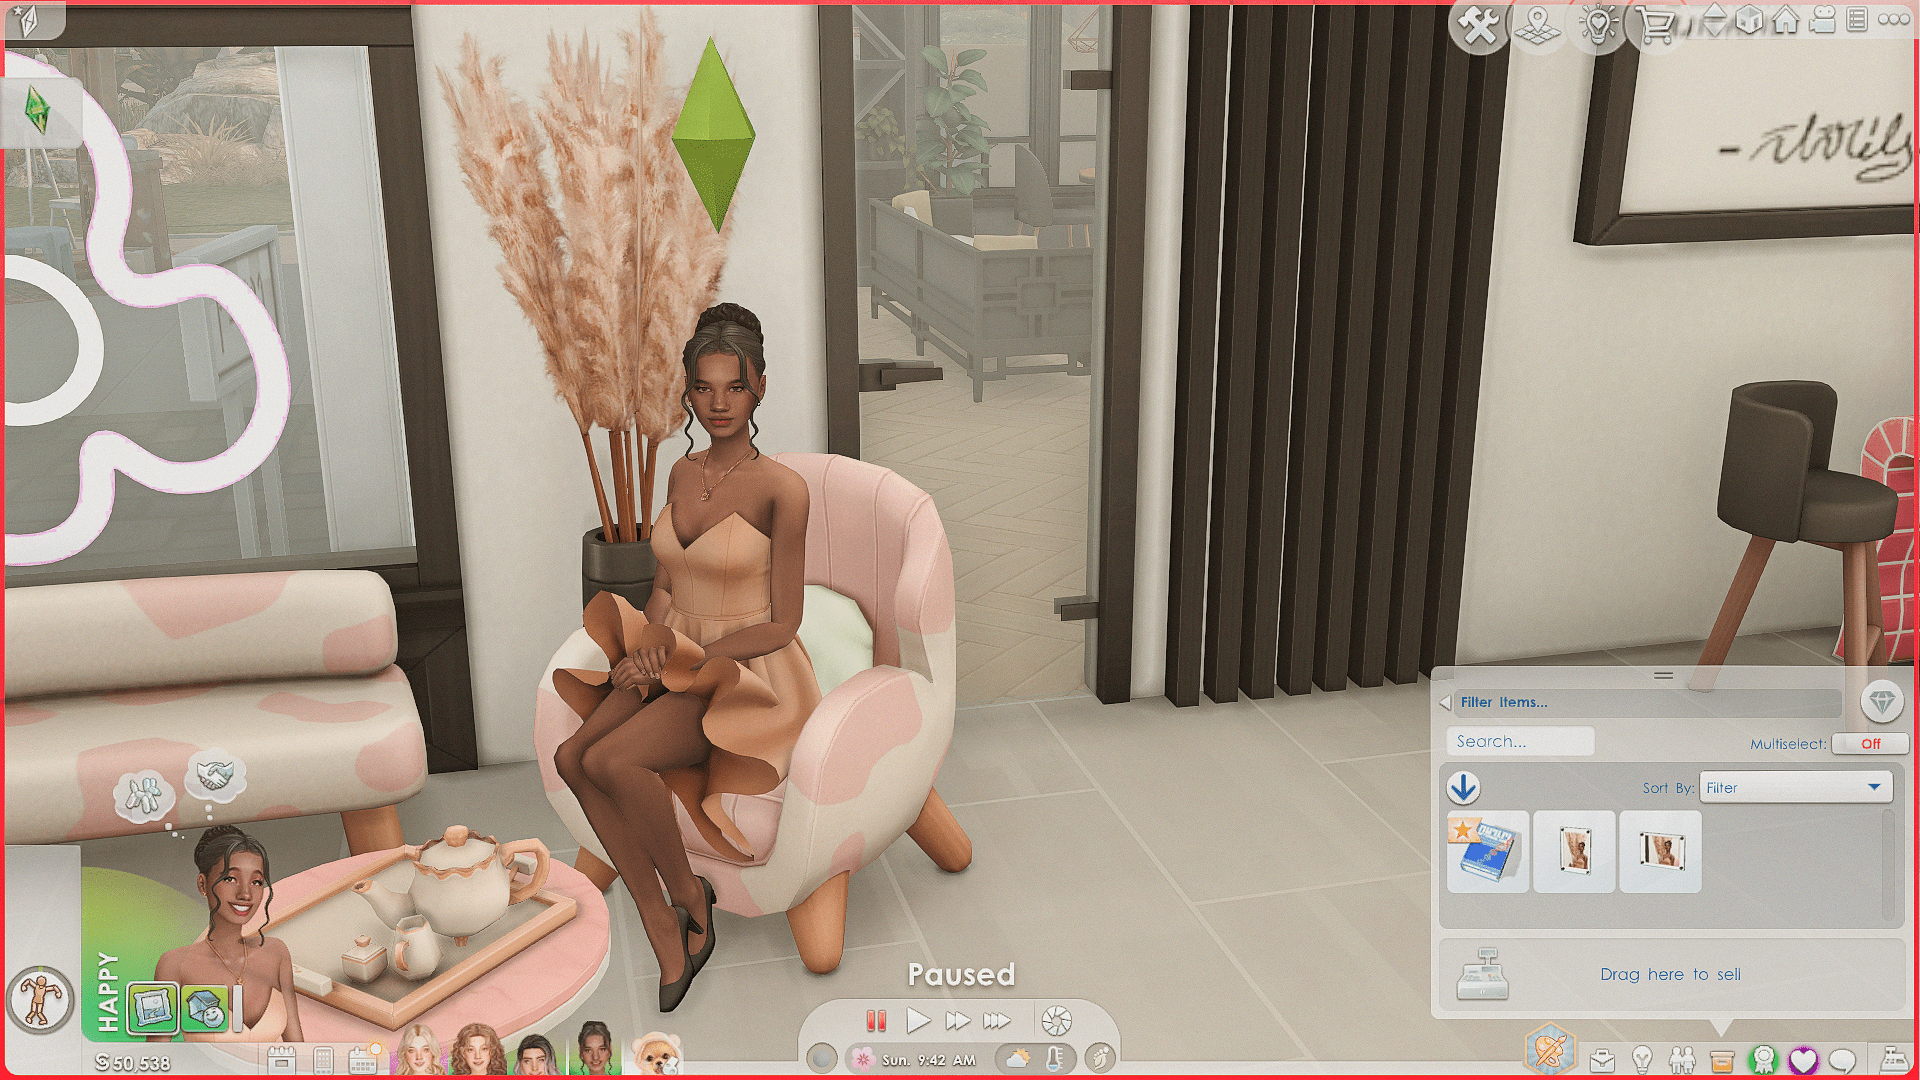
And second. If you want not only personal screenshots, but also in-game photos your sims can hang on the wall, gift to someone, or keep as memories, then you’ll have to work with the in-game camera.
In this case, we highly recommend downloading the ISO Love Photo’ camera by Ravasheen. This camera gives you much better control over framing, and your final photos will never have random gnomes or fingers sticking into the frame. Plus, they’ll always be high quality. Another bonus: unlike the regular in-game camera, this one lets you take up to 25 pictures at once!
After downloading, unzip the archive and place the files into your Mods folder.
Documents – Electronic Arts – The Sims 4 – Mods
In Build Mode, you can place the camera on any surface. You can also use your keyboard to adjust the camera’s height if necessary (9 – up, 0 – down).
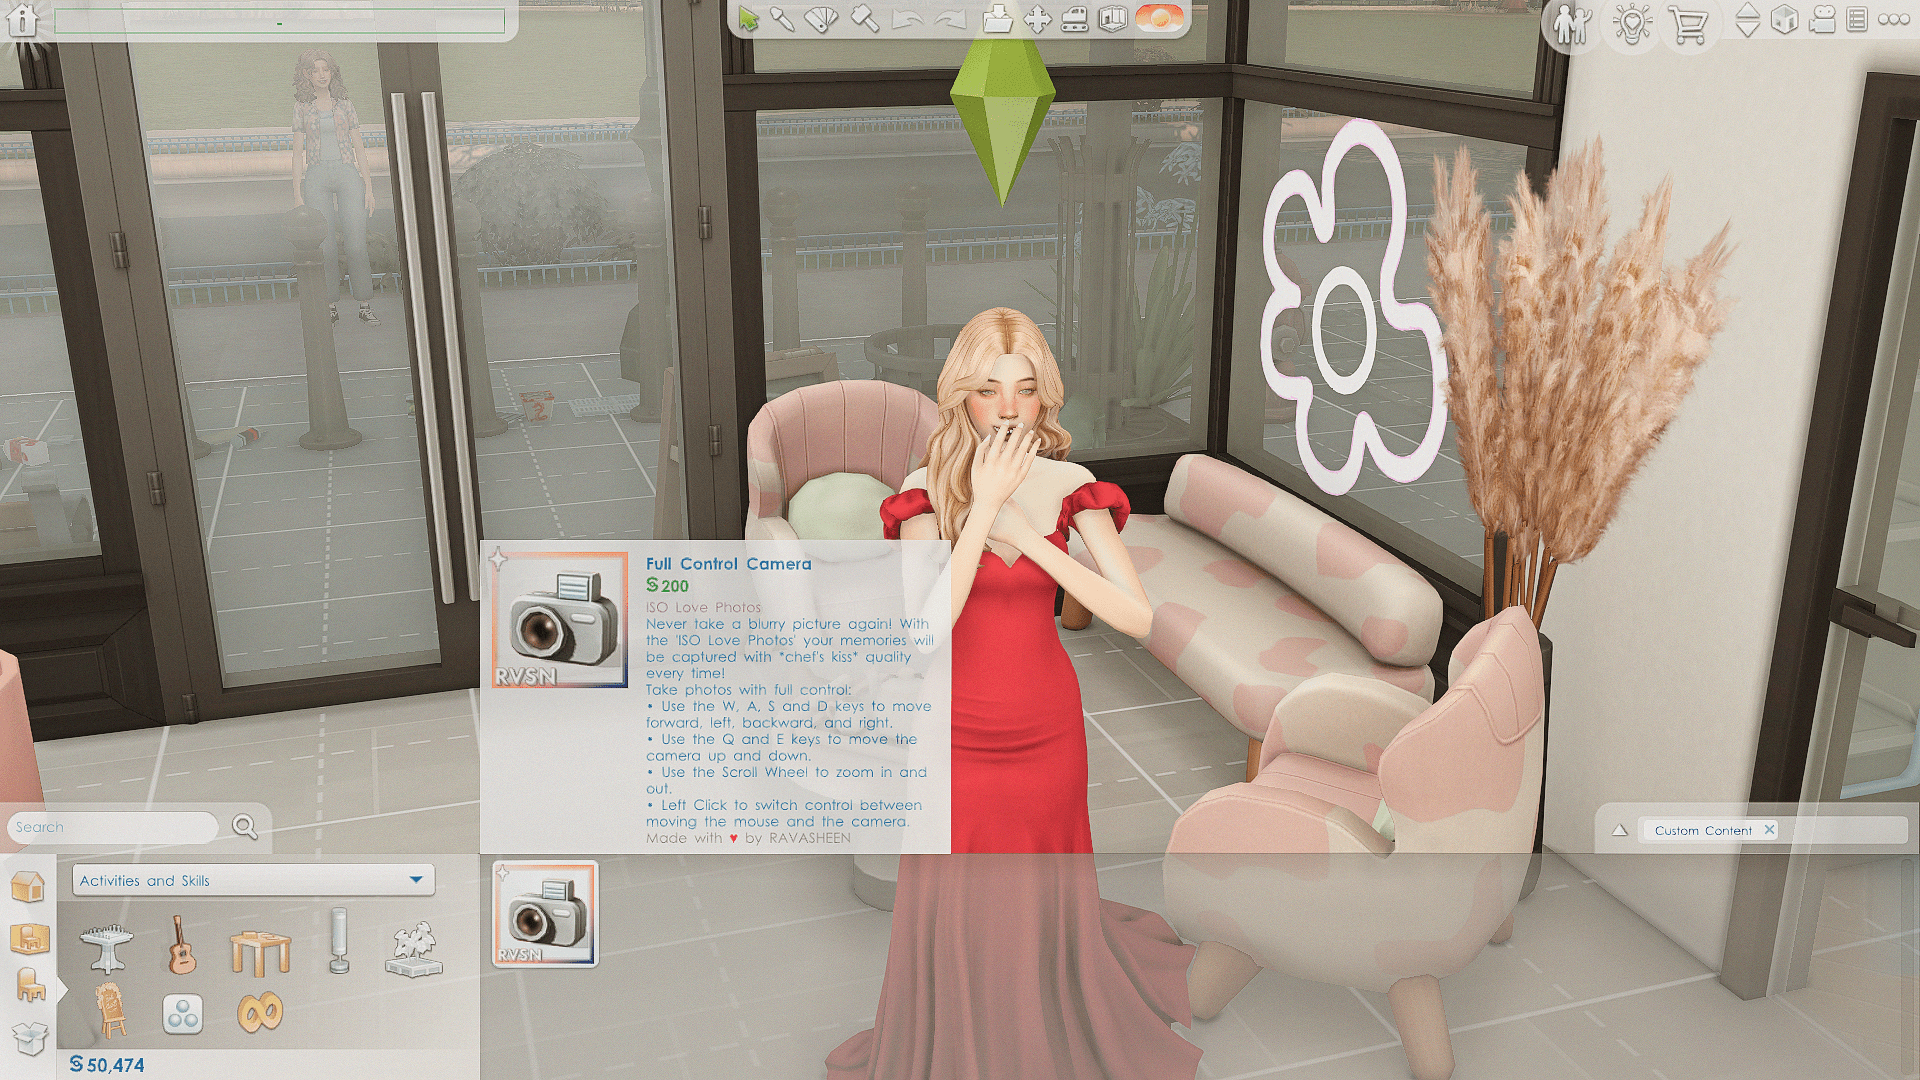
Photos taken with this camera will be saved both in the sim’s inventory (the one who took the pictures) and in the game’s regular screenshots folder on your computer.
Some general tips:
1. You don’t have to take pictures only "in the wild", you can build yourself a dedicated photo studio. For this, a professional green screen backdrop will come in handy (for example, check out the one by helgatisha).
2. One incredibly useful mod for photoshoots is Steady Sit & Seat Any Sim by amellce. With this mod, sims will stay put until you manually cancel their action.
There’s also a great sit on the floor mod by Mercuryfoam – perfect for casual picnic shots.
3. We already mentioned using clubs to gather sims and control their actions for group shots. This can be improved further by downloading Rex’s expanded club activities mod, which gives you more actions to assign to club gatherings.
4. Another great trick is installing default overrides for group animations. For example, replacing the default dance animations. That way, when all your sims start dancing, they’ll look much cooler and more stylish in the frame.
