Your sims world from scratch: How to create a blank save in The Sims 4
Inspired by Piixxa's amazing save file transformations on her streams, we've decided to write about a few ways to clear Sims cities of default decor and start your save from scratch. No matter what atmosphere you're trying to create or what era or universe your Sims live in, with a "cleaned" save file, nothing will stand in the way of your vision.
The information for this article was gathered from various sources, which will be listed in detail with the description of each method. We have also added a few important and useful nuances from our own perspective, which we believe will help you handle the creation of a base for future saving more easily.

Three methods will be described below, along with their advantages and disadvantages. Please study each of them carefully, especially the third one ;), to choose the one that is most optimal and understandable for you.
It is VERY IMPORTANT to make backups of all your saves, mods, and game worlds beforehand (we'll explain how to do this later). Do not risk your game progress.
The first two methods were shared by awingedllama in her Tumblr post.
Method 1
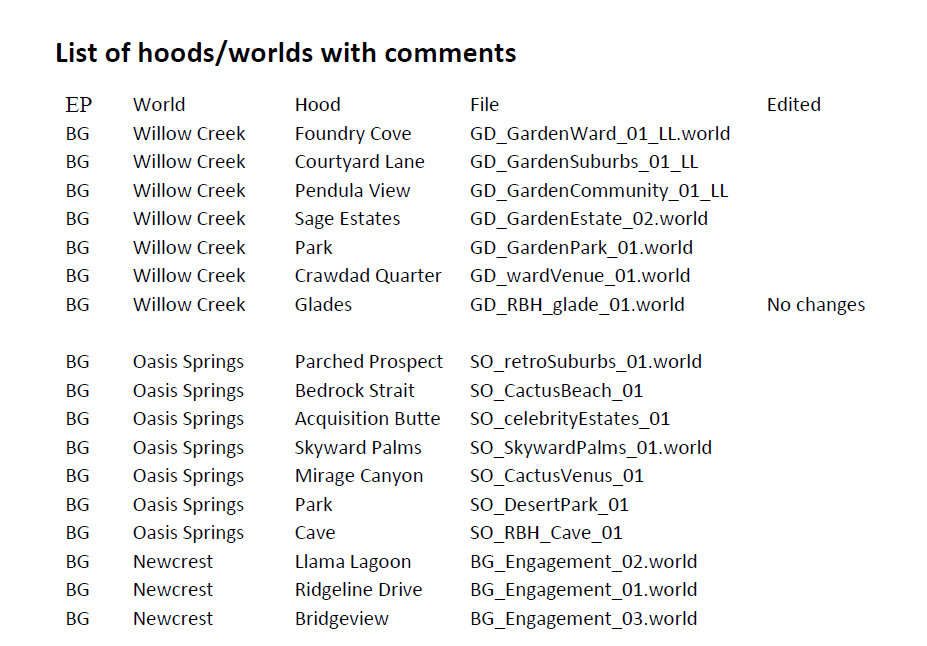
For this method, you will need Sims 4 Studio and .world files from the world you want to modify. You can find them in the root folder of the game, which was downloaded to your computer during installation (not the Documents folder that contains mods). If you need to change worlds from the base game, find them along this path:
The Sims 4 – Data – Shared – Worlds – Areas
For add-on worlds:
The Sims 4 – Delta – Specific EP/GP Folder – Worlds – Areas
To understand which of these folders contains the desired city, you can use this table.
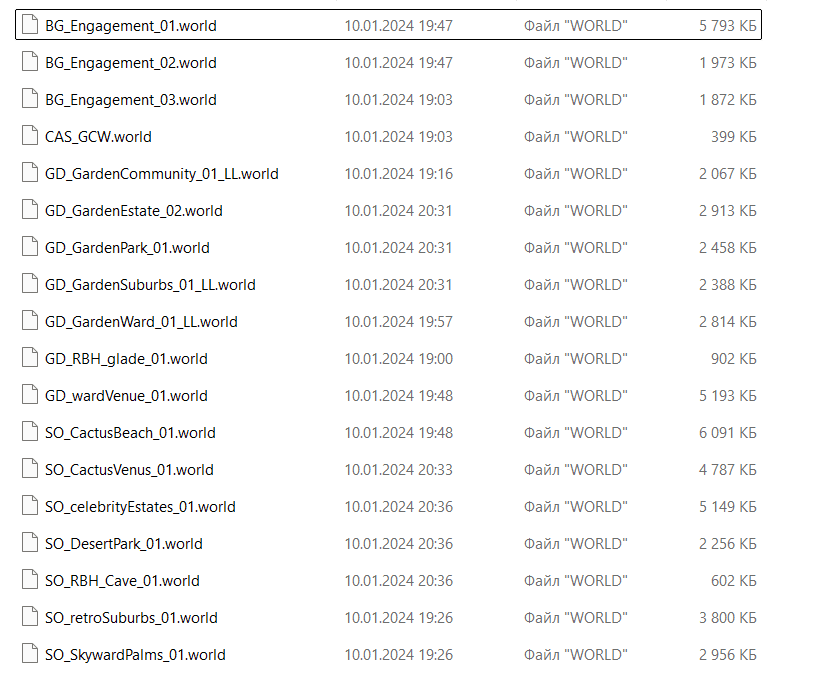
1. First, you need to copy the .world files you want to modify into a separate folder. Name it something like "world studio".
2. Open Sims 4 Studio and start a new project.
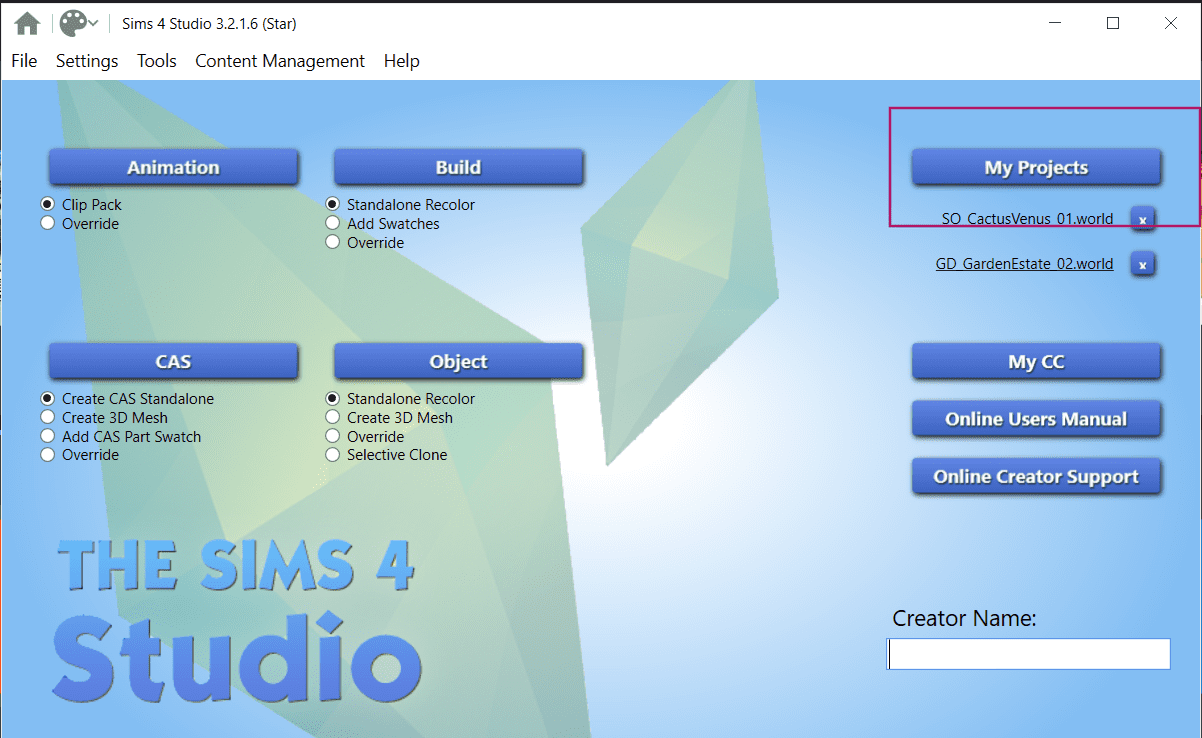
3. In the opened window, select one of the .world files you copied to the new folder and wish to modify.
4. In the list of components, you can delete decor objects from elements called World Object Data and World Data. Let's start with World Object Data. Click "Edit items".

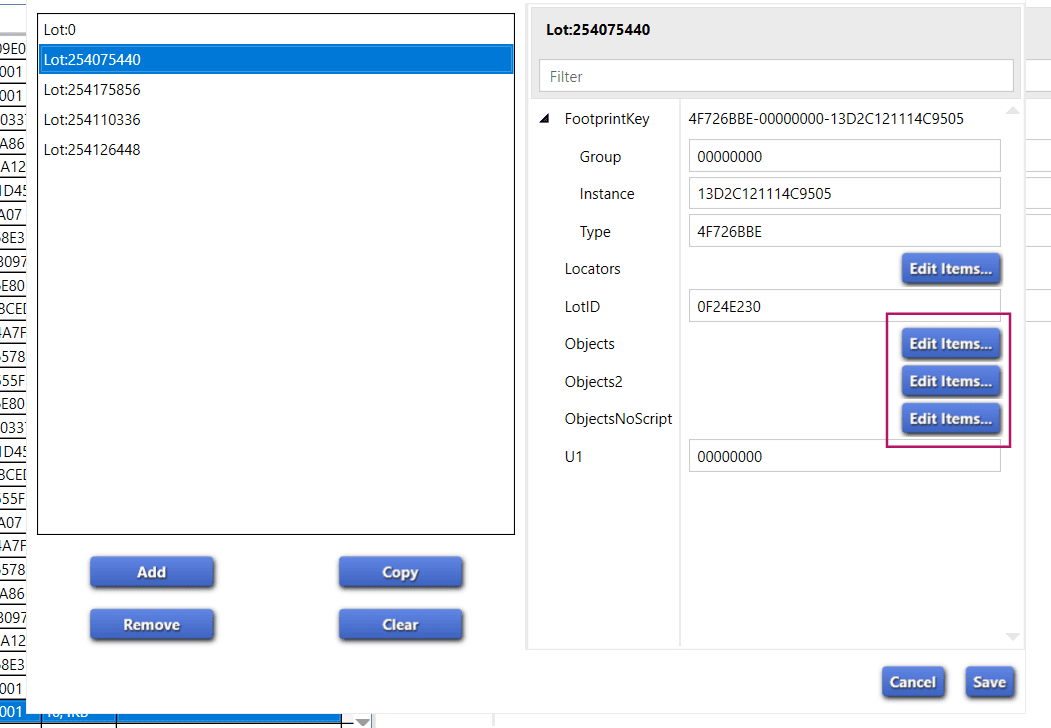
5. If you want to completely clear the world, remove objects by entire Lots, which you can see below in the screenshot, by clicking the "Delete" button beneath them. If you want to delete only specific decor elements, click "Edit items" in the right menu. Using the names as a guide, select the necessary elements and click "Delete" below the list. Click "Save" in the lower right corner.
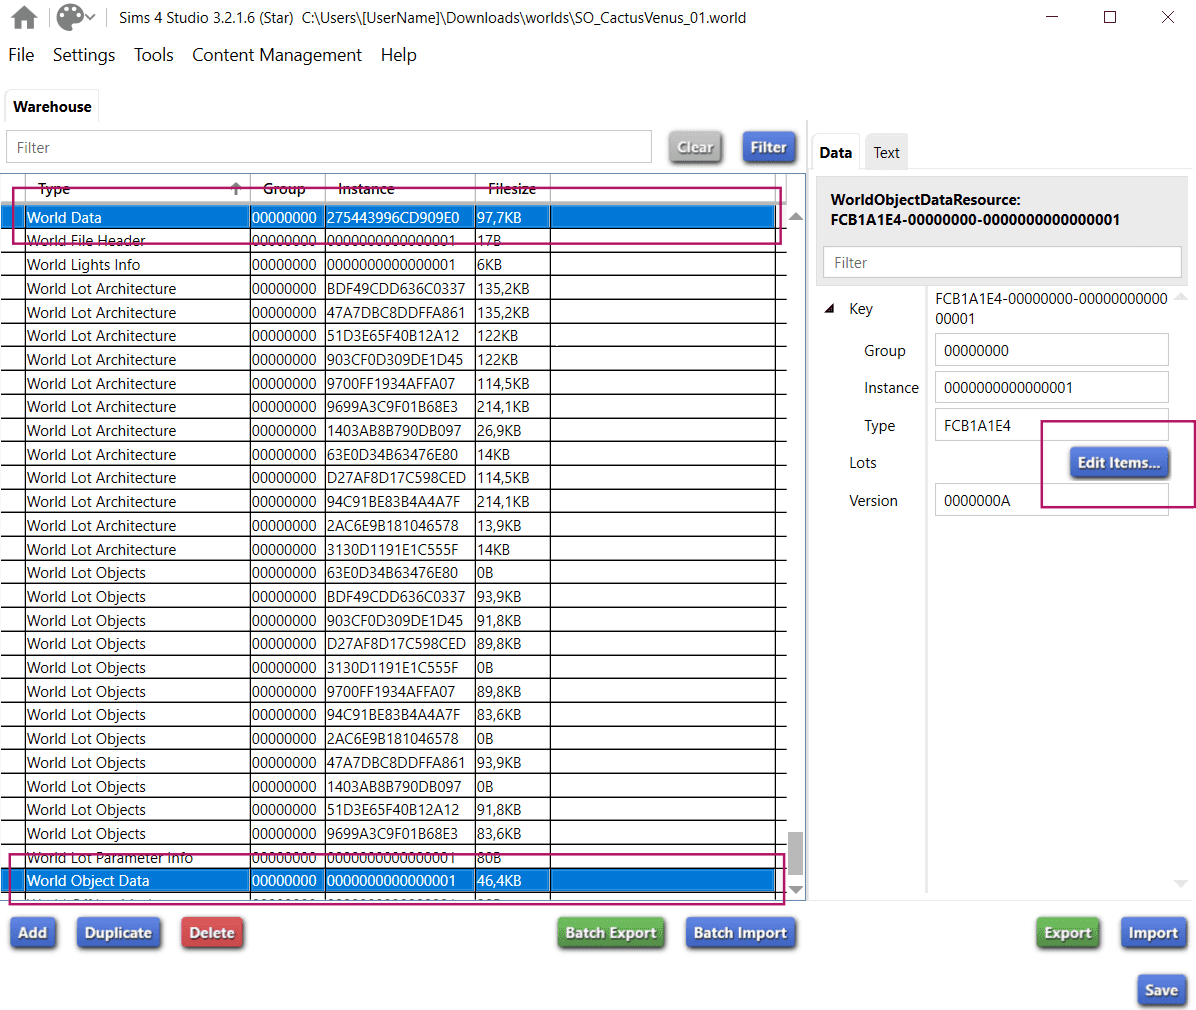
6. More objects for deletion are found in World Data. In the initial list, select World Data and click "Edit items" on the right.
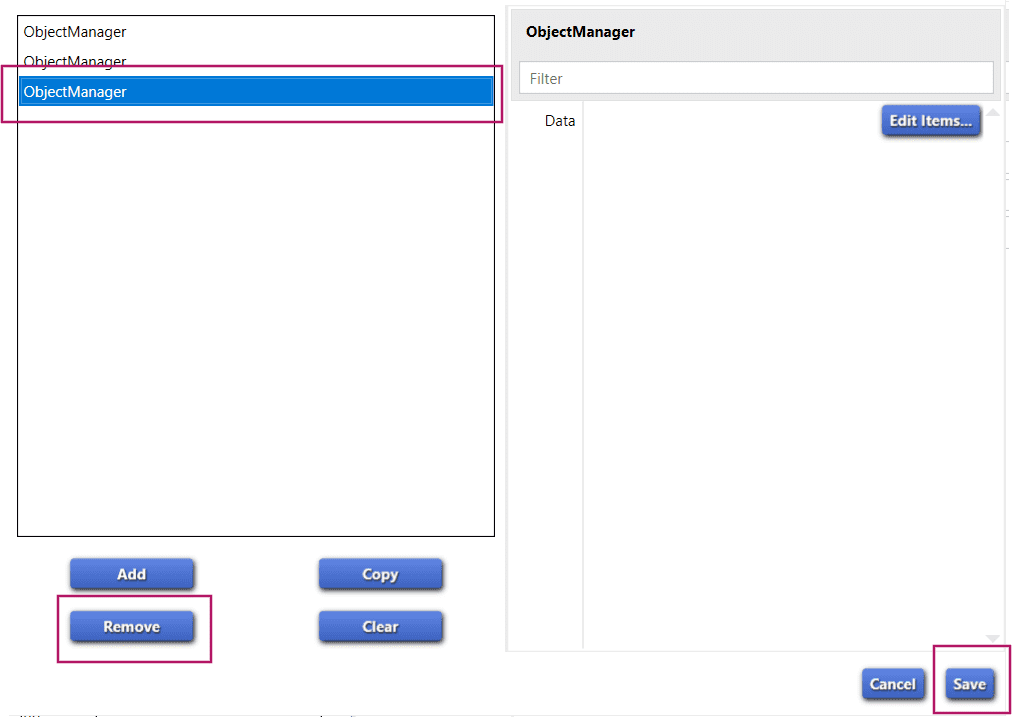
7. If you want to completely clear the world, you need to select the lower ObjectManager and delete it.
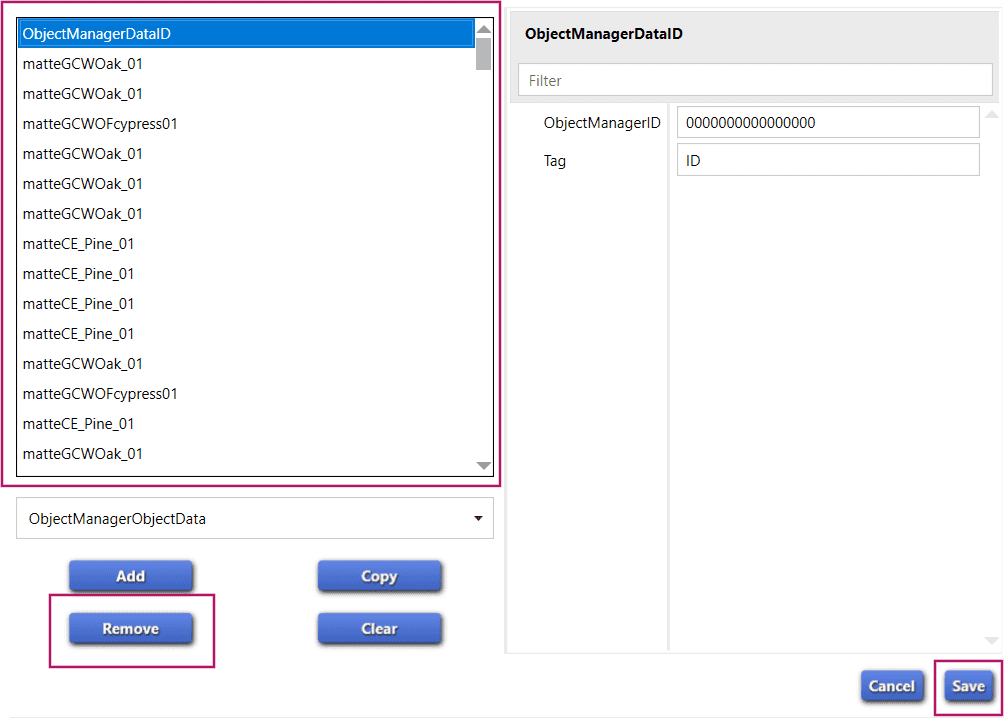
8. If you want to delete only certain decor elements, click "Edit items" in the right menu. Using the names as a guide, select the necessary ones and click "Delete" under the list. Click "Save" in the lower right corner.
9. Close the window, save all changes to the .world file, and close the studio. Then simply replace the original .world files in the root folder of the game, from which they were originally copied, with your edited versions.
The advantage of this method is that it's simple, fast, and you can decide for yourself which objects are not needed in your world.
The downside is that with each game update, you will have to replace the files every time, repeating the same operation.
Method 2
This method is more complex and time-consuming, but it's permanent, and game updates will no longer affect your modified worlds. In this case, we need to make the game's objects invisible and non-interactive. For this, we will again use Sims 4 Studio and the instructions found here.
1. To remove decor and background houses, open Sims 4 Studio.
2. Then under "Object" select "Override" and click on "Object".
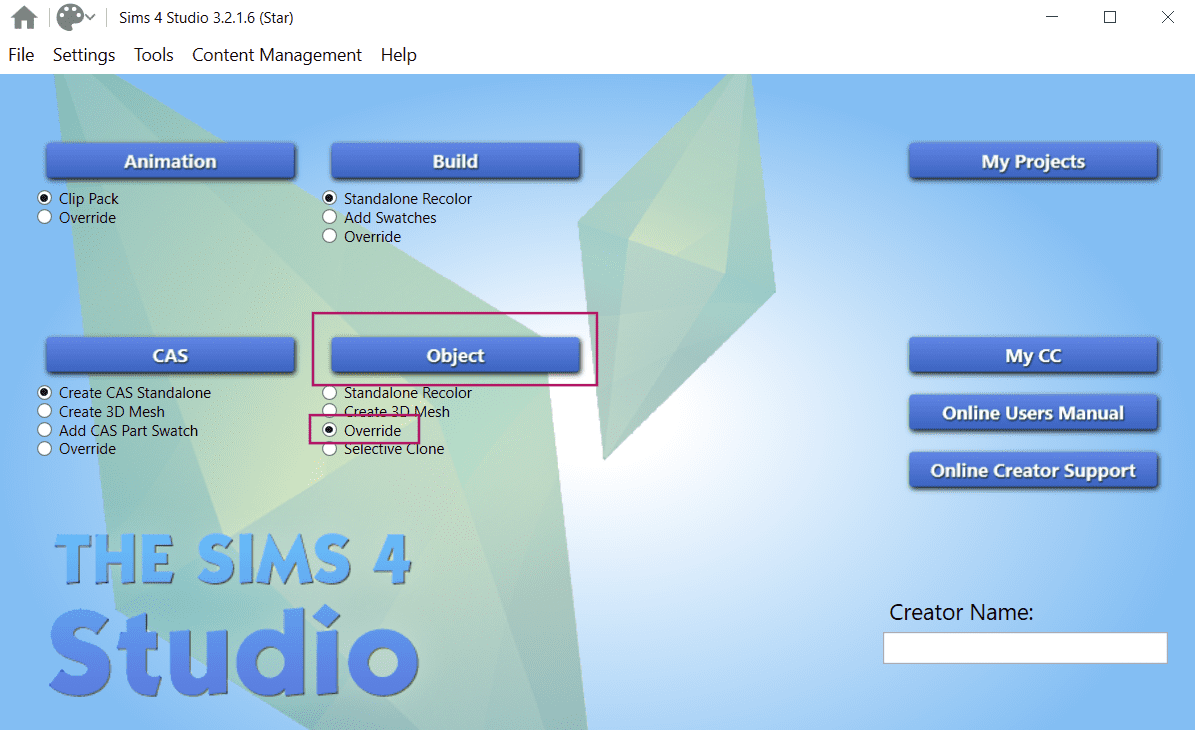
3. Check the box "Show Debug Items." Using the filters, you can select from which game pack you want to remove decor. Let's start with the base game.
4. To remove background houses, type "arch" in the search bar; to remove trees, type "tree". The other elements can be found by reviewing the entire list.
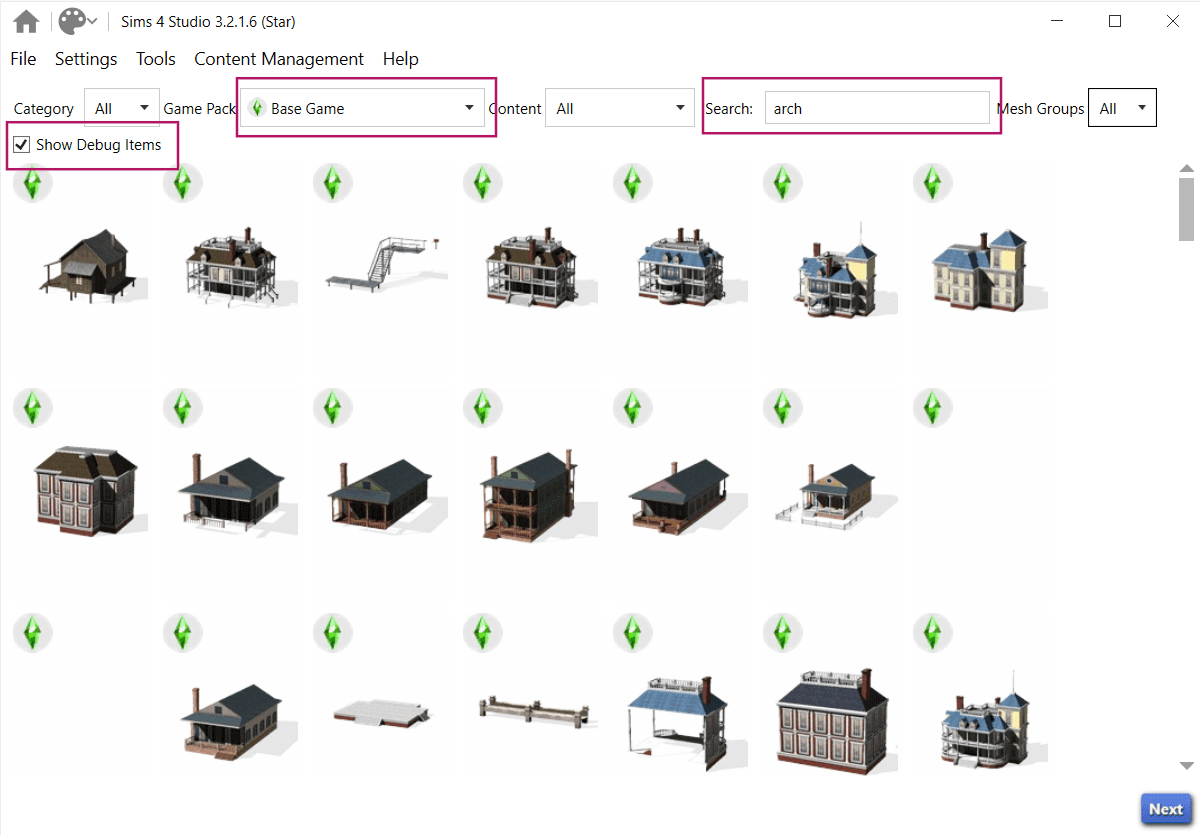
5. Click on the desired house. In the lower right corner, click the "Next" button. You need to save the project in .package format to override the background house. It's recommended to save it under the same name that appears next to the house when you hover over it with your mouse.
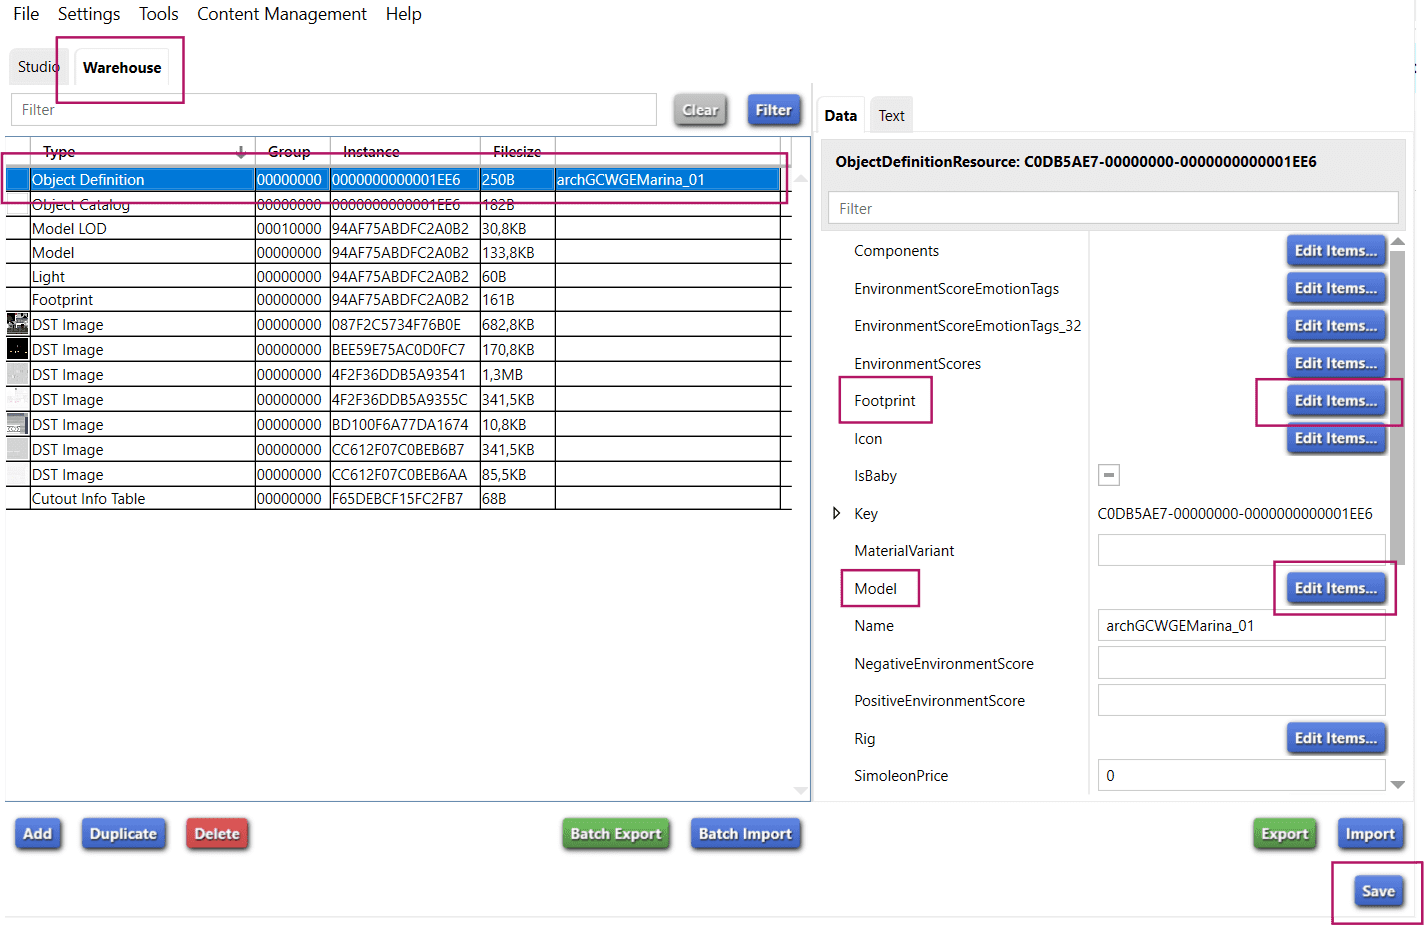
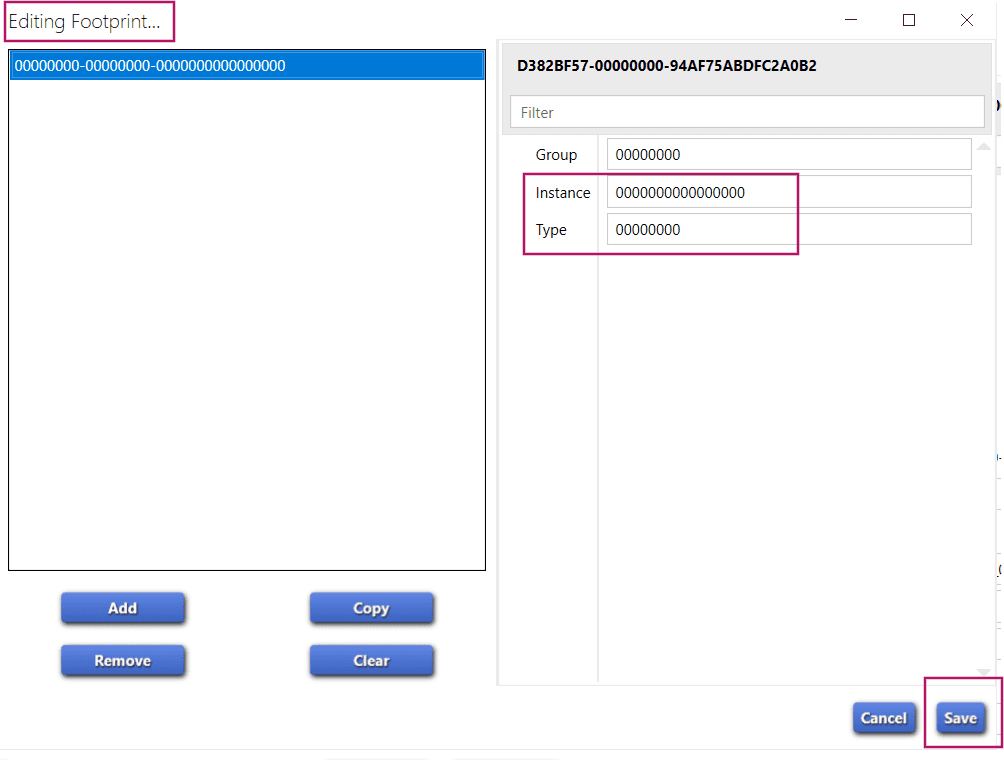
6. Then go to the "Warehouse" tab. Click on "Object Definition", then on the right of the screen, click on "Footprint" and select "Edit Items" to open it. Change the Instance and Type to zero. Then save. Scroll down until you find "Model" and change the Instance and Type to zero as well.
7. Save your project and close the window. Reopen Sims 4 Studio and repeat the same process with every element you don't need in the game. When overriding houses, don't forget about the foundations.
8. All package files created in this way should be placed in the Mods folder (Documents – Electronic Arts – The Sims 4 – Mods).
The advantage of this method, as we mentioned earlier, is its permanence. It also allows you to remove not all, but specifically those decor elements that you don't need.
The downsides, besides being time-consuming, include the fact that our "invisible" objects will become invisible in all worlds. On the other hand, there are many alternatives to any trees and basic decorations. So, this might not be an issue for you.
Based on this principle, there is a save file made by awingedllama. In it, Willow Creek and Newcrest are emptied. If you planned to set up your ideal town in one of these, you can download the save via the link in the post. It should also be placed in the Mods folder (Documents – Electronic Arts – The Sims 4 – Mods).
Alternatively, if you want to decorate a city from the expansions by yourself, you can install this save to remove all decor from the base game, including from the city you need, and then use the described second method to remove everything else. Just make sure to choose the needed expansion from the list instead of the base game when searching in Sims Studio.
Through this link, you can download a mod to extend the clickable area in Willow Creek and Newcrest, allowing your sims to run freely without restrictions.
And finally, Method 3 (the simplest and most successful, in our opinion)
This is exactly the method Piixxa mentions in this video. We're sharing with you a summary of the first part of the video with a few additions.
In this version, we will be clearing our game with the Blowtorch mod. It will remove basic objects and decorations from the developers in the worlds, without affecting houses and other buildings on the lots.
Step 1
First, let's check our Mods folder located at:
Documents – Electronic Arts – The Sims 4 – Mods
Move all mods from there to a secure place. In other words, make a copy and remove them from the main folder (since we're starting the save from scratch).
Do the same with the saves you already have in the game using the path:
Documents – Electronic Arts – The Sims 4 – Saves
Step 2
Download the Blowtorch mod via the provided link.
When downloading all mods from this article, make sure they are updated to the latest version of the game.
From all the files available for download, you only need:
Instructions:
Blowtorch – Documentation.pdf
Replacement for the Base game:
The Sims 4 – Base Game Files.zip
Replacements for Expansions and Game packs:
The Sims 4 – EP Files Part 1.zip
The Sims 4 – EP Files Part 2.zip
The Sims 4 – GP Files.zip
If you only have the base game or don't need to change cities from the expansions, you can download just the replacement for the base game.
Step 3
After downloading the required files, unzip the archives and place them in a separate folder, for convenience, you can name it Blowtorch. The PDF instructions Blowtorch – Documentation should also be placed there.
Step 4
Now we need to decide what exactly we will be replacing. If you don't have all the expansions and game packs installed or if you don't want to clear all worlds, you'll need to delete the unnecessary files from the downloaded Blowtorch folders.
To understand how each expansion or game pack is labeled, open the Blowtorch – Documentation instructions, and on pages 6-9 you will find a detailed list with all names and abbreviations.
Determine which of the EP/GP folders you don't need, and delete them from the folders with the downloaded Blowtorch replacements.
Step 5
It's time to make backup copies for our future empty towns.
Create another folder, name it something like "Backup Base game, EP, GP." These files are located in the root folder of the game, which was downloaded to your computer during installation (not the Documents folder containing mods). You can copy the entire The Sims 4 folder as a backup, or just the Delta folders (found at The Sims 4 – Delta) and the Areas folders (found at The Sims 4 – Data – Shared – Worlds – Areas).
Additionally, you can restore the game to its original state using the "Repair game" button in the store where you downloaded it.
Step 6
Finally, let's replace our regular worlds with empty ones.
1. Open both folders simultaneously: Blowtorch with our replacements and The Sims 4, where our downloaded game is stored.
2. Replacing the Base Game:
In Blowtorch, find the folder The Sims 4 – Base Game Files. In both this folder and the The Sims 4 folder, navigate the same path:
The Sims 4 – Data – Shared – Worlds – Areas
Copy all files from the Areas folder with replacements and replace the files in the Areas folder within the game folder.
3. Do the same with the remaining expansion and game pack folders.
In Blowtorch, find the folder The Sims 4 – EP Files Part 1. In both this folder and the The Sims 4 folder, follow the same path:
The Sims 4 – Delta
Copy all files from the Delta folder with replacements and replace the files in the Delta folder within the root folder of your game.
Do the same with The Sims 4 – EP Files Part 2 and The Sims 4 – GP Files.
IMPORTANT!
If you are playing with Eco Lifestyle (EP 9) and want to modify it with Blowtorch, install the file “ELHoodHidersMerged” into the Mods folder:
Documents – Electronic Arts – The Sims 4 – Mods
IMPORTANT! 2
Blowtorch also includes the Sunblind lighting mod by Softerhaze. If you need to change or remove the lighting mod, you will need to manually replace the “Sky Box Texture Data” and “World Timeline Color” resources.
Step 7
We're done with the Blowtorch folder. All that's left is to remove all buildings from the lots. Instead of doing this manually, you can replace all lots with empty ones downloaded from the Gallery. An even simpler option is to download a blank save. For example, Piixxa in her video calls Srsly's Blank Save by SrslySims the best:
1. Download the archive from the link.
2. Unzip and place the save files into the saves folder located at:
Documents – Electronic Arts – The Sims 4 – Saves
Your blank save is ready!
The only downside to this method is the amount of text about it in this article. Otherwise, in our opinion, the method is excellent.
For convenience, you may also want to install a couple of mods that will simplify the future construction of your city:
TOOL v2.8.7 - Life & Death Hotfix Update by TwistedMexi – this mod provides flexibility to move around the entire town, position objects as you wish, and click on anything you want.
Better BuildBuy v3.3.2: Life & Death Favorites Hotfix by TwistedMexi – this mod simplifies the building process (we have a detailed article on how to use Better BuildBuy).
Windenburg wooden floor override by swanette – a mod for redefining the appearance of roads. Useful for those playing Medieval or any non-modern Sims.
Lastly, we recommend adding buyable backdrops by florwalsims to your blank save. Essentially, this is standard CC content that is installed into the Mods folder. Once installed, you can buy and place various game backdrops into your save: rocks, trees, and so on. Everything can be found in Buy mode under the "rocks" category or by searching "florwalsims".